Windows Installation Guide
Welcome to CueMate! This guide will help you install CueMate on Windows. The entire process is simple and quick, taking just a few minutes to complete.
Recommended Deployment
We recommend deploying backend services to a Linux server, with only a lightweight desktop client running on your local Windows machine.
CueMate supports "Server Deployment Mode", which allows you to deploy Docker backend services to a remote Linux/macOS server while using your local Windows machine only as a client. This approach offers the following advantages:
| Comparison | Windows Local Deployment | Linux Server Deployment |
|---|---|---|
| Docker Performance | Relies on WSL2 virtualization, ~10-20% performance overhead | Native execution, optimal performance |
| Memory Usage | WSL2 + Docker Desktop uses extra 2-4GB | No additional overhead |
| System Stability | WSL2 occasional network/filesystem issues | Stable and reliable |
| Startup Speed | Docker Desktop slow to start (30-60 seconds) | Services always running, instant access |
| Resource Release | Must manually exit Docker Desktop to free memory | No local resources used |
| Multi-device Sharing | Limited to local machine | Multiple computers can share the same backend |
If you have a spare Linux server (cloud server, NAS, Raspberry Pi, etc.), we strongly recommend using server deployment mode. Simply select "Server Mode" during installation and configure the SSH connection.
The following guide is for users who choose to deploy locally on Windows.
1. System Requirements
IMPORTANT
Please confirm your computer meets the minimum requirements before installation, otherwise installation may fail or the application may not run properly.
Before installing CueMate, please confirm your computer meets the following requirements:
1.1 Hardware & System
| # | Item | Requirement | Notes |
|---|---|---|---|
| 1 | Operating System | Windows 10 (64-bit) or Windows 11 | 64-bit system required |
| 2 | Processor | x64 architecture CPU | Intel or AMD 64-bit processor |
| 3 | Memory | >= 8GB RAM (16GB recommended) | Docker + WSL2 requires more memory |
| 4 | Disk Space | >= 10GB available space | SSD recommended |
| 5 | Network | Stable internet connection | For downloading packages and AI services |
IMPORTANT
About WSL2
CueMate relies on Docker Desktop to run backend services, and Docker Desktop on Windows requires WSL2 (Windows Subsystem for Linux 2) as its runtime environment.
Install/Update WSL2: Open PowerShell as Administrator and run the following command:
wsl --updateIf prompted that WSL is not installed, run this first:
wsl --installA restart is required after installation.
1.2 Port Requirements
CueMate requires the following ports. Please ensure they are not occupied by other programs:
| # | Port | Service | Description |
|---|---|---|---|
| 1 | 3001 | Web API Service | Business API service |
| 2 | 3002 | LLM Router Service | Large language model routing |
| 3 | 3003 | RAG Service | Knowledge retrieval service |
| 4 | 3004 | Main Window Service | Main window interface access |
| 5 | 8000 | ChromaDB Vector Database | Vector data storage |
| 6 | 10095 | Speech Recognition Service | Real-time speech to text |
Note: The installation wizard will automatically detect port conflicts and provide solutions. See Step 7: Port Check.
1.3 Dependencies
| # | Dependency | Version | Notes |
|---|---|---|---|
| 1 | Docker Desktop | >= 4.0 | CueMate backend services runtime |
TIP
- Offline package: Includes Docker Desktop installer, no pre-installation required
- Online package: Requires user to install Docker Desktop separately
Note: If Docker Desktop is not installed, the installation wizard will provide automatic installation options. See Step 8: Docker Check.
2. Download Installation Package
2.1 Choose Package Type
CueMate offers two types of installation packages. Choose based on your needs:
| Type | Description | Size | Use Case |
|---|---|---|---|
| Offline Package | Includes Docker Desktop, all Docker images and speech models, ready to use | ~4.5GB | No network environment, first-time installation |
| Online Package | Requires Docker Desktop installation, downloads images and models during installation | ~700MB | Good network, Docker already installed |
TIP
- First-time installation: Offline package recommended, includes all dependencies
- Docker Desktop already installed: Online package for faster download
IMPORTANT
Online package users note: On first launch, the speech recognition service (cuemate-asr) will automatically download FunASR speech models (~1.7GB). Speech recognition will be temporarily unavailable during download. Please ensure stable network and wait patiently.
Offline package includes speech models, ready to use immediately.
2.2 Choose Deployment Mode
CueMate supports two deployment modes, selectable during installation:
| Mode | Description | Use Case |
|---|---|---|
| Local Mode | All services run on local computer | Personal use, local development |
| Server Mode | Backend services deployed to remote Linux server, local runs lightweight client only | Multi-device sharing, stronger server resources |
See deployment mode selection interface at Step 3: Deployment Mode.
NOTE
- Local Mode: Ready to use, all data stored locally
- Server Mode: Requires a Linux server, client connects via SSH to manage backend services
2.3 Choose Download Channel
CueMate offers two download channels. Choose based on your network environment:
Option 1: Baidu Netdisk (Recommended for China users)
Download Link: https://pan.baidu.com/s/15jwZHy8YkDa4cEDLIYRo9Q?pwd=3477
Access Code: 3477
Scan to access:

Download steps:
- Click the link above or scan the QR code to access Baidu Netdisk
- Enter access code
3477 - Select the version folder (e.g., v0.2.0)
- Download Windows installer:
| Package Type | Filename |
|---|---|
| Offline | CueMate-v0.2.0-windows-x64-offline.exe |
| Online | CueMate-v0.2.0-windows-x64-online.exe |
- Click "Download" button to save locally
Advantage: Fast download speed in China, no VPN required
Option 2: GitHub Release (Recommended for international users)
Visit GitHub Releases page to download the latest or historical versions:
Version List:
| Version | Release Date | Type | Major Updates | Download Link |
|---|---|---|---|---|
| v0.2.0 | 2026-01-31 | Feature Update | Windows release, Online/Offline packages, Server deployment mode, Multi-language support | GitHub Release Page |
| v0.1.1 | 2025-12-26 | Feature Update | Online/Offline packages, Server deployment mode, Multi-language support | GitHub Release Page |
| v0.1.0 | 2025-12-10 | Initial Release | Core features released | GitHub Release Page |
Choose Installation Package Type:
- Online Package (~700MB): Fast download, requires network to pull Docker images and speech models during installation
- Offline Package (~4.5GB): Large size, ready to use without network
Online Package Download (Recommended for users with good network):
- Visit GitHub Release Page
- Download Windows x64 online installer:
CueMate-vX.X.X-windows-x64-online.exe - After download, double-click the
.exefile to start installation
Offline Package Download (Recommended for users with unstable network):
NOTE
Due to the large offline package size (~4.5GB), exceeding GitHub's 2GB single file limit, it has been split into multiple volumes for upload.
- Visit GitHub Release Page
- Download all Windows x64 offline installer volume files:
CueMate-vX.X.X-windows-x64-offline.part*.exe - Place all volume files in the same directory
- Double-click the first volume file (
.part1.exe), the extractor will automatically merge all volumes - After extraction, double-click the
.exefile to start installation
Advantages: Global CDN acceleration, clear version management, supports checksum verification
After download, the installer will be saved in your "Downloads" folder.
2.4 Open Installation Package
Double-click the downloaded .exe file to launch the installation wizard.
3. Installation Steps
The installation wizard includes 11 steps that automatically guide you through the entire process.
The installation wizard interface provides:
- Language switch (top right): Supports Simplified Chinese, Traditional Chinese, English
- Install mode (top tabs): Shows current package type, e.g., "Offline Install" or "Online Install"
- Deploy mode (top tabs): Shows current deployment mode, e.g., "Local Mode" or "Server Mode", changeable in Step 3
- Version info (bottom left): Shows current installer version
3.1 Step 1: Welcome
After launching, the wizard displays a welcome screen introducing CueMate features and pre-installation preparations.
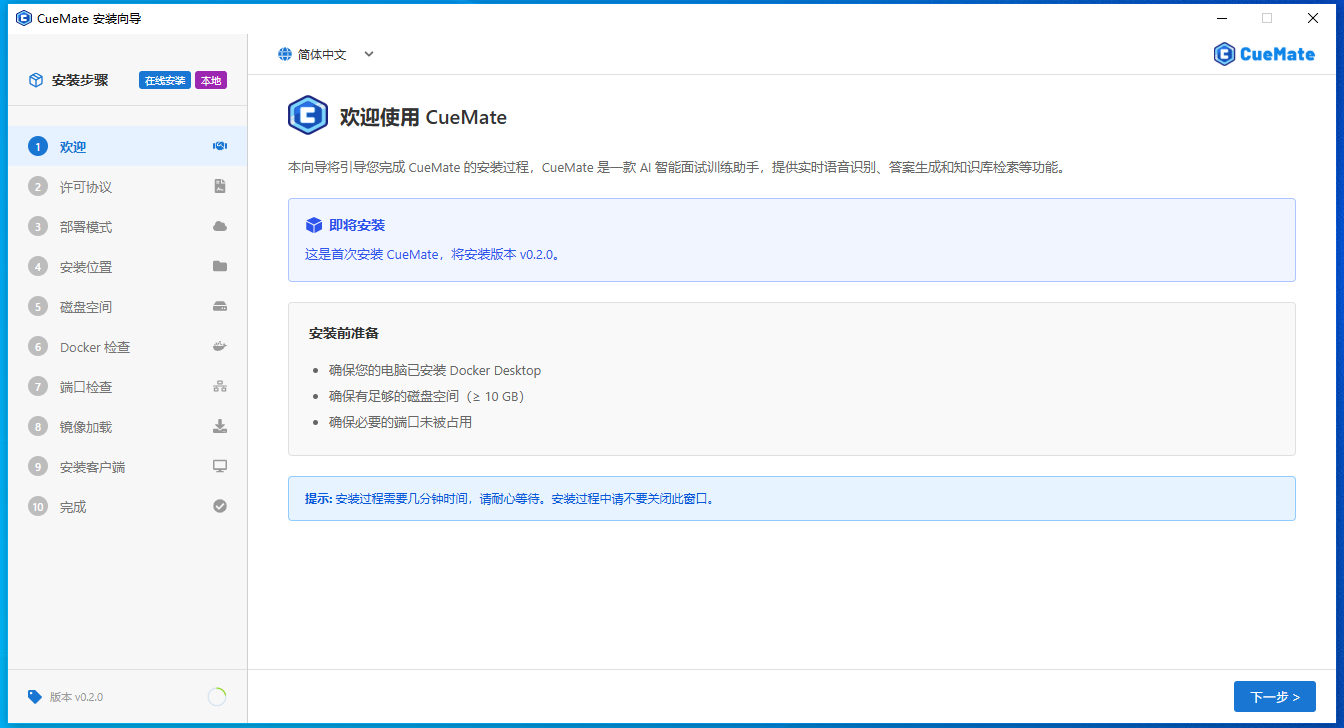
Read the welcome message and click Next to continue.
3.2 Step 2: License Agreement
Read the CueMate software license agreement.
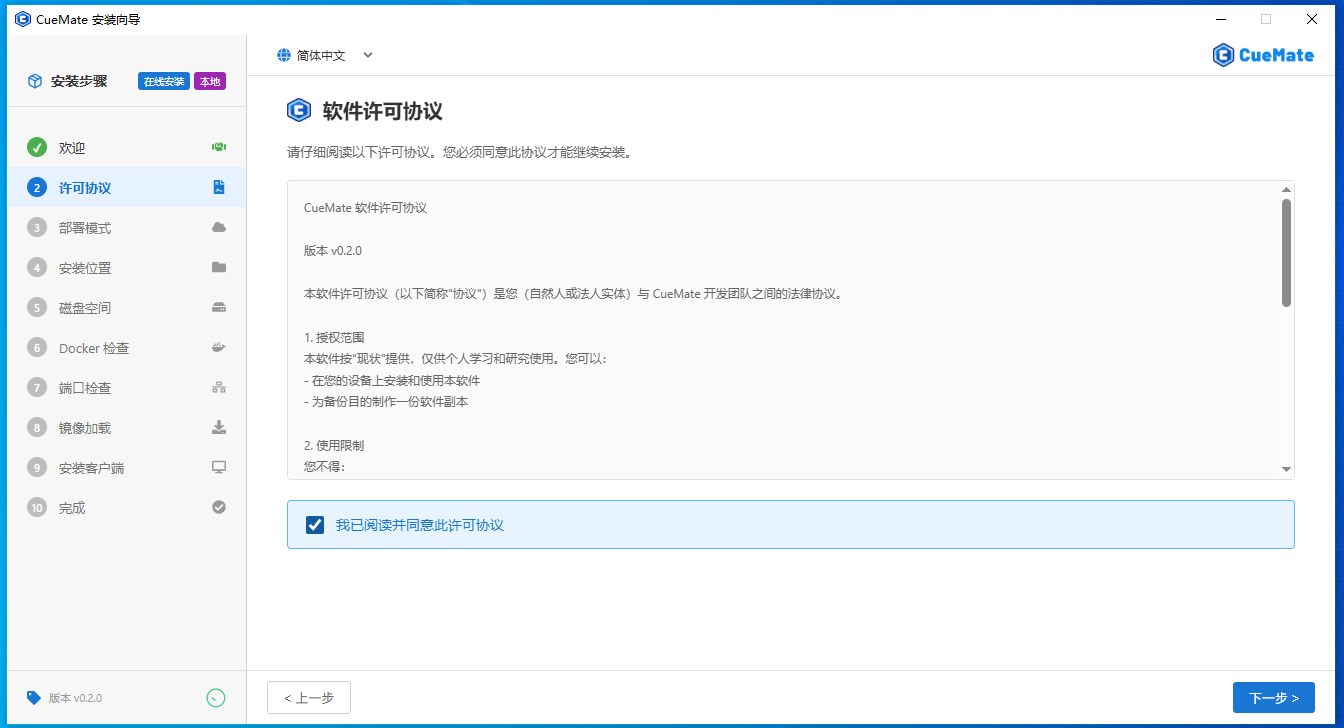
If you agree to the terms, check "I agree to the license agreement" and click Next.
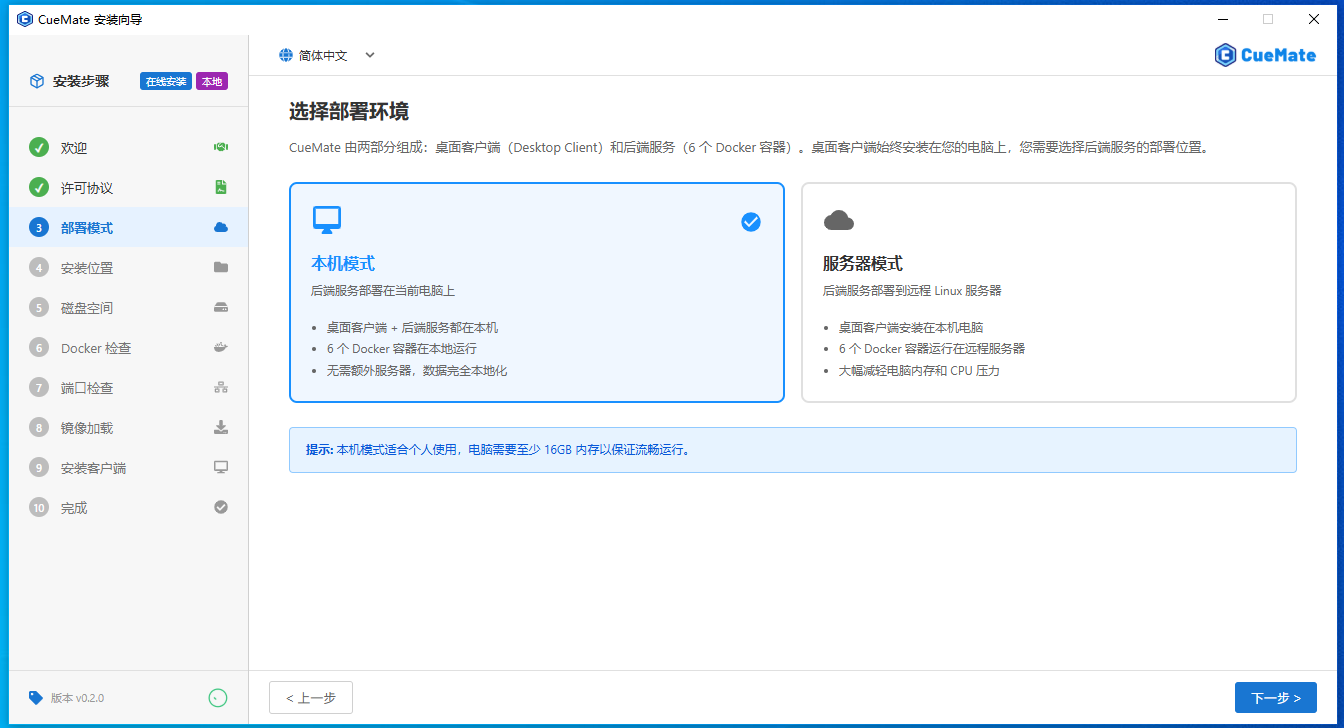
3.3 Step 3: Deployment Mode
Choose CueMate's deployment mode.
| Mode | Description | Use Case |
|---|---|---|
| Local Mode | All services run locally, ready to use | Personal use, local development, first experience |
| Server Mode | Backend deployed to remote Linux server, local runs lightweight client | Multi-device sharing, stronger server resources, team collaboration |
Local Mode (default recommended):
- All services run locally, no extra configuration
- Data stored locally, better privacy
- Suitable for most users
Server Mode:
- Requires a Linux server (Ubuntu 20.04+ or CentOS 7+)
- Local computer only runs client, low resource usage
- Supports multiple computers sharing same backend
- Wizard will guide SSH connection configuration
TIP
If unsure which mode to choose, select Local Mode. You can switch to Server Mode later in system settings.
Server Mode Requirements
If choosing Server Mode, ensure your remote Linux server meets:
Server Hardware Requirements:
| Item | Minimum | Recommended |
|---|---|---|
| CPU | 2 cores | 4+ cores |
| Memory | 4GB | 8GB+ |
| Disk | 20GB available | 50GB SSD |
| OS | Ubuntu 20.04+ / CentOS 7+ | Ubuntu 22.04 LTS |
Server Software Requirements:
- Docker 20.10+ and Docker Compose 2.0+
- Wizard will auto-detect and prompt if not installed
Security Group/Firewall Port Configuration:
Server needs these ports open for client access:
| Port | Protocol | Service | Purpose | Required |
|---|---|---|---|---|
22 | TCP | SSH | Wizard server connection | Yes |
3001 | TCP | Web API | Business API | Yes |
3002 | TCP | LLM Router | LLM routing | Yes |
3003 | TCP | RAG Service | Knowledge retrieval | Yes |
3004 | TCP | Web Service | Main interface | Yes |
8000 | TCP | ChromaDB | Vector database | Yes |
10095 | TCP | ASR | Speech recognition | Yes |
After selecting deployment mode, click Next to continue.
3.4 Step 4: Server Configuration (Server Mode Only)
If Server Mode is selected, configure remote server SSH connection.

Remote Server Configuration:
- Server Address: Remote server IP or domain
- SSH Port: Default 22
- Username: SSH login username (e.g., root)
- Server Name: Custom name for identification
- Authentication: Password or key authentication
- Deploy Path (advanced): Backend installation path on server, default
/opt/cuemate
After filling in, click Test Connection to verify. Once passed, click Next.
3.5 Step 5: Installation Location
Choose CueMate installation directory.
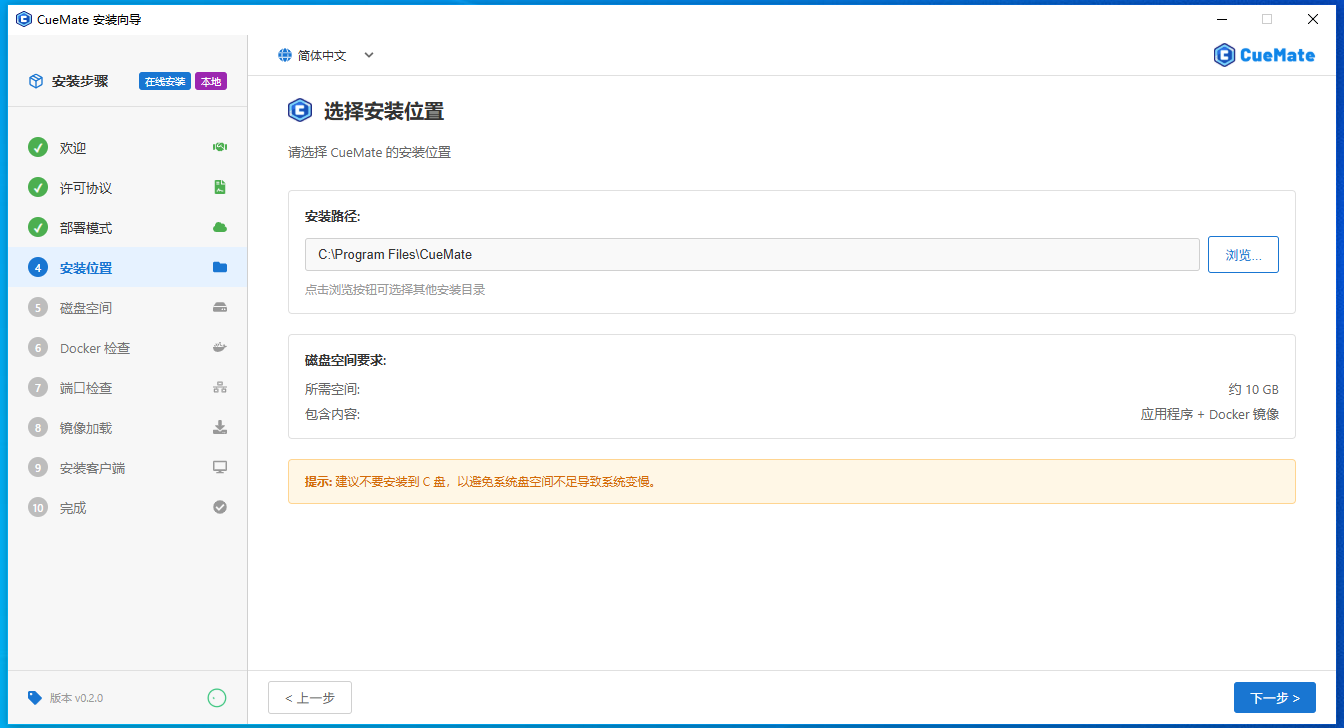
- Default path:
C:\Program Files\CueMate - Custom path: Click Browse to select another directory
TIP
Recommendation: Don't install on C: drive (system drive) to avoid system slowdown from insufficient space. Choose D: drive or other non-system drives.
Disk Space Requirements:
- Local Mode: ~10GB (application + Docker images)
- Server Mode: Local ~2GB + Server ~10GB
After selecting location, click Next to continue.
3.6 Step 6: Disk Space Check
The wizard automatically checks if disk space meets requirements.

Local Mode
Checks local disk space, displays:
- Total space, used space, available space
- OS version, architecture, memory size
Server Mode
Checks both locations:
- Local disk (Windows): For desktop client, needs ~2GB
- Server disk: For backend services, needs ~10GB
Auto-proceeds when check passes. If insufficient, clean disk and click "Re-check".
3.7 Step 7: Port Check
The wizard checks if required network ports are occupied.

Checked ports:
| Port | Service | Status |
|---|---|---|
3001 | Web API Service | (Available) or (Unavailable) |
3002 | LLM Router Service | (Available) or (Unavailable) |
3003 | RAG Service | (Available) or (Unavailable) |
3004 | Web Service | (Available) or (Unavailable) |
8000 | ChromaDB Vector Database | (Available) or (Unavailable) |
10095 | Speech Recognition Service | (Available) or (Unavailable) |
If port conflict detected:
- Click "End Process" button next to port to terminate occupying program
- Or click "Auto-resolve All Conflicts" for batch processing
After ports check passes, click Next to continue.
3.8 Step 8: Docker Check
The wizard checks if Docker environment is ready.

Local Mode
Checks local Docker Desktop:
- Is Docker Desktop installed
- Is Docker Engine running
- Is Docker Compose available
If Docker not installed:
- Offline package: Click "Install Locally" to auto-install bundled Docker Desktop
- Online package: Click "Download Docker Desktop" to go to official download page
IMPORTANT
Docker Desktop for Windows requires WSL 2 (Windows Subsystem for Linux 2) enabled. If not enabled, the wizard will prompt you to enable WSL 2.
Server Mode
Checks remote Linux server Docker:
- Is Docker Engine installed
- Is Docker service running
- Is Docker Compose available
After check passes, click Next to continue.
Handling Windows Firewall Prompt
When running Docker Desktop for the first time, Windows Firewall may display a security prompt asking whether to allow Docker Desktop Backend to communicate over the network.
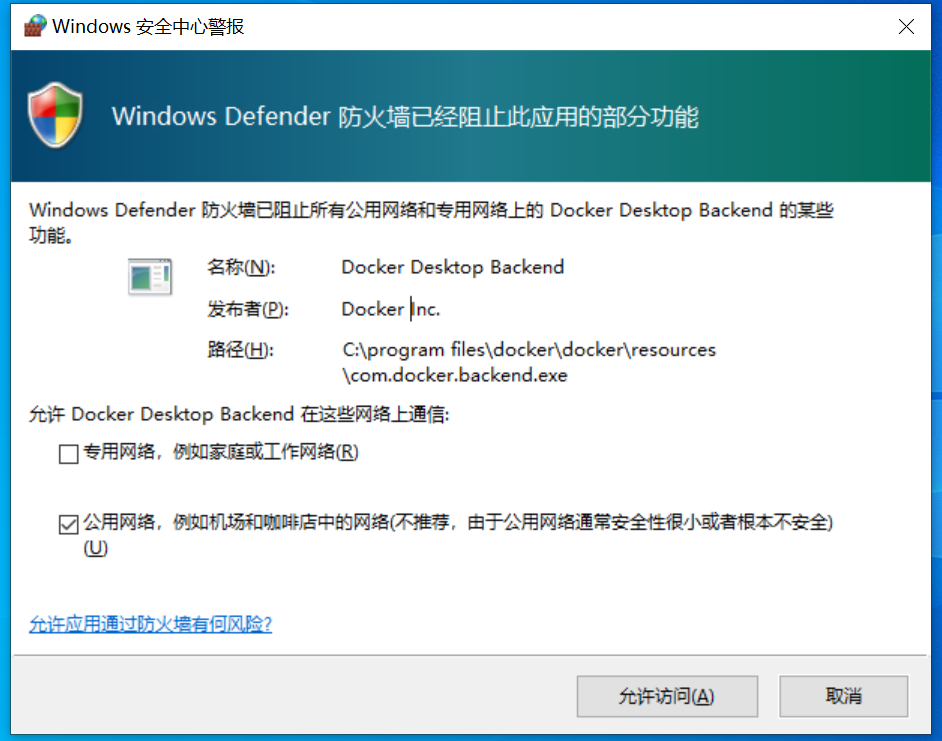
How to handle:
- Check Private networks, such as my home or work network
- Click Allow access button
IMPORTANT
You must allow Docker through the firewall, otherwise Docker's network functionality will be restricted, containers cannot communicate with each other, and CueMate backend services will not work properly.
3.9 Step 9: Image Loading
The wizard begins loading CueMate backend service images.
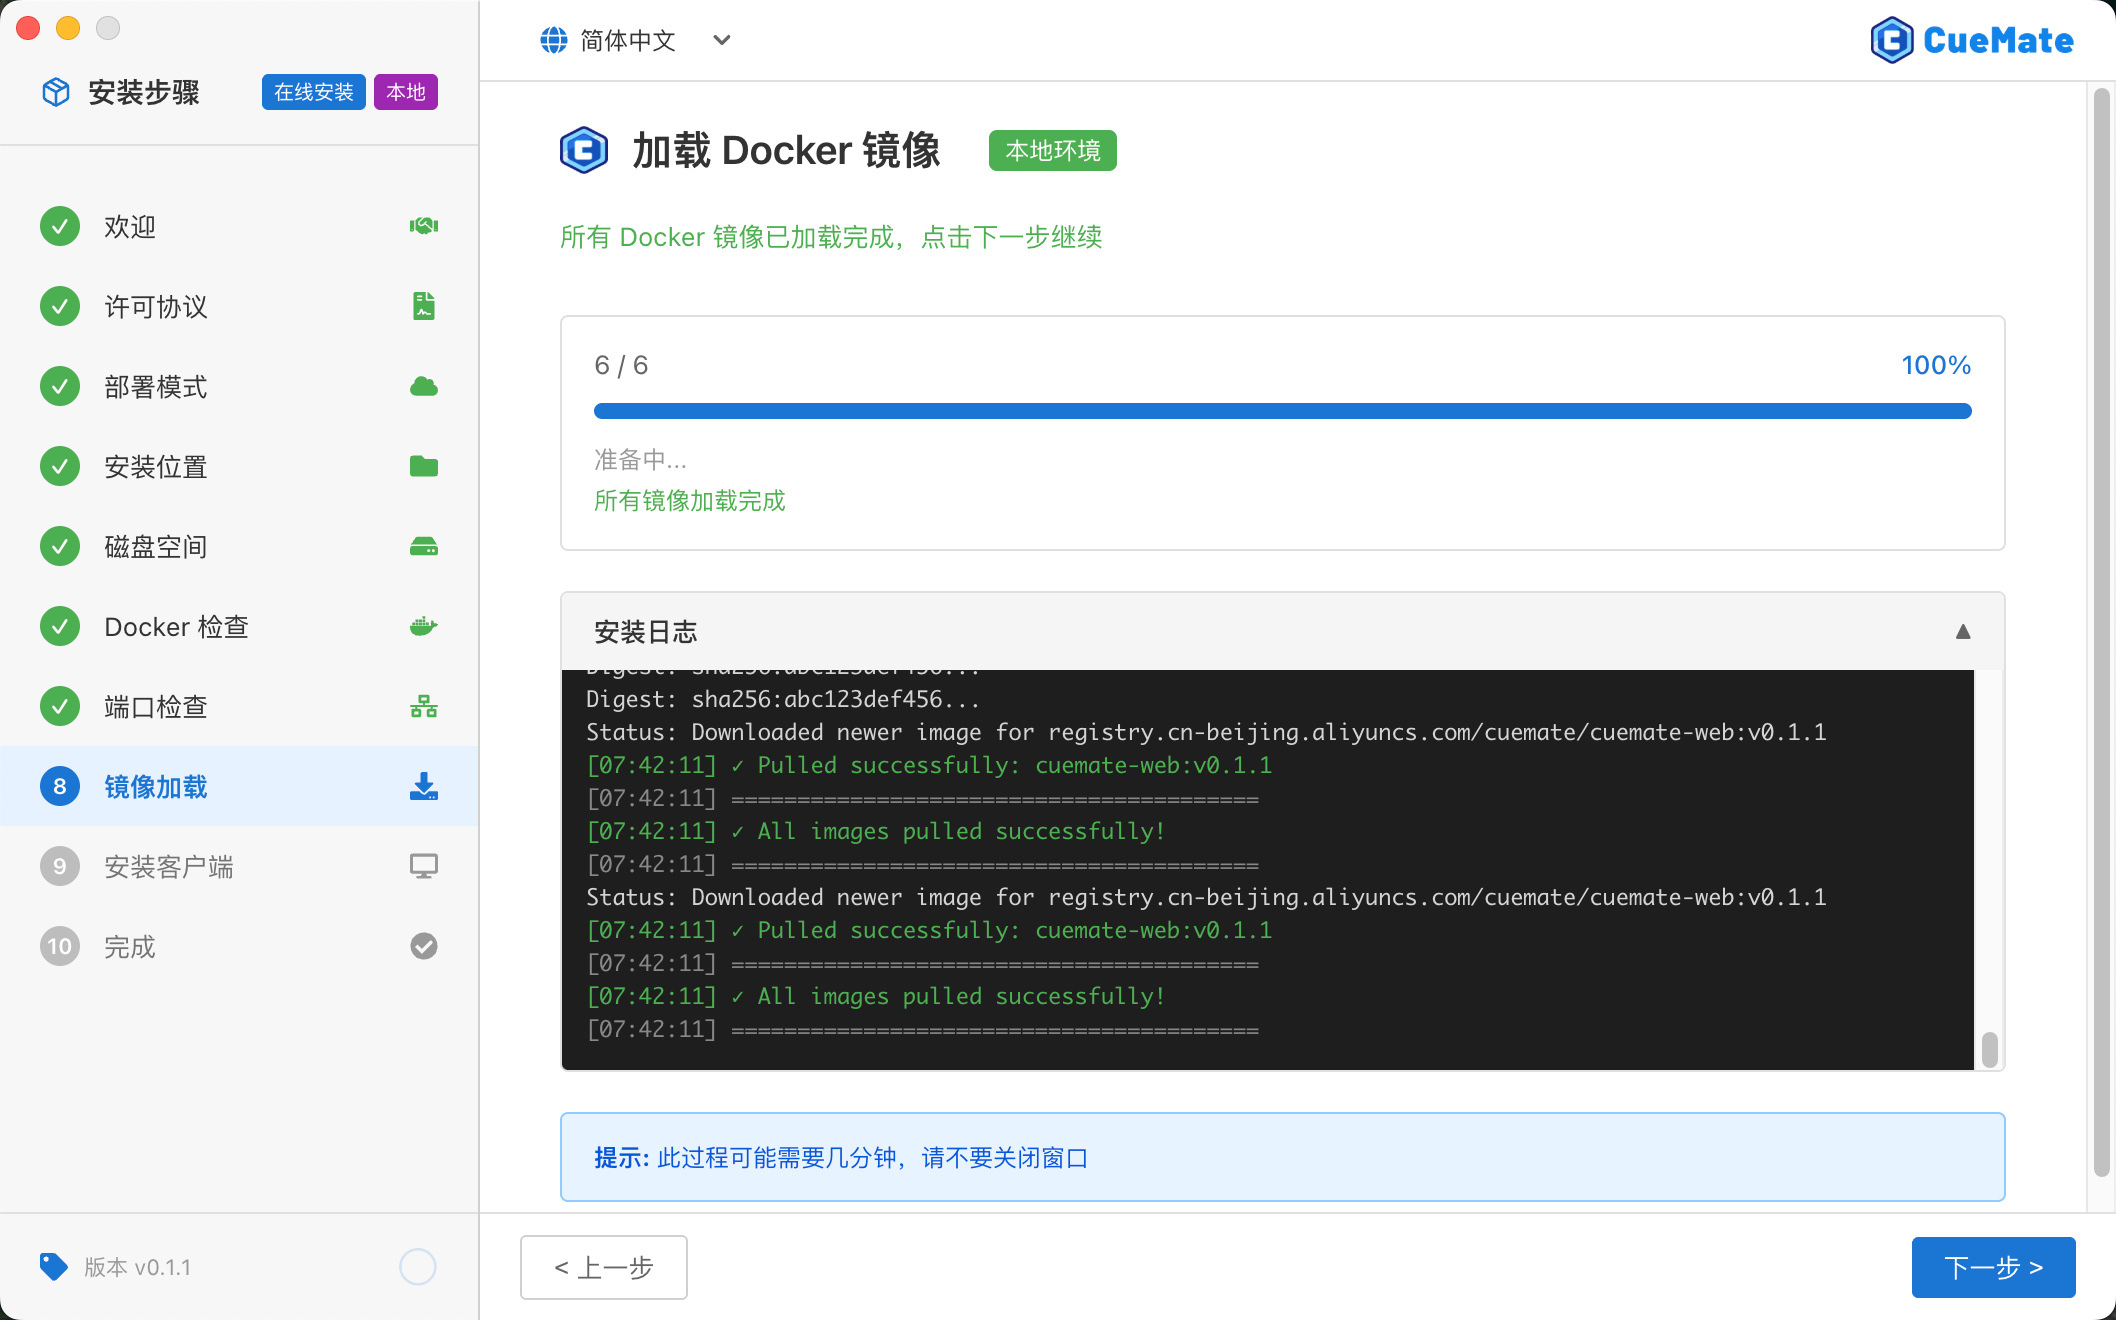
Local Mode
Images load to local Docker environment:
- Offline package: Runs
docker loadto load bundled images - Online package: Runs
docker pullfrom Docker Hub
Estimated time: 1-2 minutes (offline) or 5-10 minutes (online, depends on network)
Server Mode
Images load to remote Linux server:
- Offline package: SCP uploads image tar files to server, then SSH runs
docker load - Online package: SSH runs
docker pullon server
Estimated time: 5-15 minutes (depends on network and server performance)
WARNING
Don't close the wizard, otherwise you'll need to restart loading.
After loading completes, click Next to continue.
3.10 Step 10: Install Client
After image loading, the wizard proceeds to desktop client installation.
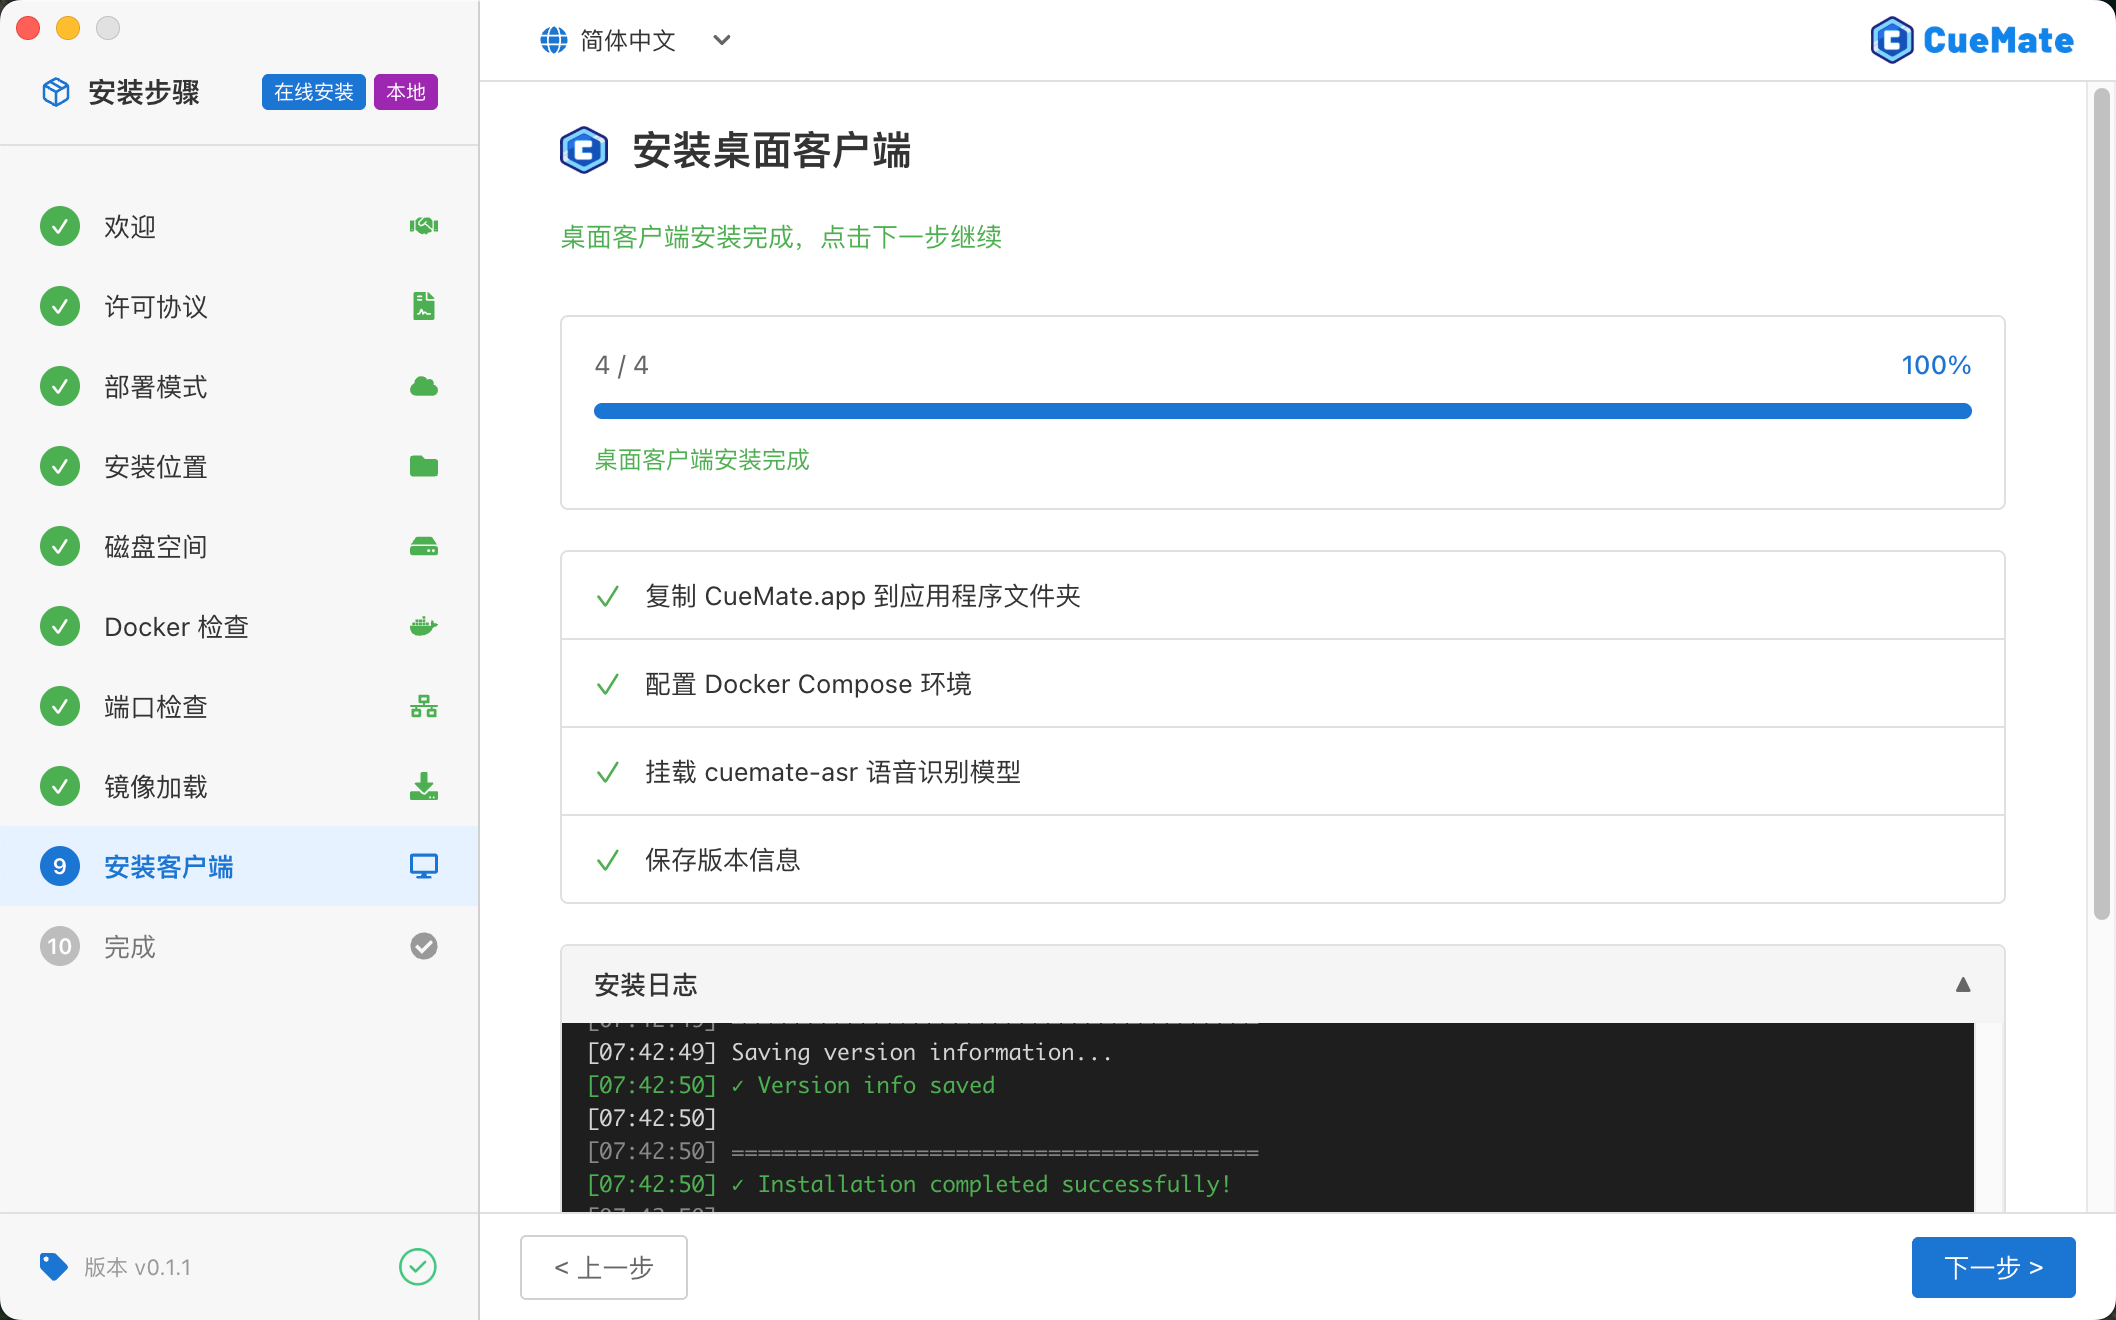
Local Mode
Executes 5 steps:
- Check Visual C++ Runtime: Verify if Visual C++ Redistributable is installed, auto-install if missing
- Copy CueMate application: Copy CueMate desktop client to selected installation directory
- Configure Docker Compose: Copy docker-compose.yml configuration file to user data directory
- Mount speech recognition and vector models: Extract ASR speech recognition models and vector models to data directory
- Save version info: Record current installed version
Server Mode
Executes 5 steps:
- Check Visual C++ Runtime: Verify if Visual C++ Redistributable is installed, auto-install if missing
- Copy CueMate application: Copy CueMate desktop client to local selected installation directory
- Upload Docker Compose configuration: SSH upload docker-compose.yml configuration file to remote server
- Upload and mount speech recognition and vector models: SCP upload model files (~1GB) to server and extract
- Save version info: Record current installed version
NOTE
Server mode requires uploading ~1GB of model files to remote server, which may take several minutes depending on network speed.
TIP
Please complete this step before closing wizard, otherwise desktop client won't be properly installed.
After installation, click Next for the final step.
3.11 Step 11: Complete
When all steps complete, the wizard displays success screen.

Click Finish, the wizard will automatically:
- Close installation window
- Launch CueMate desktop application
4. First Use
4.1 Login
After installation, search for CueMate in Start menu or find CueMate shortcut on desktop, double-click to open.
The app will show login screen.
Built-in Account:
- Username:
admin - Password:
cuemate
Enter the credentials and click Login to enter the system.
4.2 Getting Started
After login, CueMate's control window floats at the top of screen.
Control Window Buttons (left to right):
- CueMate icon: Click to open CueMate official website
- Voice Recognition: Click to start voice recognition, open interview window
- Ask AI: Click to open AI question window for quick AI queries
- Interaction Mode: Toggle window click-through mode (Interactive/Pass-through)
- Main App Window: Click to open main app window for backend management
- Show/Hide: Click to hide or show control bar and all windows
Additionally, CueMate displays an icon in system tray for quick access to common functions.
5. FAQ
5.1 Installation Wizard Won't Open
Problem: Double-clicking installer has no response or is blocked
Solution:
- Right-click installer, select "Run as administrator"
- If Windows Defender blocks, click "More info" then "Run anyway"
- Temporarily disable antivirus and retry
- If still not working, re-download the package
5.2 Insufficient Disk Space
Problem: Wizard indicates insufficient disk space
Solution:
- Clean disk to ensure at least 10GB available
- Delete unneeded files and applications
- Empty Recycle Bin
- Choose different disk for installation location
- Return to wizard, click "Re-check"
5.3 Docker Desktop Won't Start
Problem: Wizard indicates Docker won't start
Possible causes:
- WSL 2 not enabled
- Windows version too old
- Virtualization not enabled
- Docker Desktop installation incomplete
Solution:
- Confirm Windows version meets requirements (Windows 10 64-bit or higher)
- Enable WSL 2: Open PowerShell as administrator, run
wsl --install - Enable virtualization in BIOS (VT-x/AMD-V)
- Reinstall Docker Desktop
- Restart computer and retry
5.4 Port Conflict Unresolved
Problem: Wizard indicates port occupied, auto-resolve failed
Solution:
- Note the conflicting port and program name
- Manually end the occupying program:
- Open Task Manager (Ctrl + Shift + Esc)
- Find the program occupying the port
- Select program, click "End Task"
- Return to wizard, click "Re-check"
5.5 Image Loading Failed
Problem: Wizard fails at "Image Loading" step
Possible causes:
- Network connection interrupted
- Docker service abnormal
- Insufficient disk space
Solution:
- Check network connection
- Confirm Docker Desktop is running
- Check disk space
- Click "Retry" to reload
5.6 Main App Window Won't Open
Problem: Clicking "Main App Window" button has no response
Solution:
- Confirm CueMate is running (icon in system tray)
- Confirm backend services running normally (click tray icon to check service status)
- If services abnormal, click tray icon, select "Restart Services"
- Wait for services to restart (~30 seconds), try opening main window again
6. Uninstall CueMate
6.1 Uninstall Steps
- Exit CueMate (click system tray icon > Exit)
- Exiting will automatically stop all backend Docker services
- Open Windows Settings > Apps > Installed apps
- Find CueMate, click "..." on the right, select "Uninstall"
- Clean data files (optional):
- Open File Explorer
- Enter
%APPDATA%in address bar - Find and delete
cuemate-desktop-clientfolder
Note:
- Deleting
cuemate-desktop-clientfolder will clear all interview records, settings, and speech models (~1.6GB) - If planning to reinstall later, keep this folder to save time re-downloading/extracting models
Next Steps
After installation, we recommend:
- Read Quick Start Guide for basic usage
- Check Feature Manual to explore all features
- Configure AI Models to start using smart features
- Run Voice Test to ensure audio devices work properly
If you encounter issues, check FAQ or contact technical support.
Enjoy using CueMate and good luck with your interviews!