Installation Issues
This document compiles common problems and solutions encountered during CueMate installation.
Tip
If you are installing CueMate for the first time, we recommend reading the macOS Installation Guide to understand the complete installation process.
1. macOS Platform
1.1 How Do I Determine My Mac's Chip Type?
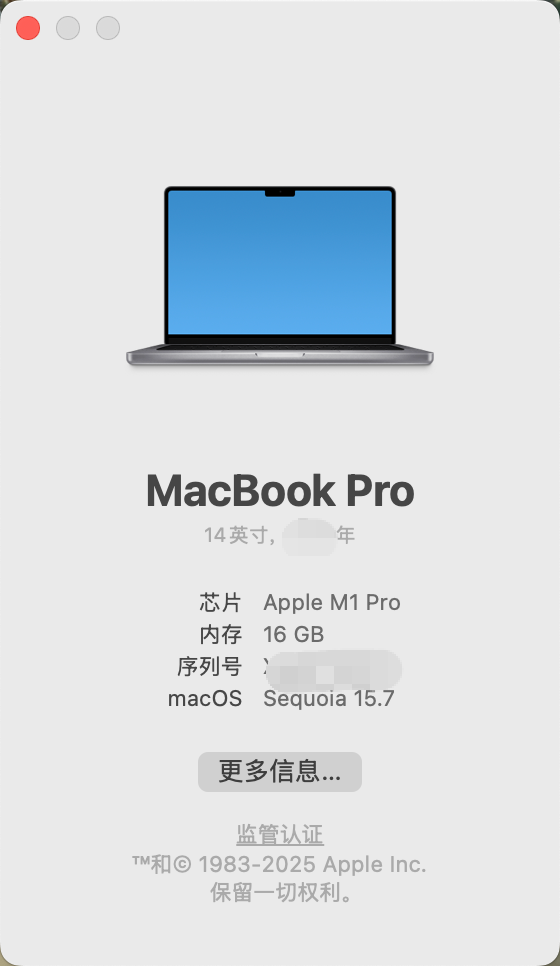
Problem Description: Don't know if your Mac has Apple Silicon or Intel chip, unsure which version to download.
Solution:
Click the Apple menu in the top left corner → About This Mac, check the Chip or Processor information:
- If you see "Apple M1", "Apple M2", or "Apple M3", download the Apple Silicon version (arm64)
- If you see "Intel", download the Intel version (x64)
1.2 Does My Mac Meet the System Requirements?
Problem Description: Unsure if your Mac meets CueMate's installation requirements.
System Requirements
CueMate requires:
- Operating System: macOS 13.0 (Ventura) or higher
- Processor: Apple Silicon (M1/M2/M3) or Intel chip
- Memory: >= 8GB RAM
- Disk Space: >= 10GB available space
- Network: Stable internet connection
How to Check:
- Click Apple menu → About This Mac
- Check macOS version, chip type, memory size
- Check if storage space is sufficient
See macOS Installation Guide - System Requirements for details.
1.3 What If Download Speed Is Too Slow?
Problem Description: Download speed for CueMate installation package is very slow, or download is interrupted.
Download Channel Recommendations
- Users in China: Prefer Baidu Netdisk (fast speed, stable)
- International users: Use GitHub Releases (global CDN)
Download Channel Comparison:
| No. | Channel | Applicable Region | Download Speed | Advantages | Disadvantages |
|---|---|---|---|---|---|
| 1 | Baidu Netdisk | Mainland China | Very fast | No VPN needed | Requires Baidu account |
| 2 | GitHub Releases | Global | Fast | Official, quick updates | May be slow in China |
Baidu Netdisk Download:
- Download link: https://pan.baidu.com/s/15jwZHy8YkDa4cEDLIYRo9Q?pwd=3477
- Extraction code:
3477
GitHub Releases Download:
- Download address: https://github.com/cuemate-chat/cuemate/releases
1.4 Installation Wizard Cannot Open
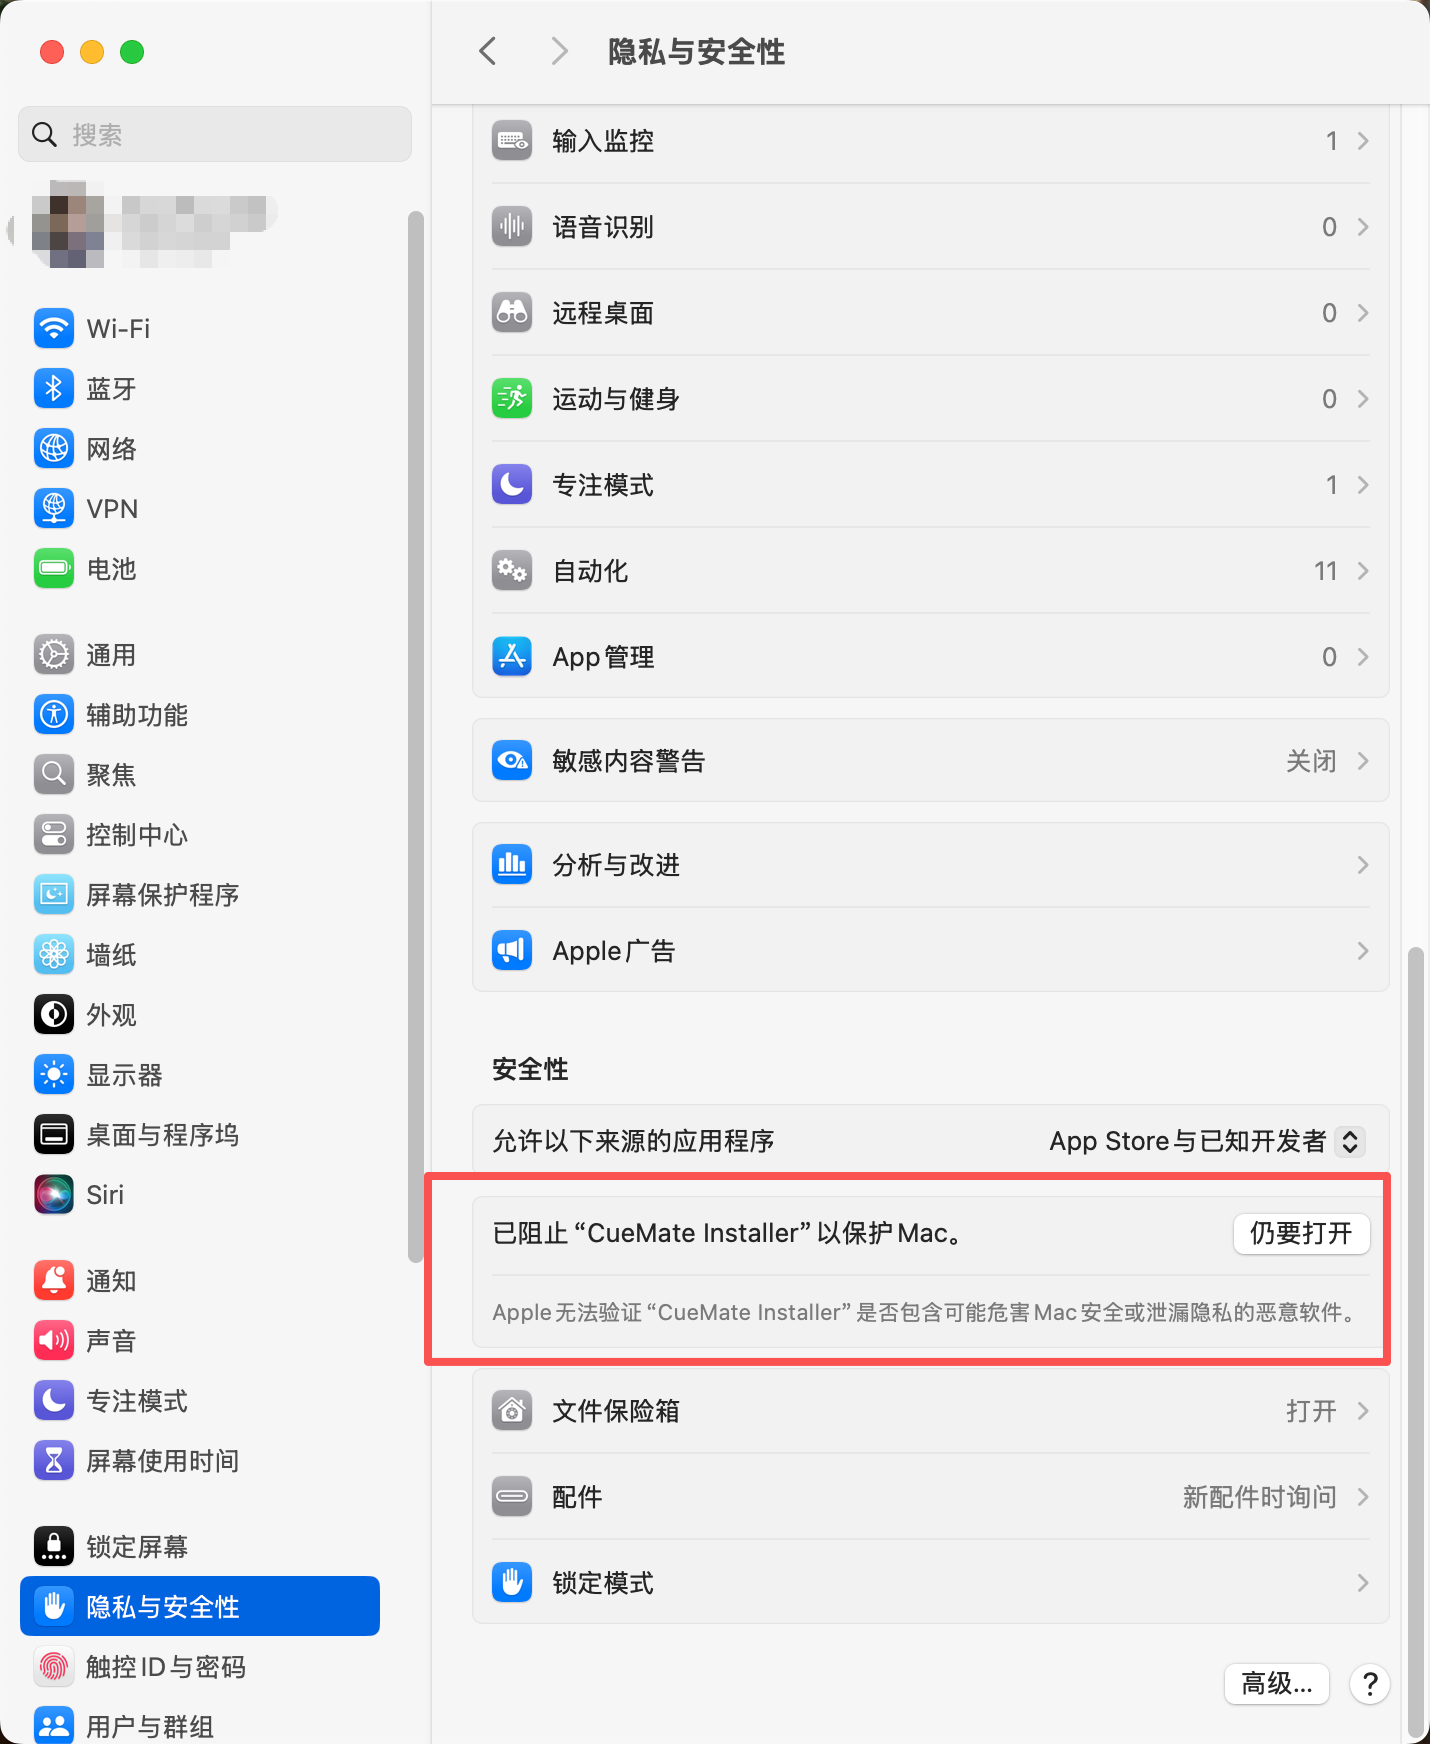
Problem Description: No response after double-clicking the installation wizard icon, or message shows "CueMate Installation Wizard cannot be opened because it is from an unidentified developer".

macOS Security Mechanism
This is macOS's Gatekeeper security mechanism. The CueMate installation wizard is safe, but since it's not notarized by Apple, you need to manually authorize it for first-time use.
Solution:
Method 1: Allow in System Settings (Recommended)
- Open System Settings (or System Preferences)
- Go to Privacy & Security
- Scroll down to find the message "CueMate Installation Wizard was blocked"
- Click the Open Anyway button
Method 2: Right-click to Open
- Right-click (or Control-click) the installation wizard icon
- Select "Open"
- Click the "Open" button in the popup dialog
Best Practice
If you still cannot open it:
- Re-download the installation package (file may be corrupted)
- Check if the downloaded file is complete (offline package ~4.4GB, online package ~670MB)
- Try using terminal command to remove quarantine attribute:
sudo xattr -rd com.apple.quarantine /Applications/CueMate\ Installation\ Wizard.app
1.5 Insufficient Disk Space
Problem Description: Installation wizard shows "Insufficient disk space, cannot continue installation".
IMPORTANT
CueMate installation requires at least 10GB of available disk space, including:
- Application itself: about 2GB
- Docker images: about 6GB
- Runtime data and logs: about 2GB
Solution:
Clean up disk:
- Delete unnecessary files and applications
- Clear "Downloads" folder
- Empty Trash
- Use macOS built-in "Storage Management" tool
Check disk space:
- Click Apple menu → About This Mac → Storage
- Ensure at least 10GB available space
Change installation location:
- In the "Installation Location" step of the installation wizard
- Click "Choose Another Location"
- Select another disk with sufficient space
Re-check after cleanup:
- Return to installation wizard
- Click "Re-check" button
1.6 Docker Desktop Not Installed
Problem Description: Installation wizard shows "Docker Desktop is not installed".

Solution:
Method 1: Auto-install via Installation Wizard (Recommended)
- Click the Auto Install button in the installation wizard
- The installation wizard will open Docker Desktop's official download page
- Download and install Docker Desktop:
- Double-click the downloaded
.dmgfile - Drag the Docker icon to the "Applications" folder
- Open Docker Desktop and complete initial setup
- Double-click the downloaded
- Return to CueMate installation wizard, click Re-check
Method 2: Manual Download and Install
- Visit Docker official website: https://www.docker.com/products/docker-desktop/
- Download the appropriate version based on your chip type
- After installation, launch Docker Desktop
- Wait for Docker to finish starting (status bar shows "Docker Desktop is running")
- Return to CueMate installation wizard, click Re-check
1.7 Docker Desktop Cannot Start
Problem Description: Docker Desktop is installed, but the installation wizard shows "Docker service is not running".
NOTE
Docker Desktop is a core dependency for CueMate. All backend services run in Docker containers. If Docker cannot start, CueMate will not work properly.
Possible Causes:
- macOS version is too low (requires macOS 13.0 (Ventura) or higher)
- System virtualization is not enabled
- Docker Desktop installation is incomplete
- Conflicts with other virtualization software (e.g., VirtualBox, VMware)
Solution:
Manually start Docker:
- Open "Applications" folder
- Double-click to launch Docker Desktop
- Wait for startup to complete (about 10-30 seconds)
- Return to installation wizard, click "Re-check"
Check macOS version:
- Click Apple menu → About This Mac
- Confirm version number >= macOS 13.0 (Ventura)
Reinstall Docker Desktop:
- Uninstall current Docker Desktop
- Re-download the latest version
- Reinstall
Restart Mac:
- Completely shut down and restart
- After startup, open Docker Desktop first
- Then run CueMate installation wizard
Check virtualization conflicts:
- Uninstall other virtualization software (VirtualBox, VMware, etc.)
- Or temporarily quit these software
- Restart Docker
1.8 Port Occupied
Problem Description: Installation wizard shows "Port is occupied, cannot start service".

Ports Used by CueMate
Please ensure the following ports are not occupied by other programs:
| Port | Service | Description |
|---|---|---|
3001 | web-api | Business API service |
3002 | llm-router | LLM routing service |
3003 | rag-service | Knowledge base retrieval service |
3004 | Nginx | Web frontend service |
8000 | ChromaDB | Vector database |
10095 | CueMate-ASR | Speech recognition service |
Solution:
Method 1: Use Installation Wizard Auto-resolve (Recommended)
- The installation wizard will display the name of the program occupying the port
- Click Auto Resolve button
- The installation wizard will try to close the program occupying the port
- Automatically re-check port status
Method 2: Manually Close Occupying Program
- Open "Activity Monitor" (Applications > Utilities)
- Enter the port number or program name in the search box
- Find the program occupying the port
- Select the program, click the "×" button in the top left to force quit
- Return to installation wizard, click Re-check
Method 3: Use Terminal Commands (Advanced Users)
# Check port occupation
lsof -i :3001
lsof -i :3004

# Force close process (replace <PID> with actual process ID)
kill -9 <PID>
WARNING
Before using kill -9 to force terminate a process, make sure it's not a critical system service! Force terminating system services may cause macOS to run abnormally.
If you cannot close the occupying program:
- Check if it's a critical system service
- Restart Mac and try installing again
- Or change to other ports (requires modifying CueMate configuration files, not recommended for beginners)
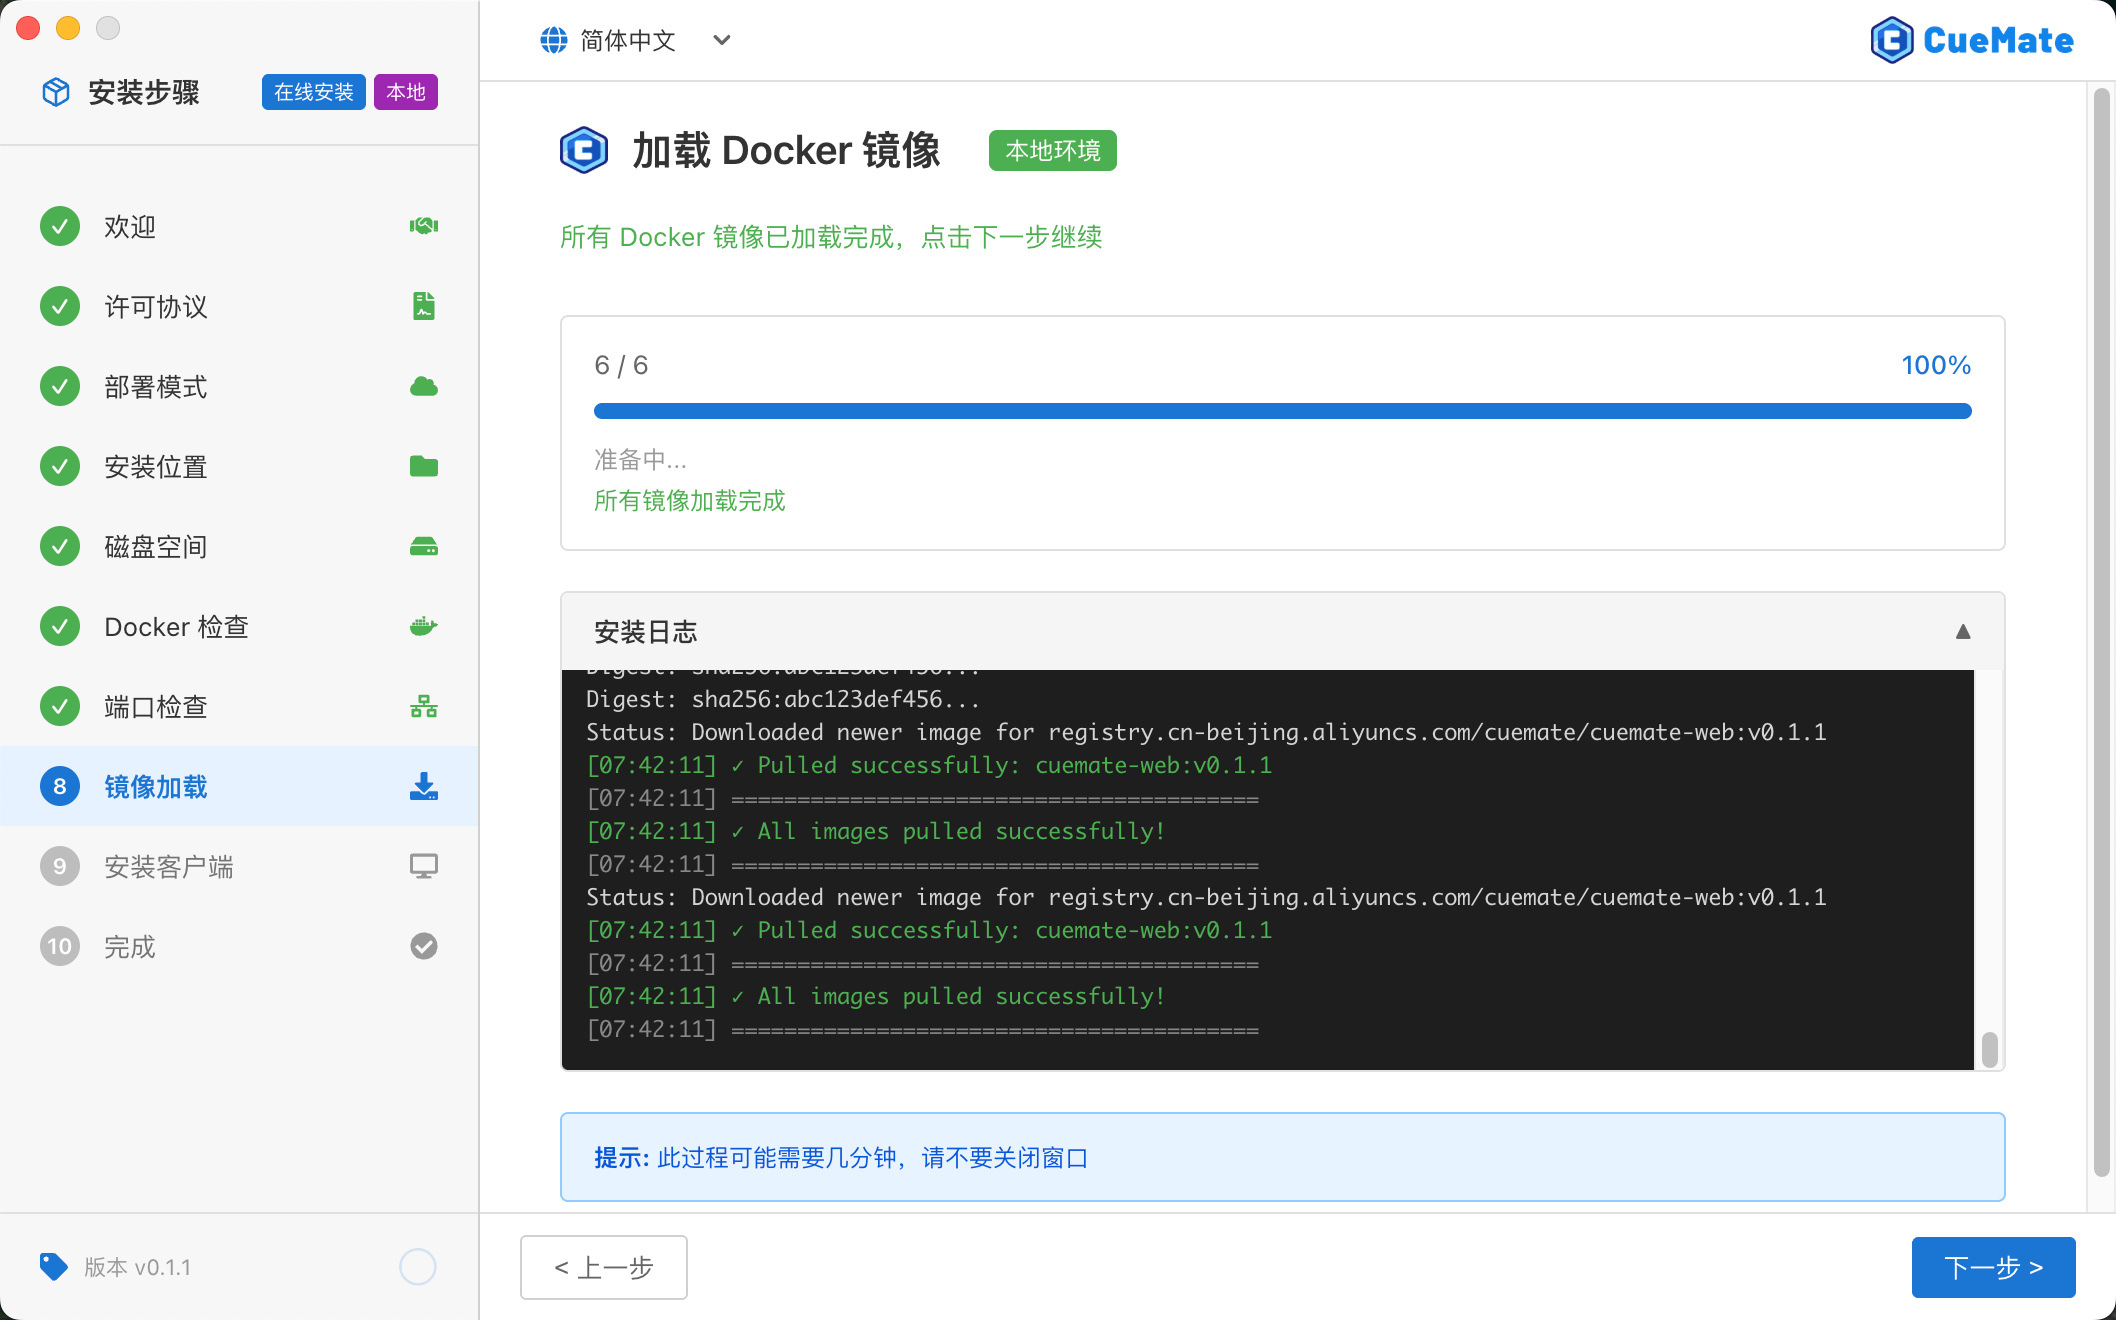
1.9 Image Loading Failed
Problem Description: Installation wizard fails at the "Image Loading" step, showing "Image loading failed, please retry".
Possible Causes:
- Network connection interrupted
- Docker service abnormal
- Insufficient disk space
- Installation package corrupted
Solution:
Check network connection:
- Confirm network connection is normal
- Try accessing other websites to test network
- If using Wi-Fi, try switching to wired network
Check Docker status:
- Open Docker Desktop
- Confirm status bar shows "Docker Desktop is running"
- If Docker is abnormal, restart Docker Desktop
Check disk space:
- Ensure at least 10GB available space
- Docker images will occupy about 3-5GB space
- Clean up disk and click "Retry"
Retry loading:
- Click the Retry button in the installation wizard
- Wait for reloading (may take 3-5 minutes)
Re-download installation package:
- If multiple retries fail, the installation package may be corrupted
- Re-download the installation package
- Confirm download is complete (offline package ~4.4GB, online package ~670MB)
View detailed logs:
- Click "View Logs" button in the installation wizard
- Record error information
- Contact technical support
1.10 Image Loading Takes Too Long
Problem Description: Image loading step waiting time exceeds 10 minutes.
TIP
Image loading time varies by device configuration:
- High-end Mac (M1/M2/M3 + SSD): 3-5 minutes
- Low-end Mac or HDD: 5-10 minutes
- Over 15 minutes: May have issues, recommend retrying
Causes:
- First-time loading requires extracting and loading about 3GB of Docker images from the installation package
- Low-end Macs or HDDs will be slower
- Docker service responding slowly
Solution:
Wait patiently:
- Normally takes 3-5 minutes
- Low-end devices may take 5-10 minutes
- Don't close the installation wizard
Check progress indicator:
- Installation wizard displays the name of the currently loading image
- Shows percentage progress
- If progress doesn't change for a long time (over 5 minutes), there may be issues
Optimize Docker performance:
- Open Docker Desktop settings
- Increase memory and CPU allocated to Docker
- Recommended: 4GB+ memory, 2+ CPU cores
Use SSD:
- HDD loading speed will be very slow
- Recommend installing CueMate on SSD
1.11 Installation Complete but Cannot Start Application
Problem Description: Installation wizard shows "Installation Complete", but clicking "Finish" doesn't launch the application.
Solution:
Manually start the application:
- Open "Applications" folder
- Find CueMate.app
- Double-click to launch
Check service status:
- Open Docker Desktop
- View container list
- Confirm CueMate-related containers are running
- If containers are not running, see Service Management
View application logs:
- Open "Terminal" app
- Run command to view logs:bash
tail -f ~/Library/Application\ Support/cuemate-desktop-client/data/logs/*/$(date +%Y-%m-%d)/error.log
Reinstall:
- If the above methods don't work
- First uninstall CueMate (see Uninstall Guide)
- Re-run the installation wizard
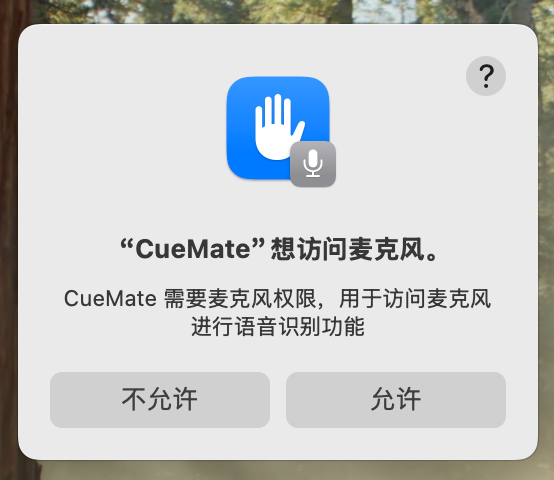
1.12 Microphone Permission Not Granted
Problem Description: When using speech recognition, shows "Microphone permission not granted" or "Cannot access microphone".
Solution:
Grant permission (first use):
- Authorization prompt will automatically appear when using microphone feature
- Click OK button to grant permission
Manually check permission settings:
- Open System Settings > Privacy & Security
- Find and click Microphone in the left menu
- Find CueMate in the app list on the right
- Toggle the switch to enable
Restart application:
- Completely quit CueMate (menu bar icon > Quit)
- Restart CueMate
- Test voice feature again
1.13 Screen Recording & System Audio Permission Not Granted
Problem Description: Cannot use interviewer voice recognition, shows "Screen Recording & System Audio permission required".
NOTE
Why is this permission needed?
- CueMate uses "Screen Recording & System Audio" permission to capture system audio
- Only used for audio capture, will NOT record screen content
- Used to recognize interviewer voice played by interview software (like Tencent Meeting, DingTalk, etc.)
Solution:
When using the speaker test feature for the first time, the system will automatically show an authorization prompt. Please click Allow to grant CueMate permission to access system audio.
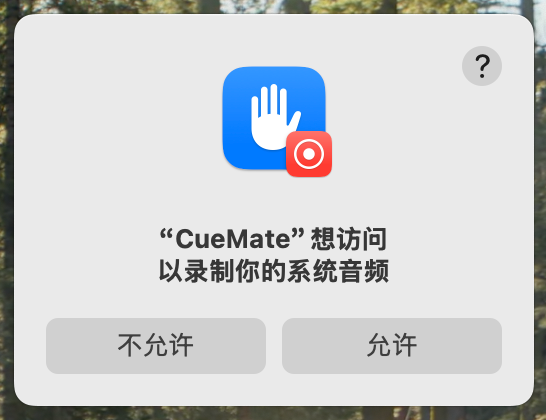
If you accidentally clicked "Don't Allow" or closed the authorization window:
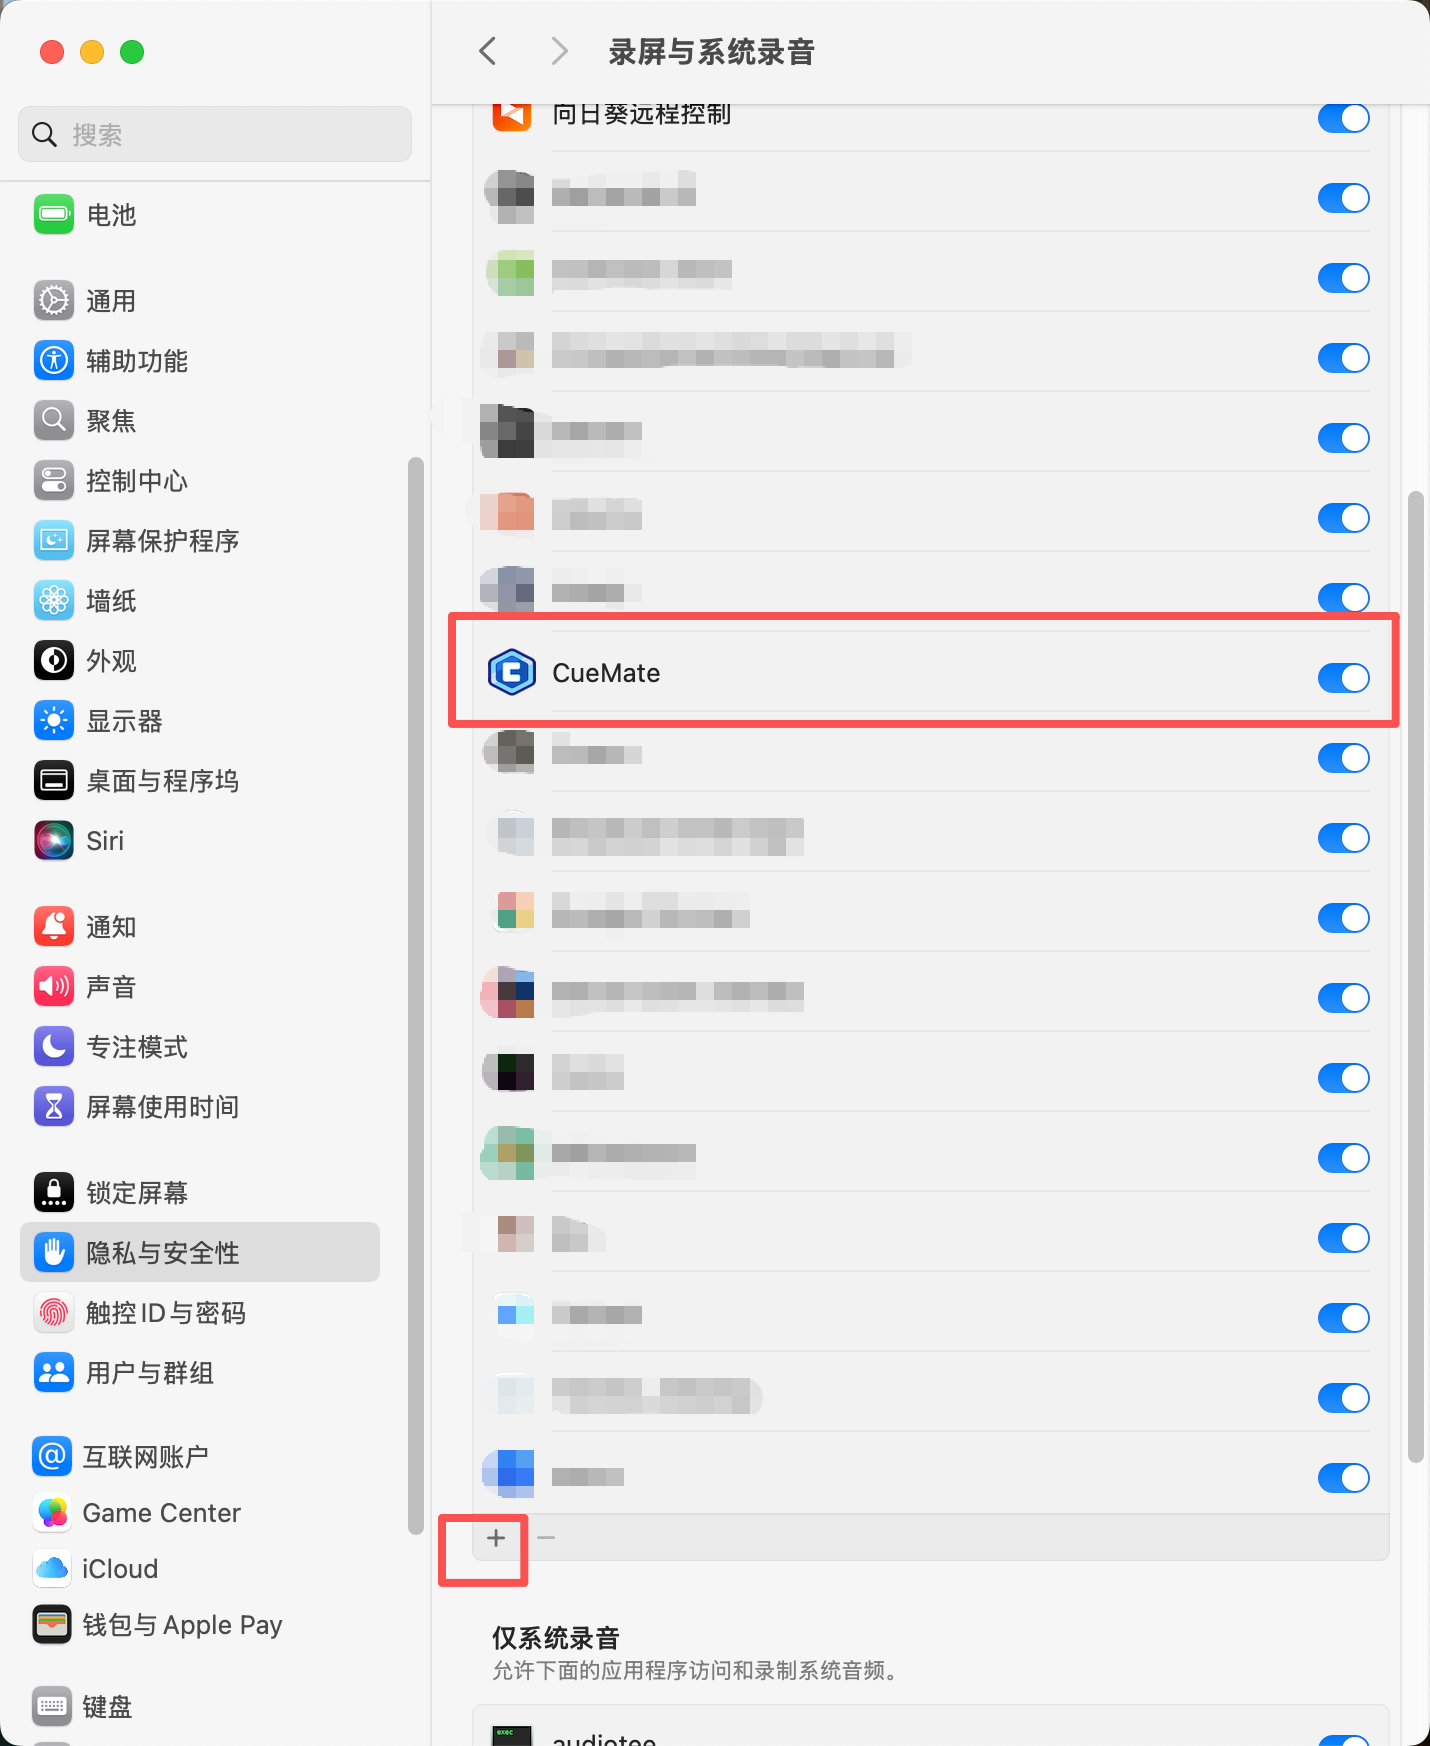
- Open System Settings > Privacy & Security
- Find and click Screen Recording & System Audio in the left menu

- Find CueMate in the app list on the right, toggle the switch to enable system audio capture permission
- If CueMate is not in the list, click the "+" button at the bottom to manually add it
- No need to restart the app after authorization, just return to CueMate to use the feature
1.14 Permission Granted but Still Cannot Use
Problem Description: Microphone or screen recording permission has been granted, but the feature still doesn't work.
Solution:
Completely restart CueMate:
- Click CueMate icon in menu bar
- Select Quit CueMate (make sure to completely quit, not minimize)
- Restart CueMate from "Applications" folder
Check permission settings:
- Go to System Settings > Privacy & Security
- Check Microphone and Screen Recording & System Audio separately
- Confirm CueMate is checked
Reset permissions:
- Uncheck CueMate in system settings
- Completely quit CueMate
- Restart CueMate
- Authorization prompt will appear again when using related features
- Re-authorize
Check device connection:
- Confirm microphone device is properly connected
- Open "System Settings" > "Sound"
- Confirm input device is selected correctly
- Speak into microphone and observe if input level changes
Restart Mac:
- If the above methods don't work
- Try restarting Mac
- Test again after restart
1.15 Cannot Login to System
Problem Description: After entering account information, shows "Username or password incorrect".
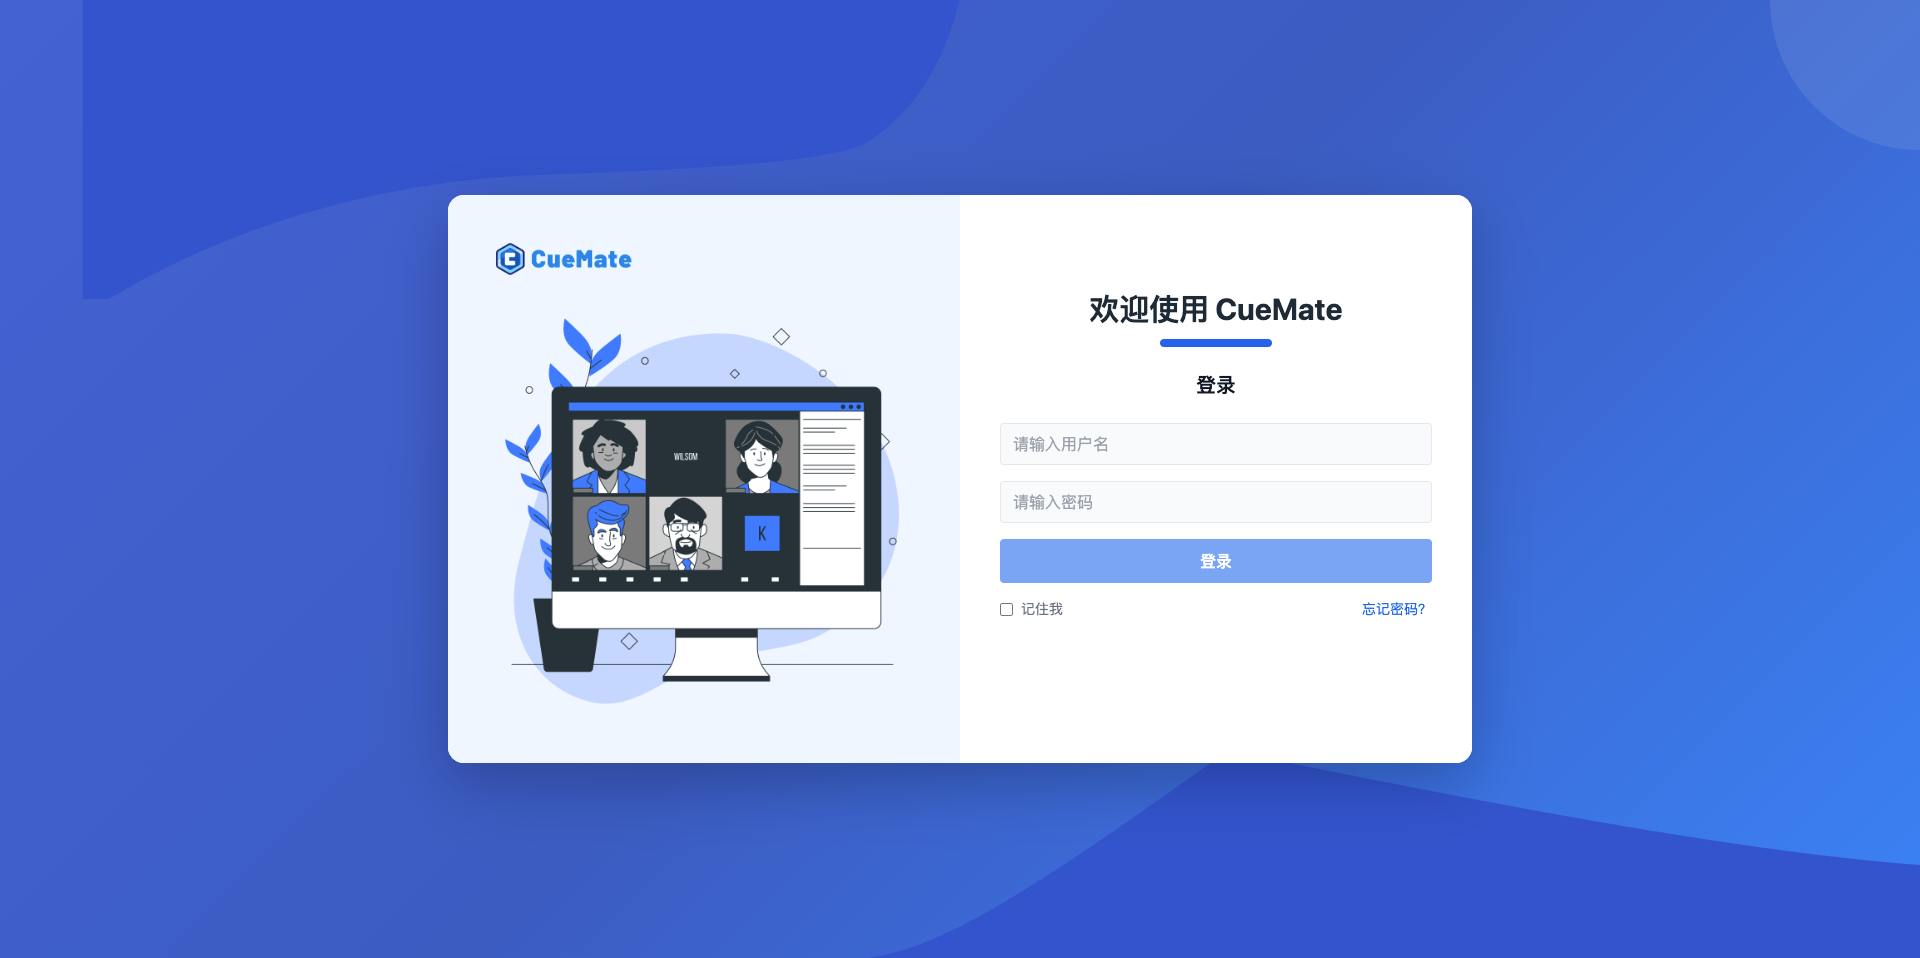
Solution:
Use built-in account:
- Username:
admin - Password:
cuemate - Note: Password is case-sensitive, all lowercase
- Username:
Check input:
- Confirm no extra spaces
- Confirm caps lock is not on
- Try copying and pasting account information
Check service status:
- Click CueMate icon in menu bar
- Select "Container Monitor"
- Confirm
cuemate-web-apiservice is running - If service is not running, click "Restart" button
Clear cache and retry:
- Completely quit CueMate
- Clear browser cache (if using Web interface)
- Restart CueMate
1.16 Main Application Window Cannot Open
Problem Description: No response after clicking "Main Application Window" button in control bar.
Possible Causes:
- Backend services not started
- Port occupied
- Network connection issues
Solution:
Check service status:
- Click CueMate icon in menu bar
- Select "Container Monitor"
- Confirm all 6 services show "Running" (green label)
- Focus on checking
cuemate-webandcuemate-web-apiservices
Restart services:
- In Container Monitor page
- Click "Restart" button for abnormal services
- Wait for service restart to complete (about 30 seconds)
- Try opening main application window again
Check ports:
- Open "Terminal" app
- Run command to check port:bash
lsof -i :3004 - Confirm port is not occupied by other programs
Access directly via browser:
- Open browser
- Visit: http://localhost:3004
- If it opens normally, services are working
- Problem may be with the desktop app itself
Restart CueMate:
- Completely quit CueMate
- Restart
- Try again
1.17 Service Startup Failed
Problem Description: In "Container Monitor" page, some services show status as "Stopped" or "Error".
Solution:
See Service Management - Service Startup Failed for details.
1.18 Installation Package File Corrupted
Problem Description: Shows "Installation package file corrupted or incomplete".
Solution:
- Delete the downloaded installation package
- Re-download the complete installation package
- Confirm file size is correct (offline package ~4.4GB, online package ~670MB)
- Use MD5 or SHA256 to verify file integrity (if checksum is provided)
1.19 Installation Process Interrupted
Problem Description: Installation process unexpectedly quit or was interrupted.
Solution:
- Re-run the installation wizard
- Installation wizard will automatically detect completed steps
- Continue installation from where it was interrupted
- If cannot continue, uninstall the partially installed content first, then start over
1.20 Reinstall After Uninstall
Problem Description: Problems occur when reinstalling CueMate after uninstall.
Solution:
Completely clean residual files:
bash# Delete application data rm -rf ~/Library/Application\ Support/cuemate-desktop-client # Delete Docker containers and images docker compose -f ~/Library/Application\ Support/cuemate-desktop-client/docker-compose.yml down docker system prune -aRestart Mac:
- Restart Mac after cleanup
- Re-run installation wizard after restart
Use fresh installation package:
- Delete old installation package
- Download the latest version installation package
- Install with new package
See Uninstall Guide for details.
2. Windows Platform
2.1 Installation Wizard Won't Open
Problem Description: Double-clicking the installer has no response or is blocked.
Solution:
- Right-click the installer, select "Run as administrator"
- If blocked by Windows Defender SmartScreen, click "More info" then "Run anyway"
- Temporarily disable antivirus software and retry
- If still unable to open, re-download the installation package
2.2 WSL 2 Not Enabled
Problem Description: Installation wizard prompts that WSL 2 needs to be enabled.
IMPORTANT
Docker Desktop for Windows requires WSL 2 support.
Solution:
- Open PowerShell as administrator
- Run command:
wsl --install - Wait for installation to complete
- Restart computer
- Return to installation wizard to continue
2.3 Docker Desktop Won't Start
Problem Description: Installation wizard prompts that Docker service is not running.
Possible Causes:
- WSL 2 not properly installed
- Virtualization not enabled in BIOS
- Windows version too low
- Hyper-V conflict
Solution:
- Confirm WSL 2 is properly installed:powershell
wsl --status - Enable virtualization in BIOS (VT-x/AMD-V)
- Confirm Windows version meets requirements (Windows 10 64-bit or higher)
- If using other virtualization software (e.g., VirtualBox), try disabling or uninstalling
- Restart computer and try again
2.4 Port Occupied
Problem Description: Installation wizard prompts that a port is occupied.
Solution:
Method 1: Use installation wizard auto-resolve
- Installation wizard will display the program name occupying the port
- Click "End Process" button
- Or click "Auto Resolve All Conflicts"
Method 2: Manually close occupying program
- Open Task Manager (Ctrl + Shift + Esc)
- Find the program occupying the port
- Select the program and click "End Task"
- Return to installation wizard and click "Re-detect"
Method 3: Use command line (advanced users)
# Check port occupation
netstat -ano | findstr :3001

# Force end process (replace <PID> with actual process ID)
taskkill /f /pid <PID>
2.5 Insufficient Disk Space
Problem Description: Installation wizard prompts insufficient disk space.
TIP
CueMate installation requires at least 10GB of available disk space. It's recommended not to install on the C: drive to avoid system disk space shortage causing system slowdown.
Solution:
- Clean up disk space (delete unnecessary files and applications)
- Empty the Recycle Bin
- Select another disk (e.g., D: drive) as the installation location in the wizard
- Click "Re-detect"
2.6 Image Loading Failed
Problem Description: Installation wizard fails at the image loading step.
Possible Causes:
- Network connection interrupted
- Docker service abnormal
- Insufficient disk space
Solution:
- Check network connection
- Confirm Docker Desktop is running
- Check disk space
- Click "Retry" button to reload
2.7 Installation Complete But Won't Start
Problem Description: After installation, clicking "Complete" but application won't start.
Solution:
- Manually start the application:
- Open Start menu
- Search for "CueMate"
- Click to launch
- Check if CueMate icon is in the system tray
- Check if Docker Desktop is running
- Check if Docker containers started normally
2.8 Microphone Permission Issues
Problem Description: Cannot use speech recognition feature.
Solution:
- Open Windows Settings > Privacy > Microphone
- Confirm "Allow apps to access your microphone" is enabled
- Confirm CueMate is in the allowed apps list
- Restart CueMate application
2.9 Cannot Capture System Audio
Problem Description: Cannot capture interviewer audio from interview software.
Solution:
Check audio device selection:
- Enter Voice Settings page
- Confirm correct speaker device is selected
Test audio capture:
- Click "System Audio Test" button
- Play any audio file
- Observe if amplitude changes
Check audio settings:
- Right-click system tray speaker icon
- Select "Sound Settings"
- Confirm output device is correct
2.10 Custom Installation Path Issues
Problem Description: Cannot install to custom path, or errors occur after installation.
Solution:
Path requirements:
- Path cannot contain Chinese characters or special characters
- It's recommended to use English path, e.g.,
D:\CueMate - Avoid paths that are too deep
Permission issues:
- Ensure target folder has write permission
- It's recommended to use user directory or a directory with full permissions
Get More Help
If the above methods cannot solve your problem, you can get help through:
View Documentation
- macOS Installation Guide - Complete installation steps
- Quick Start - Quick installation process
- Service Management - Service status and log viewing
- FAQ Overview - More common questions and answers
Contact Technical Support
- GitHub Issues: https://github.com/cuemate-chat/cuemate/issues
- Email: nuneatonhydroplane@gmail.com
When submitting issues, please provide:
- macOS version and chip type
- CueMate version number
- Detailed error messages and screenshots
- Solutions you have already tried