Speech recognition settings
The speech recognition settings page is used to configure the FunASR speech recognition service, system audio capture, Piper TTS speech synthesis, audio equipment, and test parameters. All settings are saved to the server and automatically synchronized to the desktop client.
NOTE
Platform Differences for System Audio Capture:
- macOS: Uses AudioTee for system audio capture
- Windows: Uses Electron Audio Loopback for system audio capture
Both achieve the same functionality - capturing audio output from interview software (Tencent Meeting, Zoom, etc.). The configuration page shows AudioTee options, but Windows uses Electron Audio Loopback internally.
Note: All configurations have default values by default, except for local microphones and speakers that require additional configuration.
1. Enter speech recognition settings
Click "Voice Settings" in the drop-down menu at the top to enter the settings page.
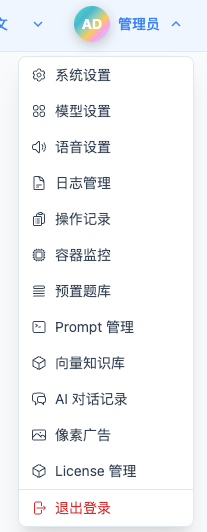
The page contains five configuration tabs:
- Device configuration: microphone and speaker settings
- FunASR configuration: speech recognition service parameters
- AudioTee configuration: System audio capture configuration
- Piper TTS configuration: speech synthesis parameters
- Test configuration: test parameter settings

2. Device configuration
NOTE
Device configuration requires the desktop client to function properly. The web client will automatically obtain the device list from the desktop client, please make sure the desktop application is started.
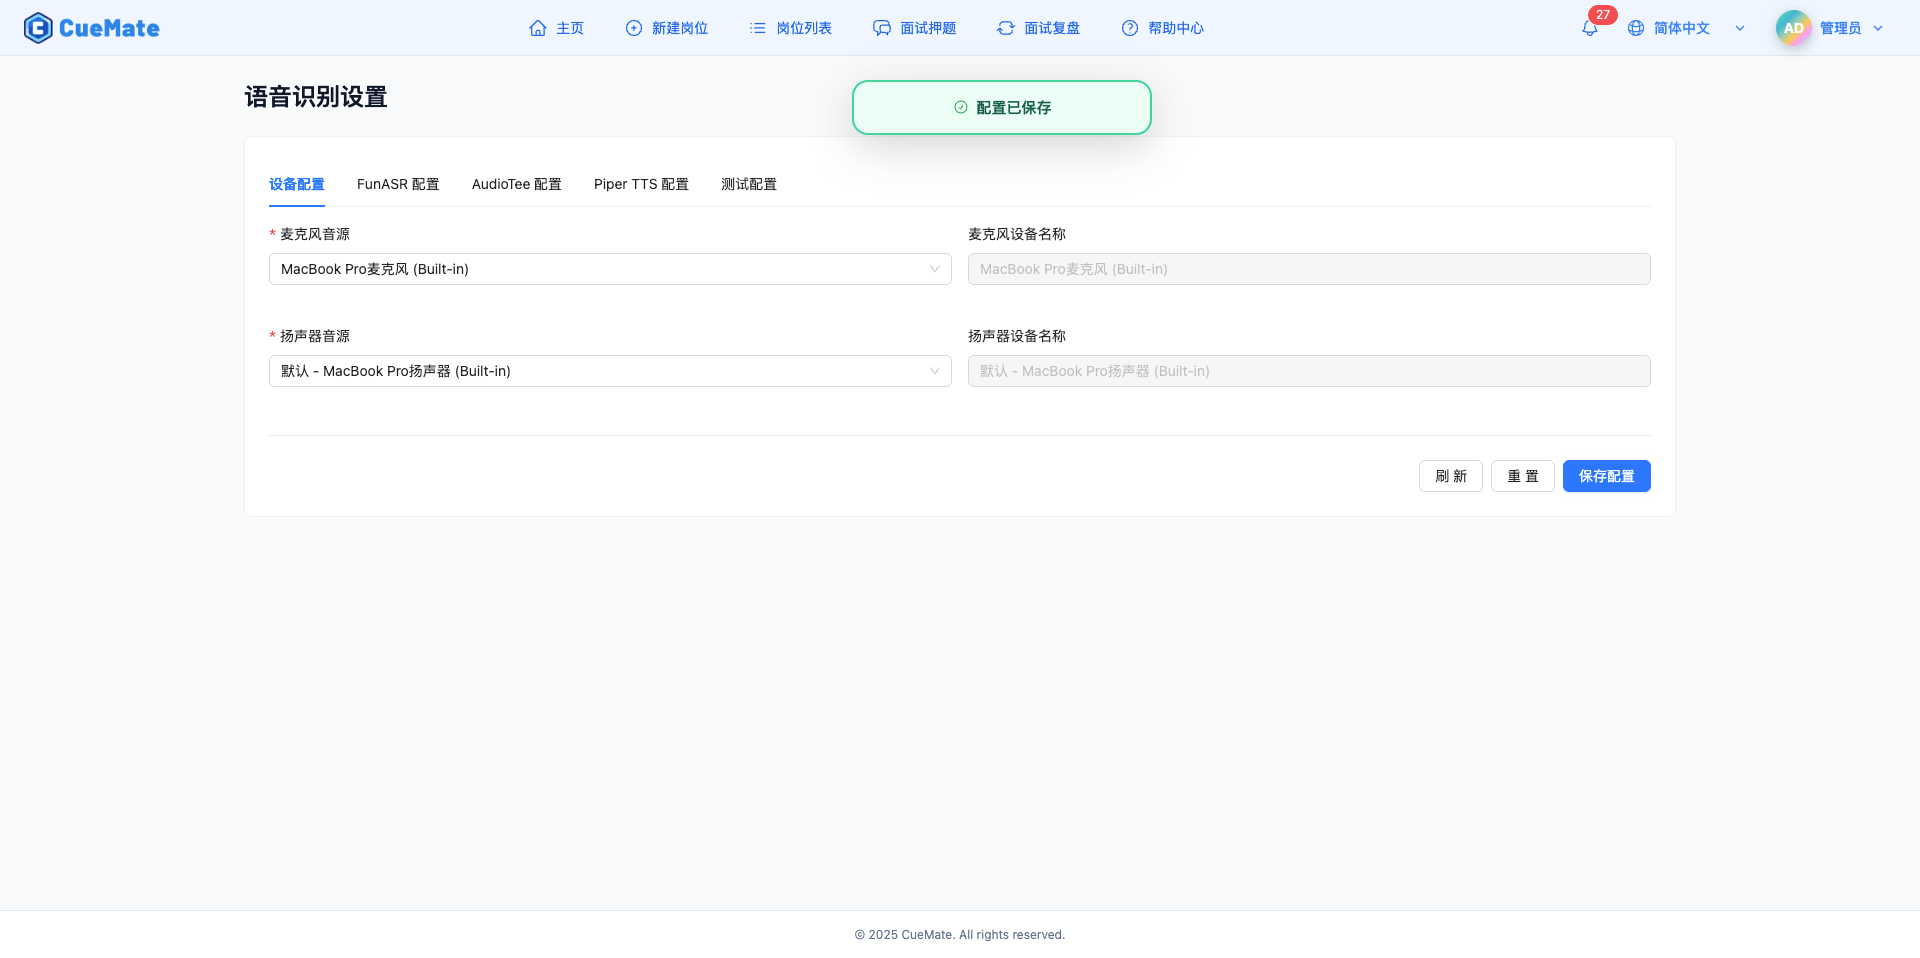
2.1 Microphone settings
On the "Device Configuration" tab, configure the microphone audio input device.
TIP
Recommended Equipment Selection:
- Preferred: Computer built-in microphone (simple and convenient)
- When the environment is noisy: Headset microphone (good noise reduction effect)
- Pursuing high quality: Professional USB microphone (high recognition accuracy)
Microphone sound source
- Drop-down box displays all available microphone devices in the system
- The desktop client will automatically detect and report the device list to the web client
- Select the microphone device to use
- The built-in microphone of the computer itself is preferred (such as MacBook built-in microphone)
- Also supports external microphones (e.g. USB microphone, headset microphone)
- Examples of device formats: built-in microphone, USB microphone
Microphone device name
- Automatically display the full name of the selected microphone
- Read-only fields, not manually editable
- Used to confirm whether the selected device is correct
Usage Scenario
Microphone is the core input device for mock interviews and interview training. It is mainly used for:
- User voice input
- Microphone captures your voice as the user answers questions in the mock interview
- Speech is converted into text in real time through FunASR service
- Text content is sent to LLM to generate intelligent answers and suggestions
- The whole process realizes the closed loop of "speaking → recognition → AI answer"
- Interview training scenario
- Microphone records your answers as you practice speaking
- The system recognizes your voice content and analyzes the quality of your answers
- Provide targeted feedback based on recognition results
Equipment Selection Suggestions
- Prioritize using the computer's built-in microphone, which is simple and convenient and requires no additional equipment
- When the environment is noisy, you can choose a headset microphone to reduce background noise
- For higher recognition accuracy, you can use a professional USB microphone
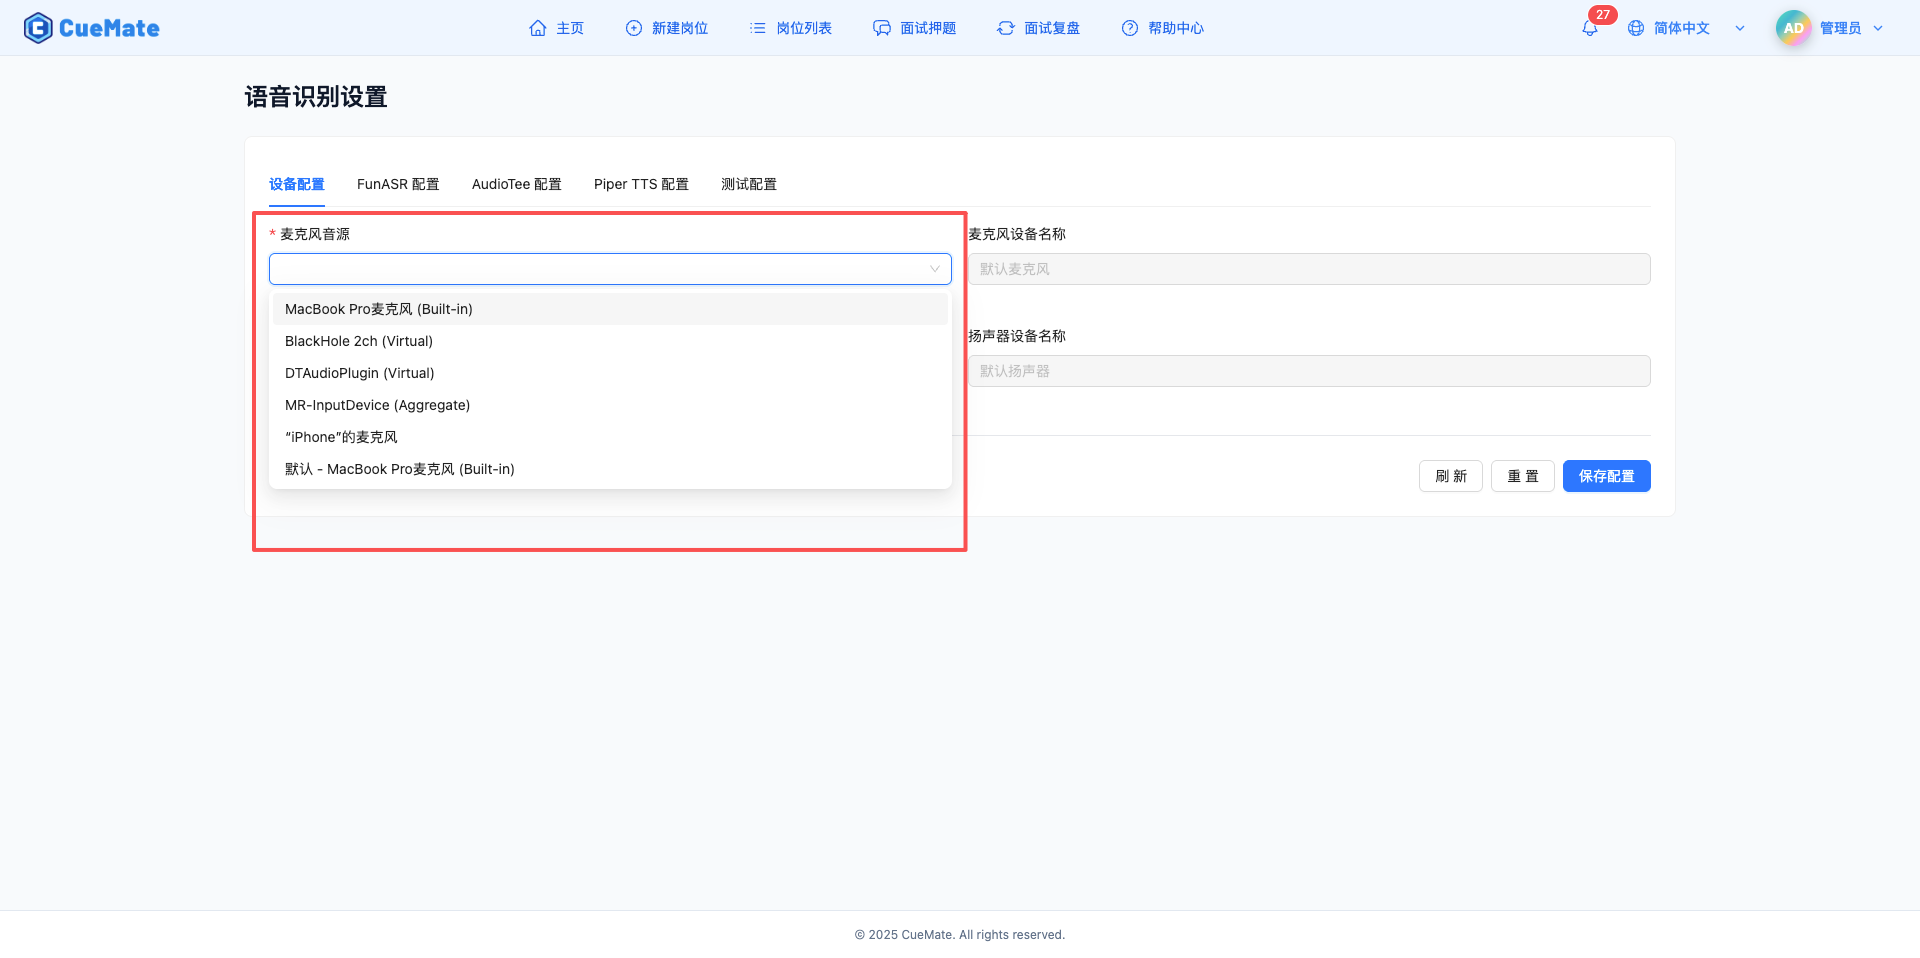
2.2 Speaker settings
On the "Device Configuration" tab, configure the speaker audio output device.
Speaker Source
- Drop-down box displays all available speaker devices in the system
- The desktop client will automatically detect and report the device list
- Select the speaker device you want to use
- Prefer the built-in speakers of the computer itself (such as MacBook built-in speakers)
- Also supports external audio devices (such as USB speakers, Bluetooth headsets, wired headsets)
- Examples of device formats: built-in speakers, USB speakers, Bluetooth headsets
Speaker device name
- Automatically display the full name of the selected speaker
- Read-only fields, not manually editable
- Used to confirm whether the selected device is correct
Usage Scenario
Speakers play two key roles in mock interviews and interview training:
- Play AI-generated answer voice (Piper TTS)
- When you speak, AI generates smart answers and suggestions
- Piper TTS converts text answers into natural and smooth speech
- Play it through the speaker so you can hear the AI's answer
- This way you don’t have to stare at the screen to read text, free your eyes and focus on thinking
- Capture the interviewer’s voice (AudioTee system audio capture)
- This is the most important function of the speaker
- When you use Tencent Conference, Zoom and other software for mock interview training
- The mock interviewer's voice will be played from the speakers
- AudioTee captures the system audio stream played by speakers
- Captured audio recognized as text by FunASR
- AI analyzes questions and generates answer prompts in real time
- Implemented the complete process of "voice playback → speaker output → AudioTee capture → FunASR recognition → AI generated answer"
Technical Principle Description
Why speakers are critical to capturing interviewer voices:
- Audio output from interview software (Tencent Conference, Zoom) to speakers
- AudioTee acts as a system-level audio capture tool that intercepts audio streams sent to speakers
- AudioTee captures audio data even if you are wearing headphones
- This is a non-intrusive audio capture solution that does not affect the normal operation of the interview software
Equipment Selection Suggestions
- Prioritize the use of the computer's built-in speakers for the most stable system audio capture
- Make sure AudioTee can correctly identify the audio device when using headphones
- Avoid using Bluetooth devices, there may be latency and compatibility issues
- It is recommended to use wired headphones in interview training scenarios to ensure sound quality and capture stability.
2.3 Refresh device list
If a new audio device is connected, click the "Refresh" button at the bottom to re-detect the device list.
Refresh operation
- Click the "Refresh" button
- Send device request to desktop client
- Browser re-enumerates local audio devices
- Automatically update the device list
Usage Scenario
- Refresh the list after plugging in a new USB microphone or speaker
- Refresh device after connecting Bluetooth headset
- Reload when the device list displays abnormally
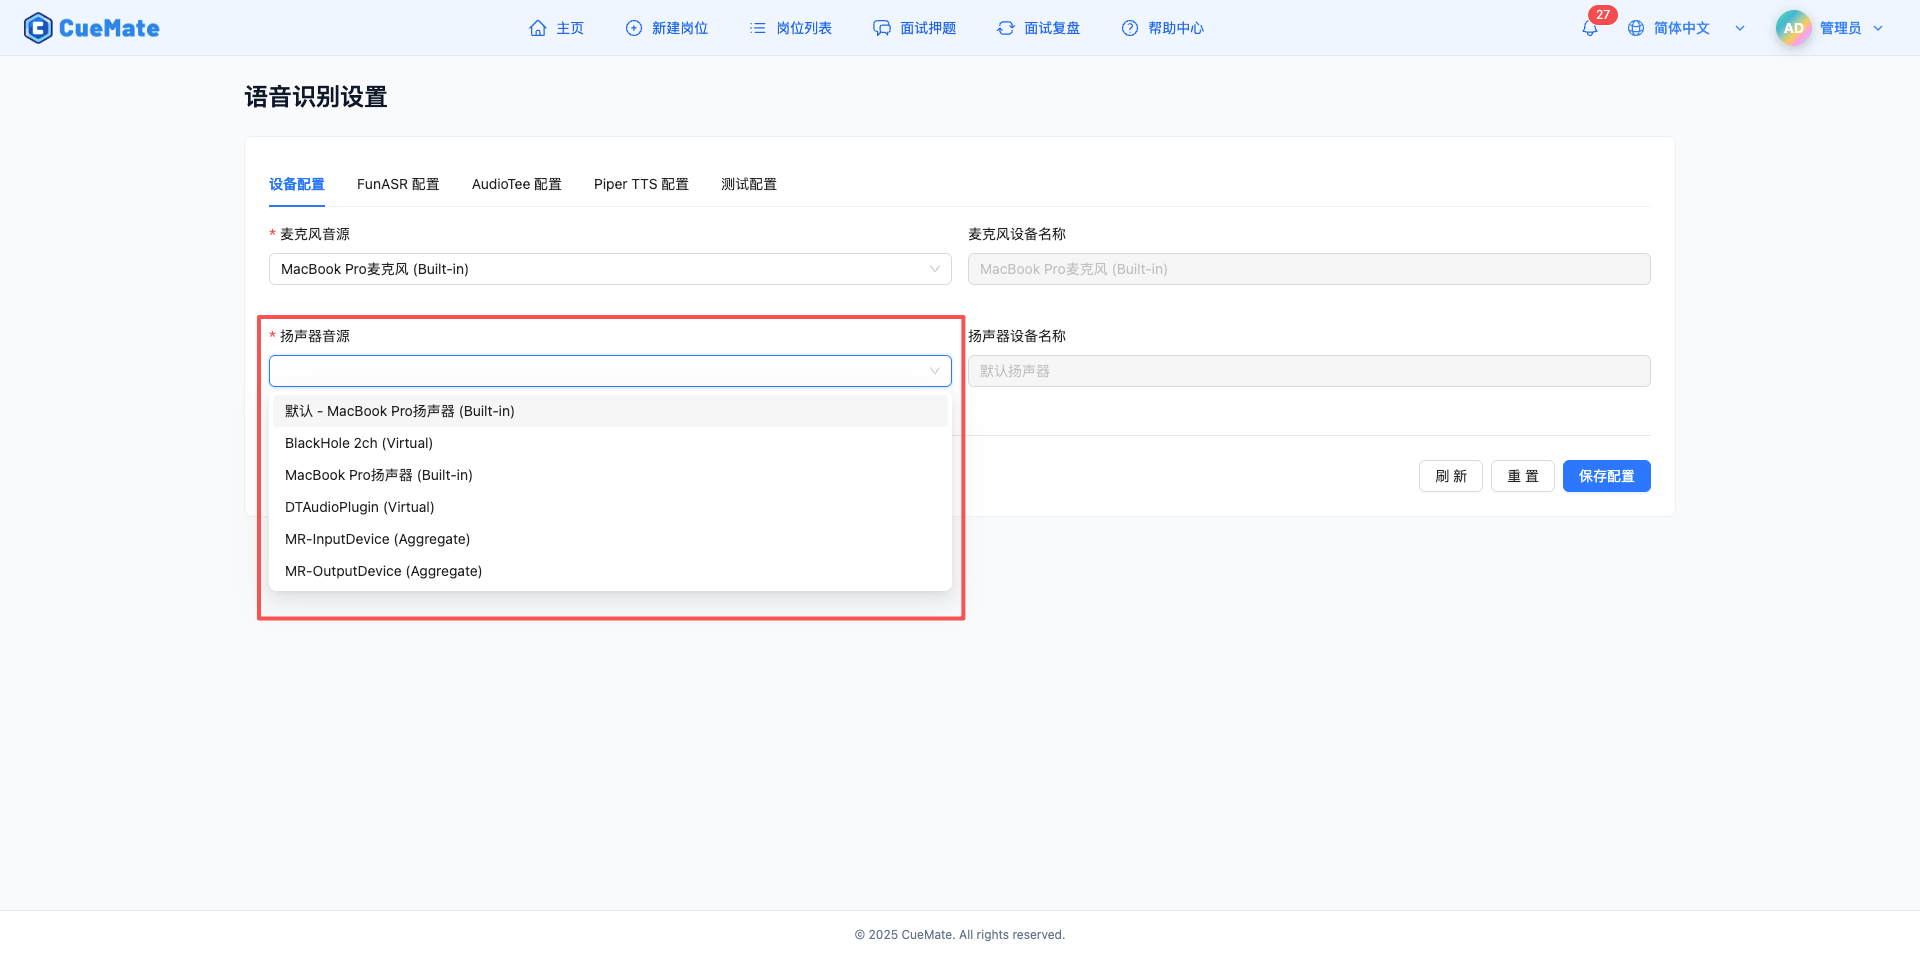
3. FunASR Configuration
3.1 Basic configuration
On the "FunASR Configuration" tab, configure the connection parameters of the FunASR speech recognition service.
Note: All configurations have default values by default and do not need to be modified.
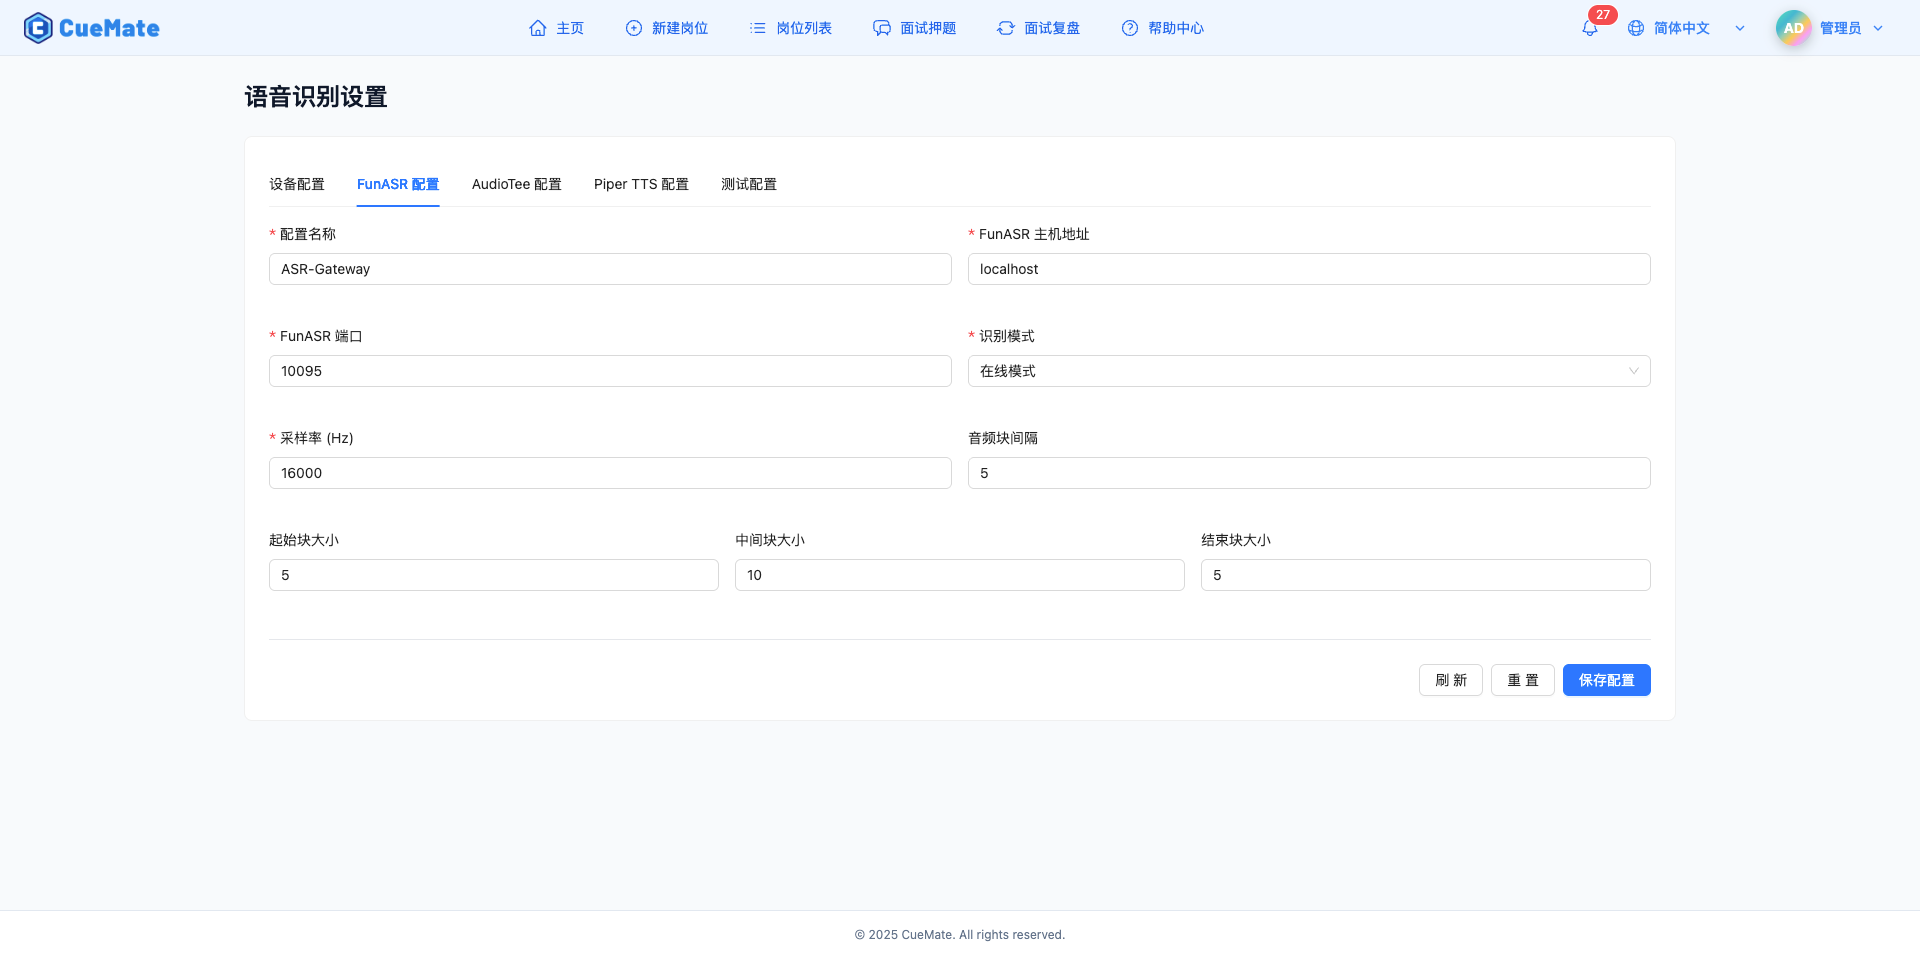
Configuration name
- Give the current configuration a name
- Default: ASR-Gateway
- Easy to identify and manage multiple configurations
FunASR host address
- Host address of the FunASR service -Default: localhost
- For local deployment, fill in localhost or 127.0.0.1
- Fill in the server IP address for remote deployment
FunASR port
- WebSocket port for FunASR service -Default value: 10095
- Value range: 1-65535
- Make sure the port is not occupied by other services
Identification Pattern
- Online mode (online): real-time streaming recognition, low latency, text-to-text while speaking
- Offline mode: Unified recognition after recording is completed, with high accuracy
- Two-pass mode (2pass): first display online in real time, and then optimize the results offline
Usage Scenario
- It is recommended to use "online mode" for interview scenarios to see answers in real time
- It is recommended to use "offline mode" to convert recording to text for higher accuracy.
- It is recommended to use "two-pass mode" for important meetings, taking into account real-time and accuracy
3.2 Audio parameters
Sampling rate (Hz)
- Audio sampling rate, affecting recognition quality
- Default: 16000 Hz
- Value range: 8000-48000 Hz
- 16000 Hz recommended to balance quality and performance
Audio block interval
- Audio block sending interval
- Default value: 5
- Value range: 1-20
- The smaller the value, the lower the latency, but the greater the network pressure.
3.3 Audio block size configuration
FunASR uses a chunking recognition strategy to divide the audio stream into three stages: start, middle, and end.
Start chunk size (chunk_size_start)
- Audio chunk size for speech onset phase
- Default value: 5
- Value range: 1-20
- Smaller values trigger recognition quickly
Middle chunk size (chunk_size_middle)
- Audio chunk size for speech duration phase
- Default value: 10
- Value range: 1-20
- Larger values improve stable recognition
End chunk size (chunk_size_end)
- Audio chunk size for end of speech phase
- Default value: 5
- Value range: 1-20
- Smaller values can end recognition quickly
Tuning Suggestions
- Small start and end blocks for fast response
- The middle block is larger and long sentences can be recognized stably
- The smaller the overall value, the more real-time it is, but the recognition may be unstable.
- The larger the overall value, the more stable it is, but the higher the latency
4. AudioTee Configuration
4.1 Introduction to AudioTee
NOTE
Platform Differences:
- macOS: Uses AudioTee for system audio capture, supports advanced features like process filtering
- Windows: Uses Electron Audio Loopback for system audio capture, simpler configuration, no additional setup required
AudioTee is a macOS system audio capture tool used to capture the audio output of interview software (such as Zoom, Tencent Meeting) to realize interviewer voice recognition.
Windows users can skip the process filtering configuration in this section and use the default settings directly.
4.2 Basic configuration
On the "AudioTee Configuration" tab, configure system audio capture parameters.
Note: All configurations have default values by default and do not need to be modified.
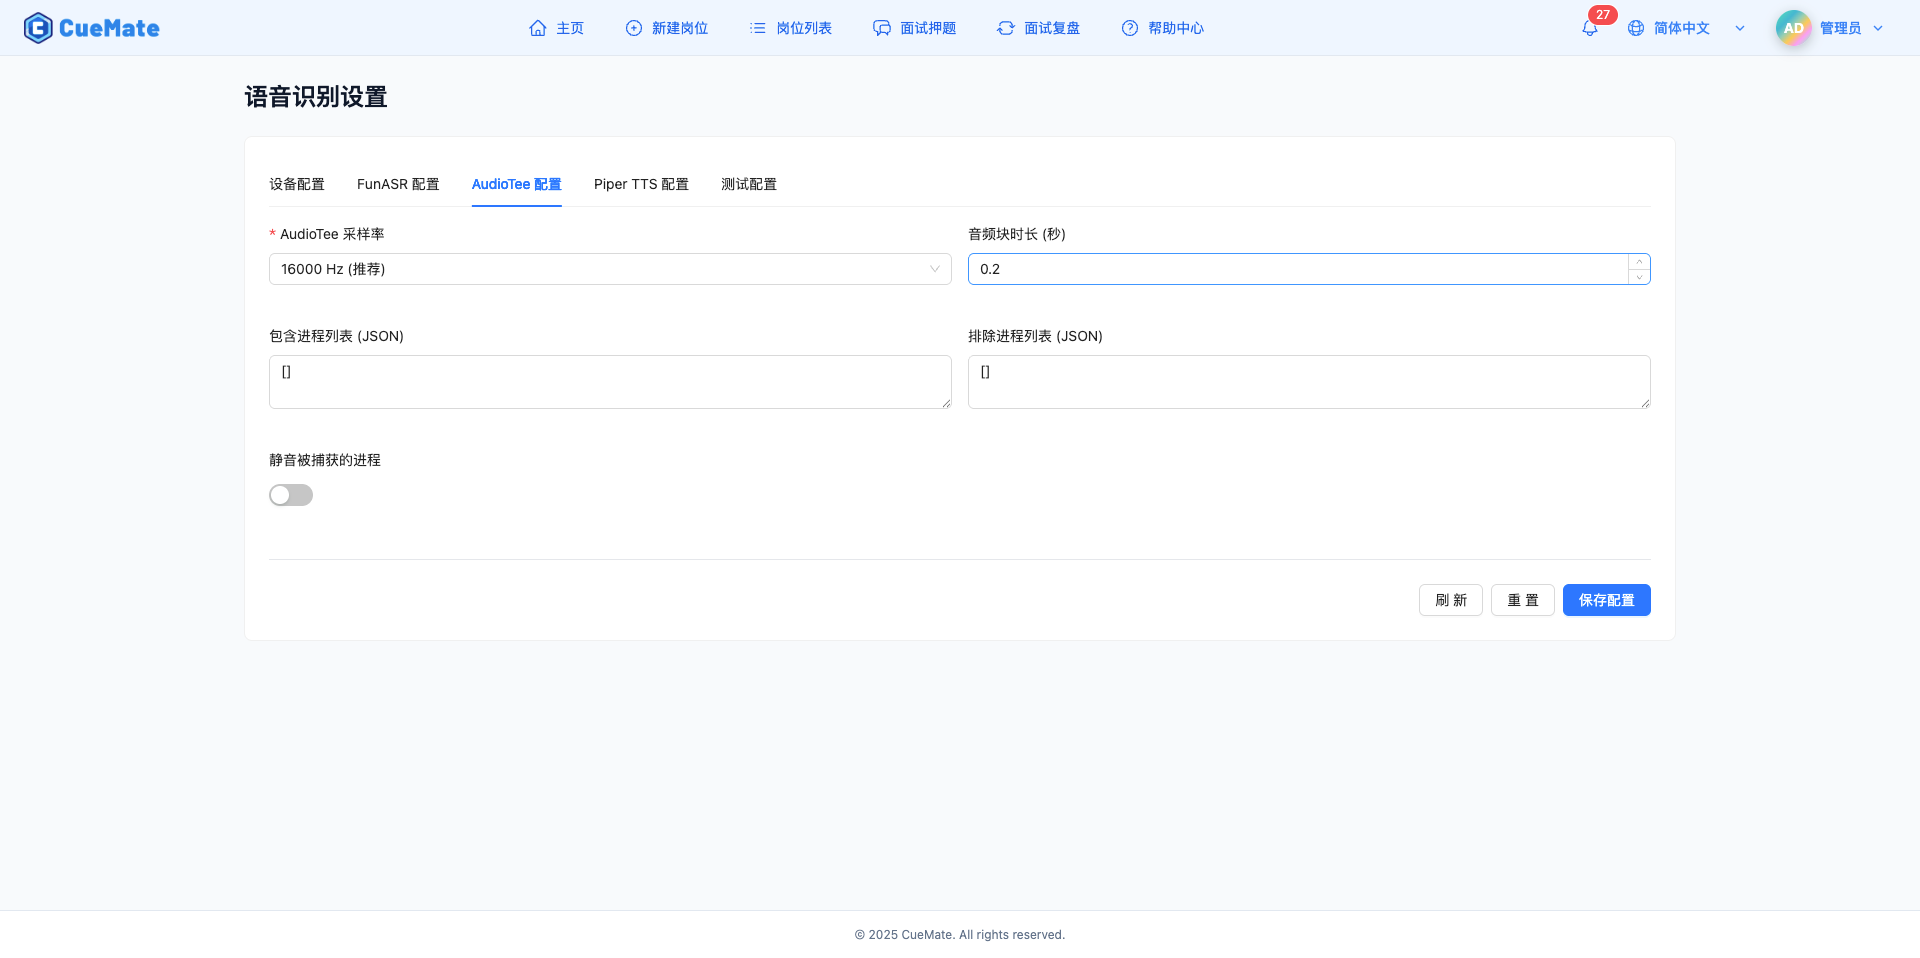
AudioTee sampling rate
- Sample rate for system audio capture
- Default: 16000 Hz (recommended)
- Optional values: 8000/16000/22050/24000/32000/44100/48000 Hz
- It is recommended to use 16000 Hz, consistent with the FunASR sampling rate
Audio chunk duration (seconds)
- Duration of each audio chunk
- Default: 0.2 seconds
- Value range: 0.1-2.0 seconds
- Smaller values result in lower latency, but higher processing frequency
4.3 Process filtering configuration
AudioTee supports filtering the audio of specific processes to achieve accurate capture.
Contains process list (JSON)
- Only capture the audio of the specified process
- Format: JSON string array
- Example:
["1234", "5678"] - Leave blank to capture all process audio
Exclude process list (JSON)
- Exclude audio from specified processes
- Format: JSON string array
- Example:
["9999"] - Used to filter unwanted audio sources
Process filtering logic
- If "Include process list" is set, only the audio of processes in the list will be captured.
- If "Exclude Process List" is set, the audio of the processes in the list will not be captured.
- The two lists can be combined
Usage Scenario
- Only capture the audio of Tencent Conference: Include the process list to fill in the process ID of Tencent Conference
- Exclude the audio of the music player: fill in the process ID of the music player in the excluded process list
- Capture all system audio by default: leave both lists empty
[]
Get process ID (macOS)
# Find Tencent conference process ID
ps aux | grep "TencentMeeting"

# Find the Zoom process ID
ps aux | grep "zoom.us"
4.4 Silent control
Mute the captured process
- Switch controls whether to mute captured process audio
- When turned on, captured audio will not be played from the speakers
- After closing, capture while playing audio normally -Default: off
Usage Scenario
- If you want a quiet environment during the interview, turn on mute
- If you need to hear the interviewer's voice, turn off mute
- If you don’t want to disturb others when recording, turn on mute
5. Piper TTS Configuration
5.1 Introduction to Piper TTS
Piper TTS is a native neural network speech synthesis system that converts text into natural and smooth speech. The desktop client uses Piper TTS to read the AI-generated answers.
Technical Implementation
- Piper TTS has been packaged as a standalone executable via PyInstaller
- Built-in Python runtime and all necessary dependencies
- No need for users to separately install Python or configure the environment
- Distributed with desktop client, ready to use out of the box
- Supports two voice models: Chinese (Fairy Girl Voice) and English (Amy Girl Voice)
5.2 Voice configuration
On the "Piper TTS Configuration" tab, configure the speech synthesis parameters.
Note: All configurations have default values by default and do not need to be modified.
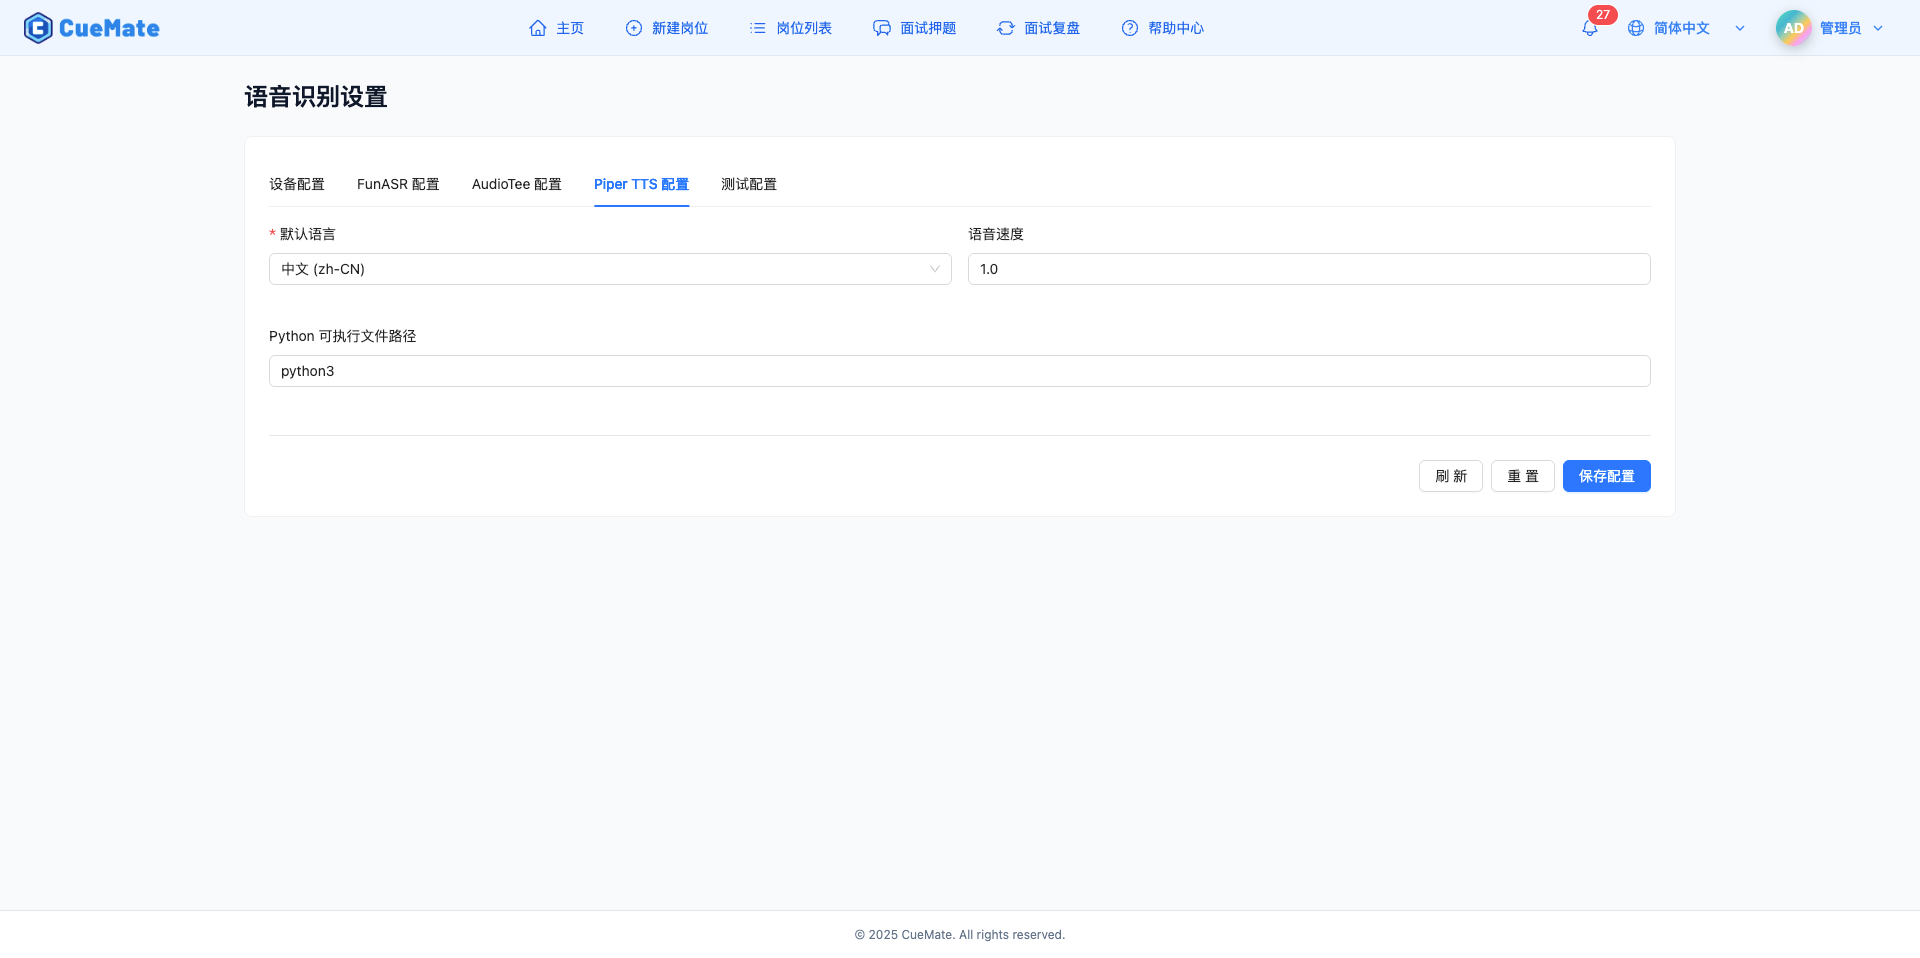
Default language
- Select the default language for TTS speech synthesis
- Chinese (zh-CN): Use the Chinese model of Huayan Girl
- English (en-US): Use Amy female English model
- The corresponding voice will be automatically selected according to the interface language set by the user
Voice Speed
- Control the speed of voice reading
- Default: 1.0 (normal speed)
- Value range: 0.5-2.0
- 0.5 means slow, 2.0 means fast
- It is recommended to use a value between 0.8-1.2
Suggestions for Speech Speed Selection
- 0.5-0.7: Learning mode, slow understanding
- 0.8-1.0: Normal mode, comfortable and natural
- 1.1-1.5: Quick mode, save time
- 1.6-2.0: Extreme speed mode, quick browsing
Usage Scenario
- For Chinese interviews, select "Chinese (zh-CN)"
- For English interviews, select "English (en-US)"
- Reduce the speech speed when the answer is long to make it easier to understand
- Increase your voice speed for faster browsing when time is tight
Configuration recommendations
- The voice language should be consistent with the interface language set by the system
- It is recommended that the speech speed be between 0.9-1.1. Too fast or too slow will be unnatural.
NOTE
About Python dependencies: The desktop client has built-in Piper TTS independent executable file (packaged using PyInstaller), no need to install Python and piper-tts dependencies separately. All necessary components are distributed with the application.
6. Test configuration
6.1 Test parameters
On the "Test Configuration" tab, configure the test parameters of the audio device and speech recognition.
Note: All configurations have default values by default and do not need to be modified.
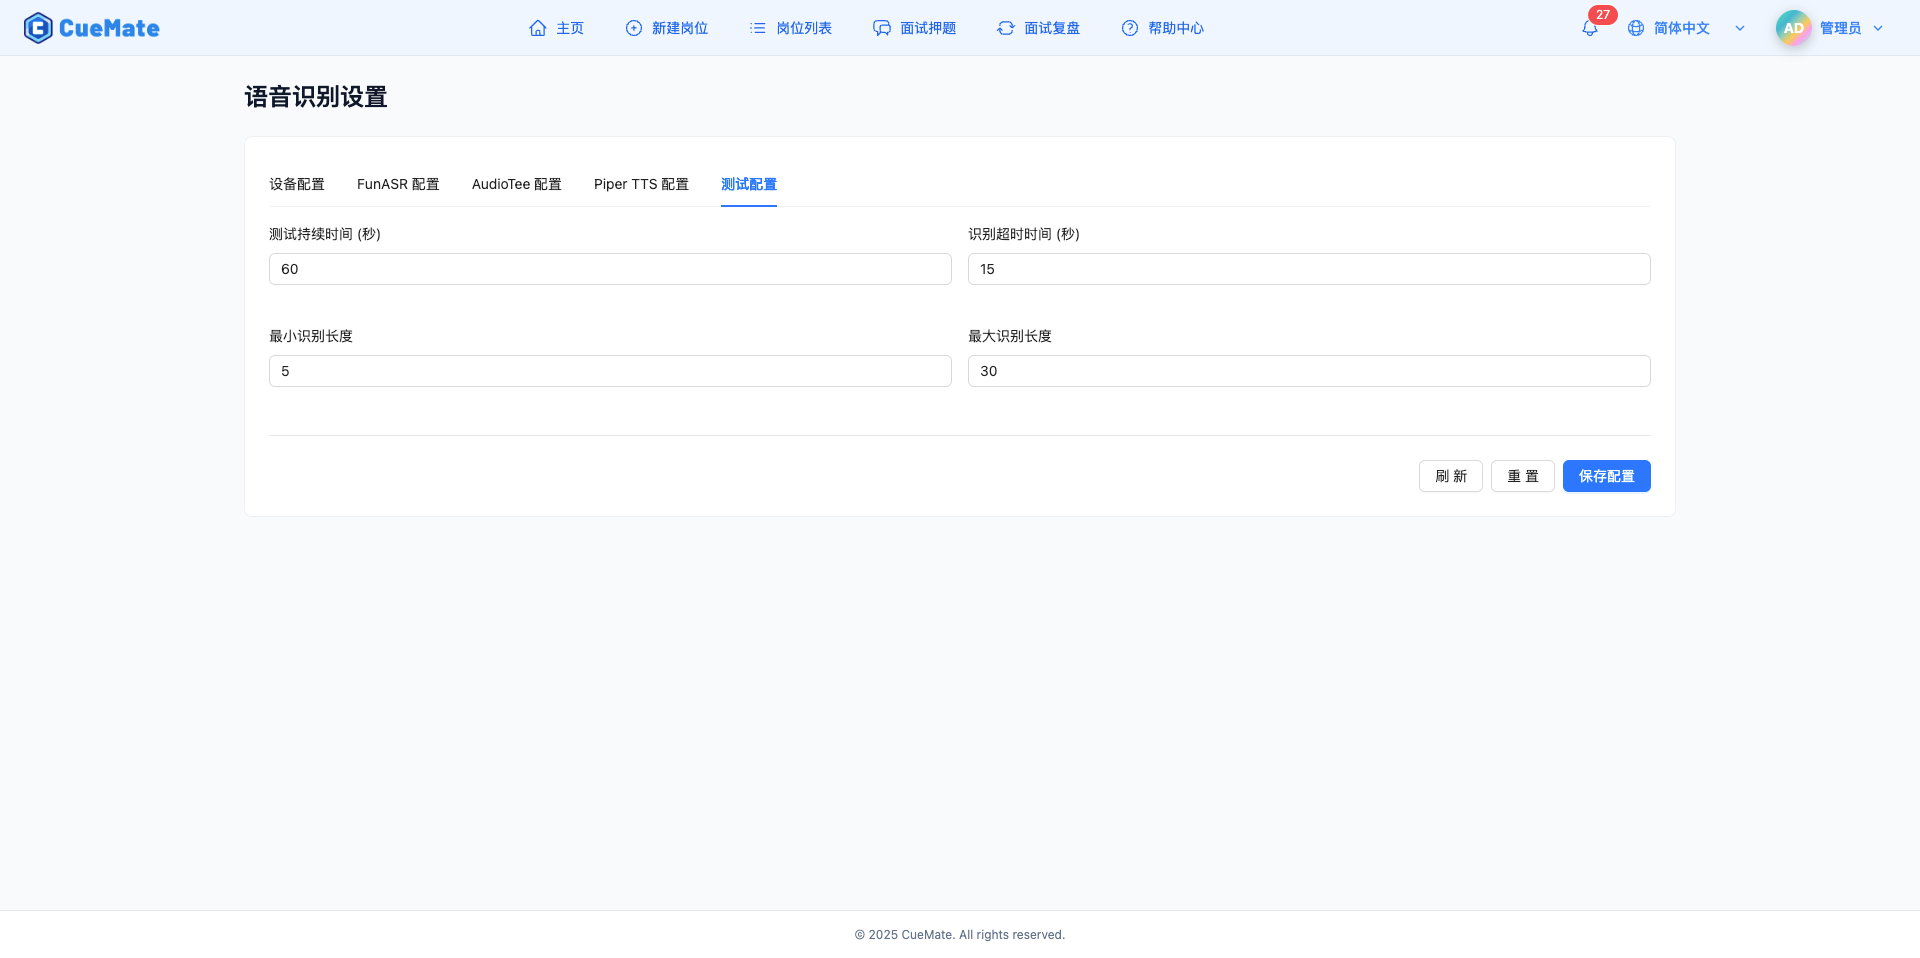
Test duration (seconds)
- Maximum duration of device testing
- Default: 60 seconds
- Value range: 10-300 seconds
- Automatically stop testing after time expires
Identification timeout (seconds)
- Timeout for speech recognition
- Default: 15 seconds
- Value range: 5-60 seconds
- If the voice is not recognized within the time limit, the recognition will be considered failed.
6.2 Identification length limit
Minimum recognition length
- Minimum number of characters for recognition results
- Default value: 5
- Value range: 1-50
- Recognition results shorter than this length may be filtered
Maximum recognition length
- The maximum number of characters in the recognition result
- Default value: 30
- Value range: 10-200
- Recognition results exceeding this length may be truncated
Usage Scenario
- Filter short speech sounds (such as "um", "ah") and set the minimum recognition length to 5
- Limit long sentence recognition to set the maximum recognition length
- You can adjust these parameters to observe the effect during testing
7. Save and reset
7.1 Save configuration
Click the "Save Configuration" button at the bottom to save all configurations to the server.
Save process
- Click the "Save Configuration" button
- Verify that all required fields are filled in correctly
- Submit the configuration to the server
- The server saves the configuration and returns confirmation
- Display the "Configuration Saved" success prompt
- Desktop client automatically synchronizes new configurations
SAVE CONTENT
- Device configuration (microphone, speakers)
- FunASR configuration (host, port, mode, etc.)
- AudioTee configuration (sampling rate, process filtering, etc.)
- Piper TTS configuration (language, speech speed, etc.)
- Test configuration (test time, recognition length, etc.)
IMPORTANT NOTE
- After modifying the configuration, you must click "Save Configuration" to take effect.
- Desktop client will automatically synchronize the latest configuration
- It is recommended to modify the configuration and test during non-interview time
7.2 Reset configuration
Click the "Reset" button at the bottom to restore all configurations to default values.
Reset Operation
- Click the "Reset" button
- Restore all fields to default values
- It will not be saved automatically, you need to manually click "Save Configuration"
Default configuration value
Configuration name: ASR-Gateway
FunASR host: localhost
FunASR port: 10095
Recognition mode: online mode
Sampling rate: 16000 Hz
Audio block interval: 5
Start/middle/end block size: 5/10/5
AudioTee sampling rate: 16000 Hz
Audio chunk duration: 0.2 seconds
Process filter: empty []
Silent process: off
Piper default language: Chinese (zh-CN)
Voice speed: 1.0
Test duration: 60 seconds
Recognition timeout: 15 seconds
Minimum recognition length: 5
Maximum recognition length: 30
Usage Scenario
- Configuration modification error, restore default value
- Not sure how to configure, use default configuration
- Restore recommended configuration after testing is completed
7.3 Refresh the device
Click the "Refresh" button at the bottom to re-detect the audio device list.
Refresh function
- Request latest device list from desktop client
- Browser re-enumerates local audio devices
- Microphone and speaker drop-down boxes automatically updated
Usage Scenario
- Refresh after plugging in a new USB audio device
- Refresh after connecting Bluetooth headset
- Refresh when the device list displays abnormally
8. FAQ
8.1 Device list is empty
Issue: There are no device options for the microphone or speaker dropdowns.
Solution
- Click the "Refresh" button to re-detect the device
- Check whether the desktop client is running normally
- Confirm that the browser has granted microphone permission
- Check whether the audio device is connected to the system
- Restart the browser and desktop client
8.2 Failed to save configuration
Problem: Clicking the "Save Configuration" button prompts that the save failed.
Solution
- Check that all required fields are filled in
- Check whether the port number is in the range of 1-65535
- Check whether the process list in JSON format is correct
- Check the browser console for error messages
- Check whether the network connection is normal
8.3 FunASR connection failure
Issue: After the configuration is saved, the desktop client cannot connect to the FunASR service.
Solution
- Check whether the FunASR host address and port are correct
- Confirm whether the FunASR Docker container is running normally
docker ps | grep FunASR- Test whether the FunASR service is accessible
curl ws://localhost:10095- Check if the firewall is blocking the connection
- View FunASR container logs
docker logs FunASR8.4 System Audio Capture Not Working
Issue: System audio capture is configured, but the audio from the interview software cannot be captured.
Solution (macOS)
- System Preferences > Security & Privacy > Screen Recording
- Allow CueMate or desktop client to access screen recording permissions
- Check whether the process filtering configuration is correct
- Confirm that the interview software is playing audio
- Try turning off the "Mute captured processes" switch
- Check the desktop client logs for error messages
Solution (Windows)
- Check if the correct speaker device is selected
- Confirm that interview software is playing audio
- Test with "System Audio Test" feature
- Check Windows audio settings:
- Right-click speaker icon > Sound Settings
- Confirm output device is correct
- Restart CueMate application
- Check desktop client logs at:
%APPDATA%\cuemate-desktop-client\data\logs\
8.5 Piper TTS No sound
Question: Piper TTS is configured, but there is no sound when playing answers.
Solution
- Check whether the speaker device is selected correctly
- Make sure the system volume is not muted
- Check whether the Piper TTS language setting matches the content (Chinese content needs to select Chinese voice)
- Check the desktop client logs for TTS errors
- macOS:
~/Library/Application Support/cuemate-desktop-client/data/logs/
- Confirm whether the Piper TTS binary file is normal
- Binary file location:
resources/piper-bin/piper - If files are missing or damaged, please reinstall the desktop client
NOTE
Piper TTS is built into the desktop client as a standalone executable, no need to install Python or piper-tts package separately. If you encounter problems, it's usually a configuration or system permissions issue rather than a missing dependency.
8.6 Speech recognition accuracy is low
Problem: Speech recognition often recognizes errors or fails to recognize it.
Solution
- Check whether the microphone device is working properly
- Choose a quiet environment to reduce background noise
- Adjust the microphone position to be closer to the speaker
- Pronounce clearly, speak at a moderate speed, and avoid rapid continuous reading.
- Try increasing the FunASR sampling rate to 48000 Hz
- Switch the recognition mode to "two-pass mode" to improve accuracy
8.7 High recognition delay
Problem: The recognition results are not displayed until a long time after speaking.
Solution
- Reduce the FunASR audio block interval (such as changing to 3)
- Reduce the FunASR block size (such as start/middle/end to 3/6/3)
- Reduce the AudioTee audio block duration (such as changing to 0.1 seconds)
- Use a wired microphone to avoid Bluetooth delays
- Check system resource usage and close unnecessary programs
- Confirm that the network connection is normal and the delay is low
Related pages
- System Settings - Configure system parameters such as language, theme, time zone, etc.
- Interview Questions - Start the voice interview and test the speech recognition effect
- Log Management - View ASR service logs and troubleshoot problems
- Container Monitor - View FunASR container status