macOS Installation Guide
Welcome to CueMate! This guide will help you install CueMate on your macOS system. The entire process is simple and quick, taking only a few minutes to complete.
1. System Requirements
IMPORTANT
Please confirm your Mac meets the minimum requirements before installation, otherwise it may cause installation failure or abnormal operation.
Before installing CueMate, please ensure your Mac meets the following requirements:
1.1 Hardware and System
| No. | Item | Requirement | Description |
|---|---|---|---|
| 1 | Operating System | macOS 13.0 (Ventura) or later | Supports the latest macOS |
| 2 | Processor | Apple Silicon (M1/M2/M3) or Intel chip | Supports both architectures |
| 3 | Memory | >= 4GB RAM | Ensures smooth operation |
| 4 | Disk Space | >= 10GB available | SSD recommended |
| 5 | Network | Stable internet connection | For downloading packages and AI services |
1.2 Port Availability Check
CueMate requires the following ports. Please ensure these ports are not occupied by other programs:
| No. | Port | Service Name | Description |
|---|---|---|---|
| 1 | 3001 | Web API Service | Backend API service |
| 2 | 3002 | LLM Router Service | Large language model routing |
| 3 | 3003 | RAG Knowledge Base Service | Knowledge retrieval service |
| 4 | 3004 | Main Window Service | Provides main window access |
| 5 | 8000 | ChromaDB Vector Database | Vector data storage |
| 6 | 10095 | Speech Recognition Service | Real-time speech-to-text |
Note: The installation wizard will automatically detect port availability. If there are conflicts, solutions will be provided. See Step 7: Port Check.
1.3 Dependencies
| No. | Dependency | Version Requirement | Description |
|---|---|---|---|
| 1 | Docker Desktop | >= 4.0 | CueMate backend service runtime environment |
TIP
- Offline Package: Includes Docker Desktop installer, no need to pre-install
- Online Package: Requires user to install Docker Desktop separately
Note: If Docker Desktop is not installed, the installation wizard will provide automatic installation options. See Step 6: Docker Check.
2. Download Installation Package
2.1 Choose Installation Package Type
CueMate offers two types of installation packages. Please choose according to your needs:
| Type | Description | Size | Suitable Scenarios |
|---|---|---|---|
| Offline Package | Includes Docker Desktop, all Docker images and speech models, ready to use | ~4.4GB | No network environment, first-time installation |
| Online Package | Requires Docker Desktop installation, pulls images and models from network during installation | ~670MB | Good network, already have Docker |
TIP
- First-time installation is recommended to use the offline package, which includes all dependencies without additional downloads
- Users who have already installed Docker Desktop can use the online package for faster download
IMPORTANT
Online Package Users Note: When CueMate starts for the first time, the speech recognition service (cuemate-asr) will automatically download the FunASR speech model (~1.7GB). Speech recognition will be temporarily unavailable during download. Please ensure good network connectivity and wait patiently for the download to complete.
The offline package includes the built-in speech model, no additional download required, ready to use upon startup.
2.2 Choose Deployment Mode
CueMate supports two deployment modes, selectable during installation:
| Mode | Description | Suitable Scenarios |
|---|---|---|
| Local Mode | All services run on local Mac | Personal use, local development |
| Server Mode | Backend services deployed to remote Linux server, local only runs lightweight client | Multi-device sharing, stronger server resources |
For detailed deployment mode selection interface, refer to Step 3: Deployment Mode.
NOTE
- Local Mode: Ready to use out of the box, all data stored locally
- Server Mode: Requires a Linux server, client connects to server via SSH to manage backend services
2.3 Determine Your Mac Chip Type
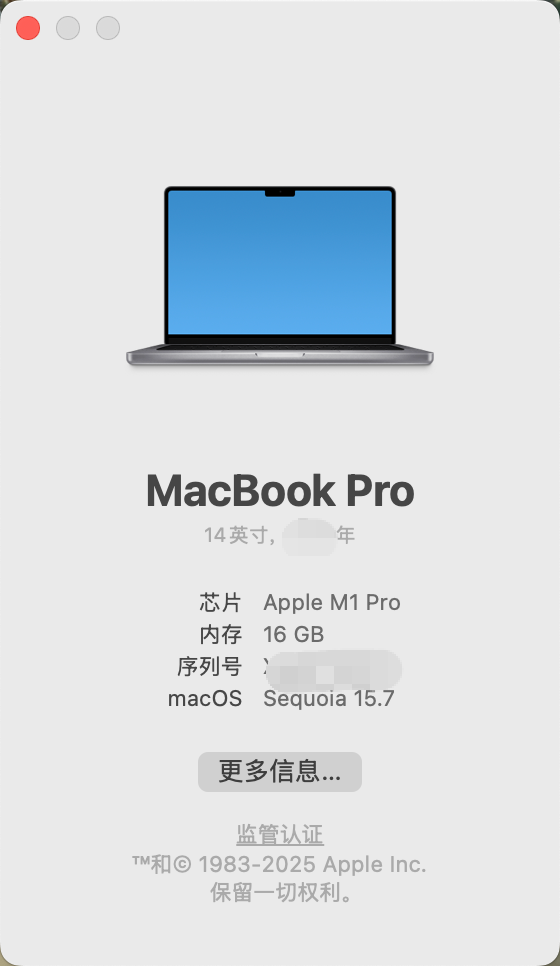
Click the Apple Menu in the top-left corner of the screen → About This Mac, and check the Chip or Processor information:
- If you see "Apple M1", "Apple M2", or "Apple M3", download the Apple Silicon version (arm64)
- If you see "Intel", download the Intel version (x64)
2.4 Choose Download Channel
CueMate provides two download channels. Please choose based on your network environment:
Option 1: Baidu Netdisk (Recommended for Users in China)
Download Link: https://pan.baidu.com/s/15jwZHy8YkDa4cEDLIYRo9Q?pwd=3477
Extraction Code: 3477
Scan QR Code to Access:

Download Steps:
- Click the link above or scan the QR code to access Baidu Netdisk
- Enter extraction code
3477 - Select the corresponding version folder (e.g., v0.1.0)
- Download the installation package according to your chip type and package type:
| Chip Type | Offline Package | Online Package |
|---|---|---|
| Apple Silicon (M1/M2/M3) | CueMate-v0.1.1-macos-arm64-offline.dmg | CueMate-v0.1.1-macos-arm64-online.dmg |
| Intel | CueMate-v0.1.1-macos-x64-offline.dmg | CueMate-v0.1.1-macos-x64-online.dmg |
- Click the "Download" button to save locally
Advantage: Fast download speed within China, no VPN required
Option 2: GitHub Release (Recommended for International Users)
Visit the GitHub Releases page to download the latest version or historical versions:
Version List:
| Version | Release Date | Type | Major Updates | Download Link |
|---|---|---|---|---|
| v0.2.0 | 2026-01-31 | Feature Update | Windows release, Online/Offline packages, Server deployment mode, Multi-language support | GitHub Release Page |
| v0.1.1 | 2025-12-26 | Feature Update | Online/Offline packages, Server deployment mode, Multi-language support | GitHub Release Page |
| v0.1.0 | 2025-12-10 | Initial Release | Core features released | GitHub Release Page |
Choose Installation Package Type:
- Online Package (~670MB): Fast download, requires network to pull Docker images and speech models during installation
- Offline Package (~4.4GB): Large size, ready to use without network
Online Package Download (Recommended for users with good network):
- Visit GitHub Release Page
- Based on your chip type, download the corresponding online installer:
- Apple Silicon (M1/M2/M3):
CueMate-vX.X.X-macos-arm64-online.dmg - Intel Chip:
CueMate-vX.X.X-macos-x64-online.dmg
- Apple Silicon (M1/M2/M3):
- After download, double-click the
.dmgfile to start installation
Offline Package Download (Recommended for users with unstable network):
NOTE
Due to the large offline package size (~4.4GB), exceeding GitHub's 2GB single file limit, it has been split into multiple volumes for upload.
- Visit GitHub Release Page
- Based on your chip type, download all volume files:
- Apple Silicon (M1/M2/M3): Download all
CueMate-vX.X.X-macos-arm64-offline.dmg.part*files - Intel Chip: Download all
CueMate-vX.X.X-macos-x64-offline.dmg.part*files
- Apple Silicon (M1/M2/M3): Download all
- Place all volume files in the same directory
- Open Terminal and run the following command to merge the volumes:
# Apple Silicon (ARM64) version
cat CueMate-vX.X.X-macos-arm64-offline.dmg.part* > CueMate-vX.X.X-macos-arm64-offline.dmg

# Intel (x64) version
cat CueMate-vX.X.X-macos-x64-offline.dmg.part* > CueMate-vX.X.X-macos-x64-offline.dmg- After merging, double-click the
.dmgfile to start installation
Advantages: Global CDN acceleration, clear version management, supports checksum verification
After download completes, the installation package will be saved in your "Downloads" folder.
2.5 Open Installation Package
Double-click the downloaded .dmg file. macOS will automatically mount the disk image and pop up the installation window.

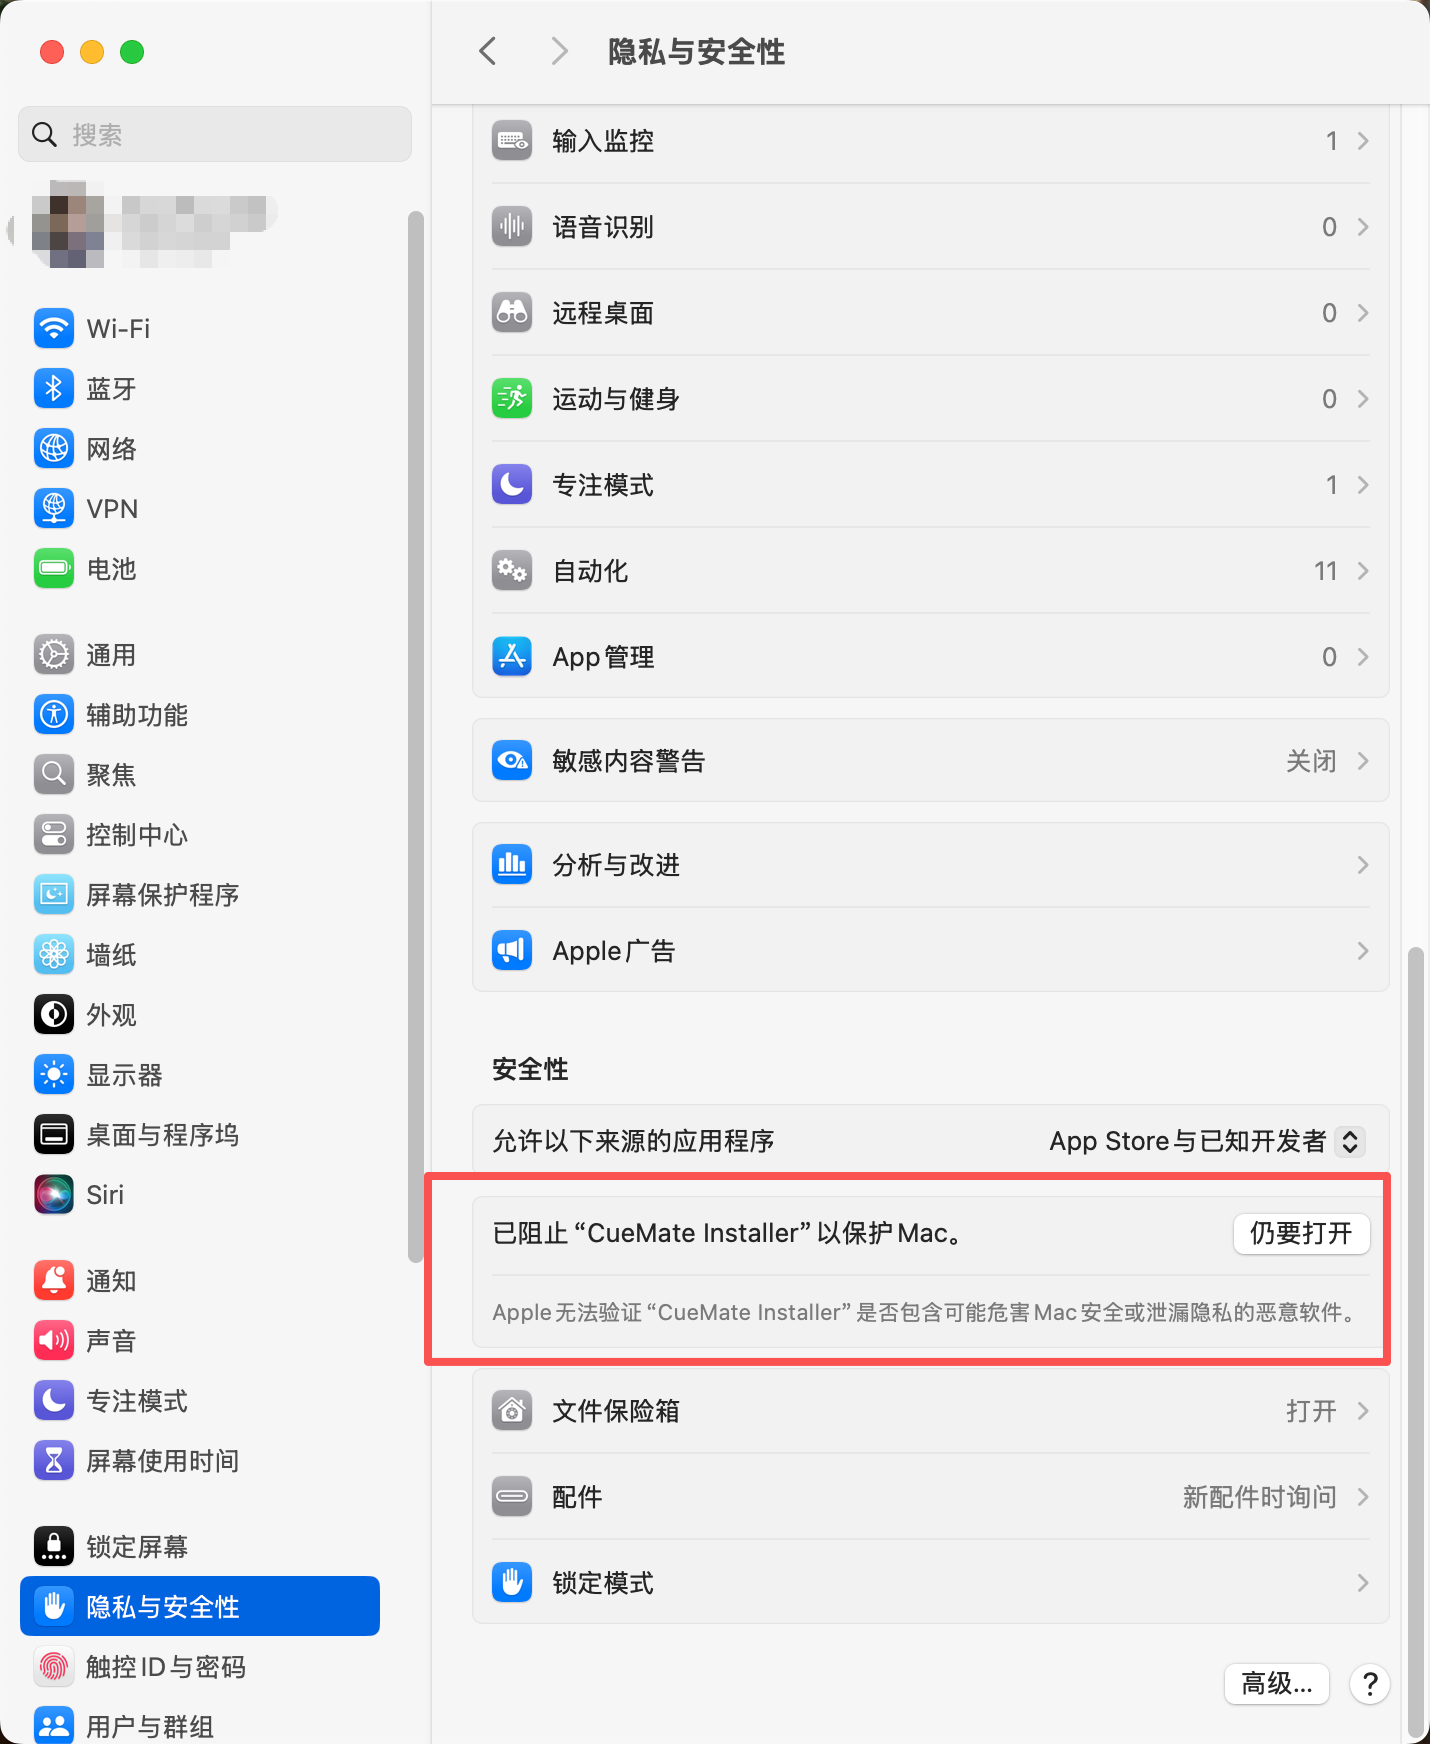
2.6 Handle Security Prompt
When running for the first time, macOS may display a security prompt: "CueMate Installer cannot be opened because it is from an unidentified developer."

NOTE
This is macOS's Gatekeeper security mechanism. The CueMate installer is safe, but since it has not been notarized by Apple, manual authorization is required for the first opening.
Solution:
- Open System Settings (or System Preferences)
- Go to Privacy & Security
- Scroll down to find the message "CueMate Installer was blocked"
- Click the Open Anyway button
3. Installation Steps
The installation wizard includes 10 steps and will automatically guide you through the entire installation process.
The installation wizard interface provides the following information and features:
- Language Switch (top right): Supports Simplified Chinese, Traditional Chinese, and English, switchable at any time
- Installation Mode (top label): Shows current package type, such as "Offline Installation" or "Online Installation"
- Deployment Mode (top label): Shows current deployment mode, such as "Local Mode" or "Server Mode", can be modified in Step 3
- Version Info (bottom left): Shows current installation wizard version number
3.1 Step 1: Welcome
After the installation wizard starts, it first displays the welcome screen, introducing CueMate's features and pre-installation preparation items.
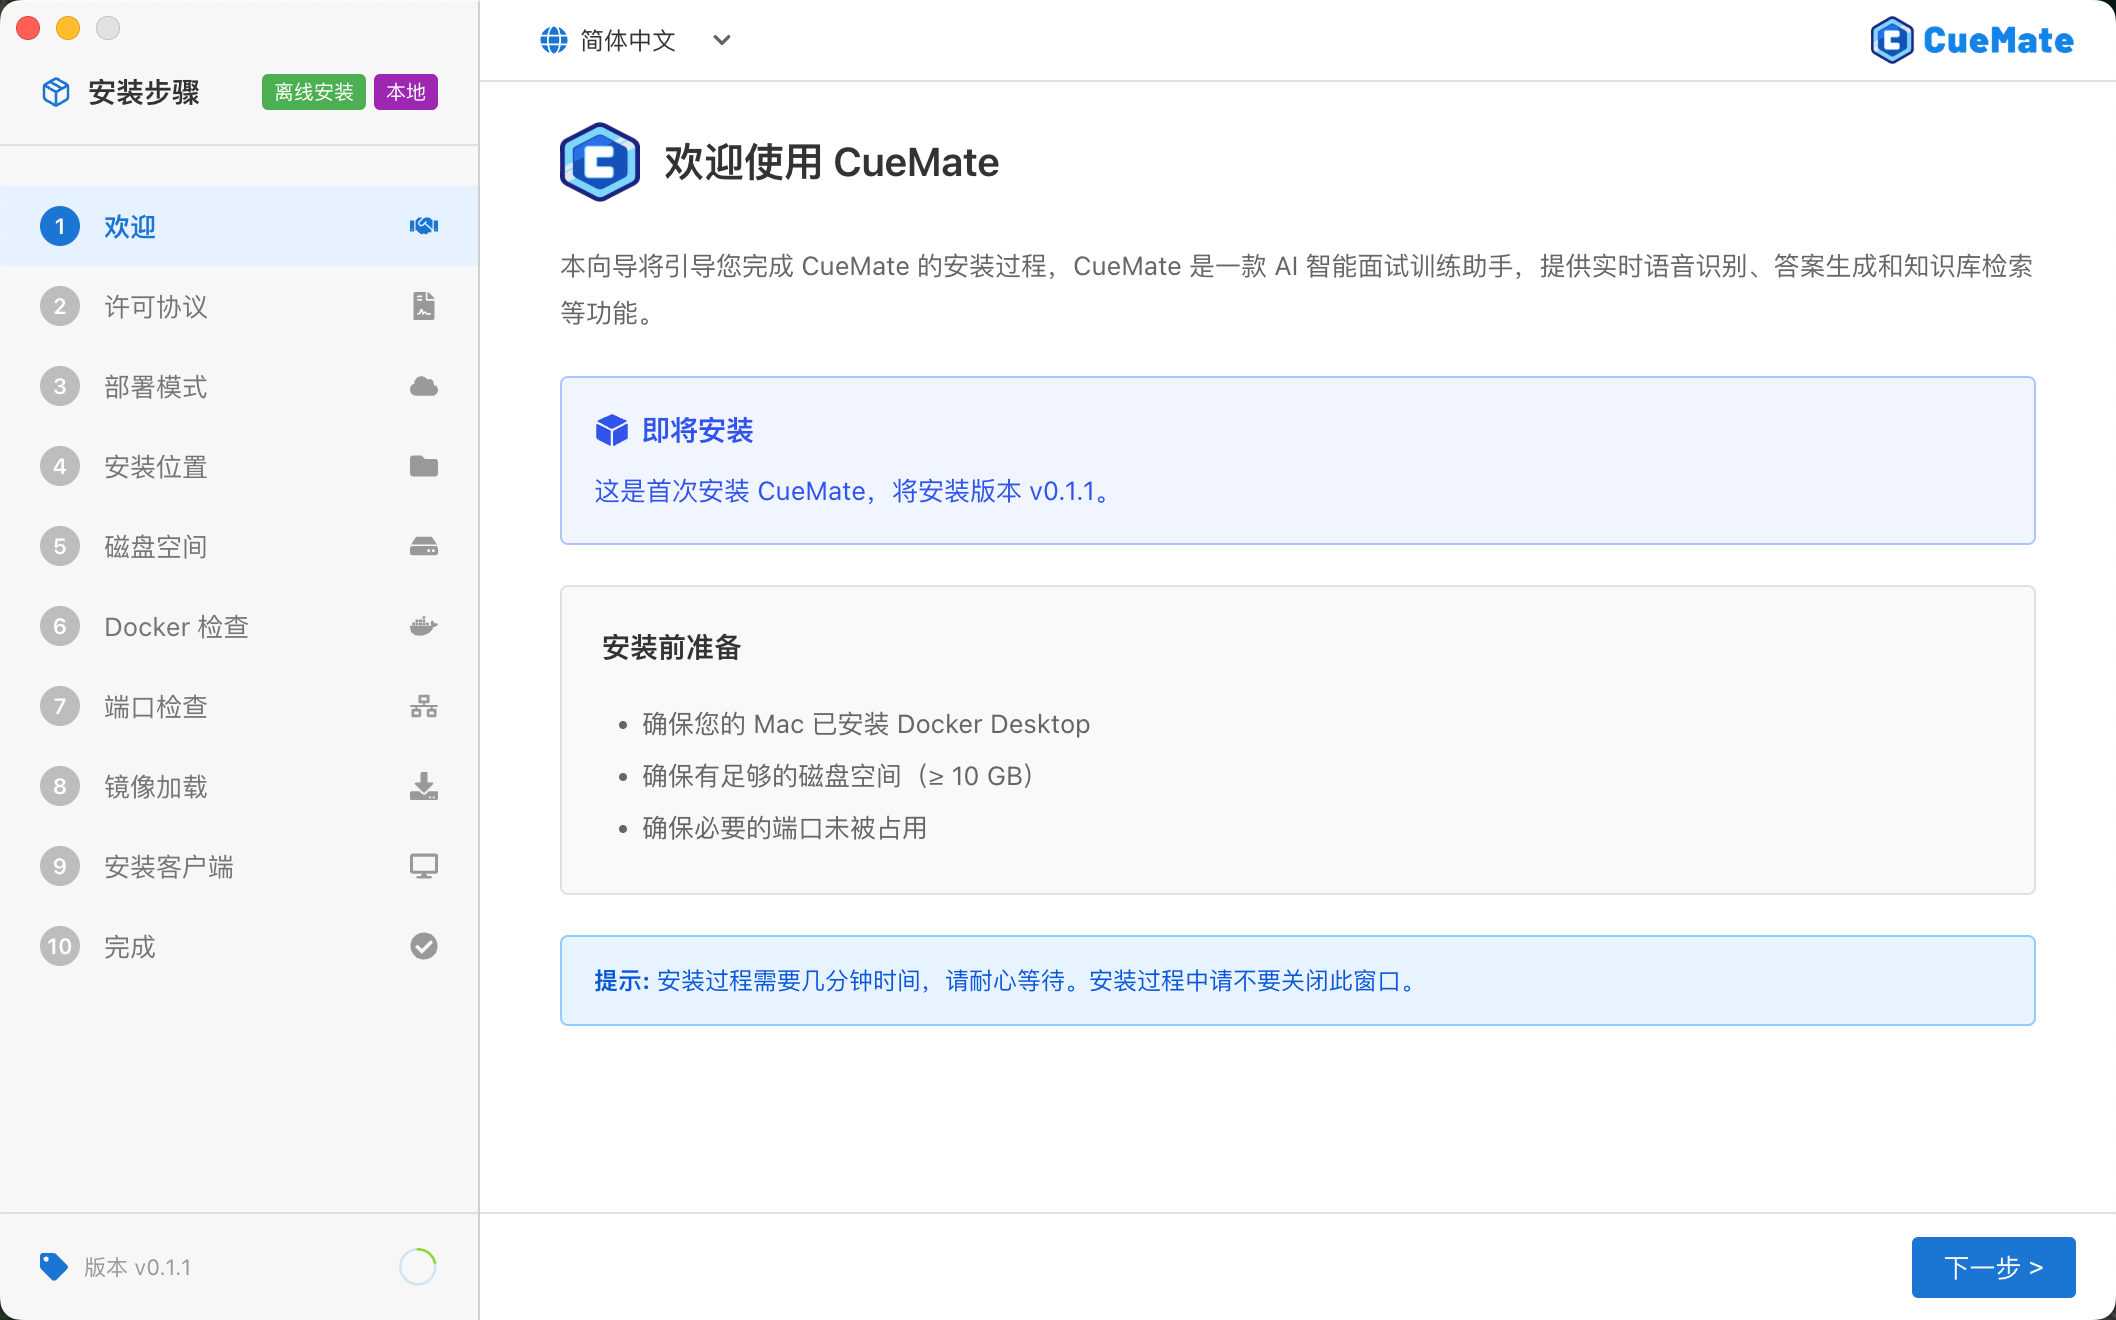
After reading the welcome information, click the Next button to continue.
3.2 Step 2: License Agreement
Read CueMate's software license agreement.
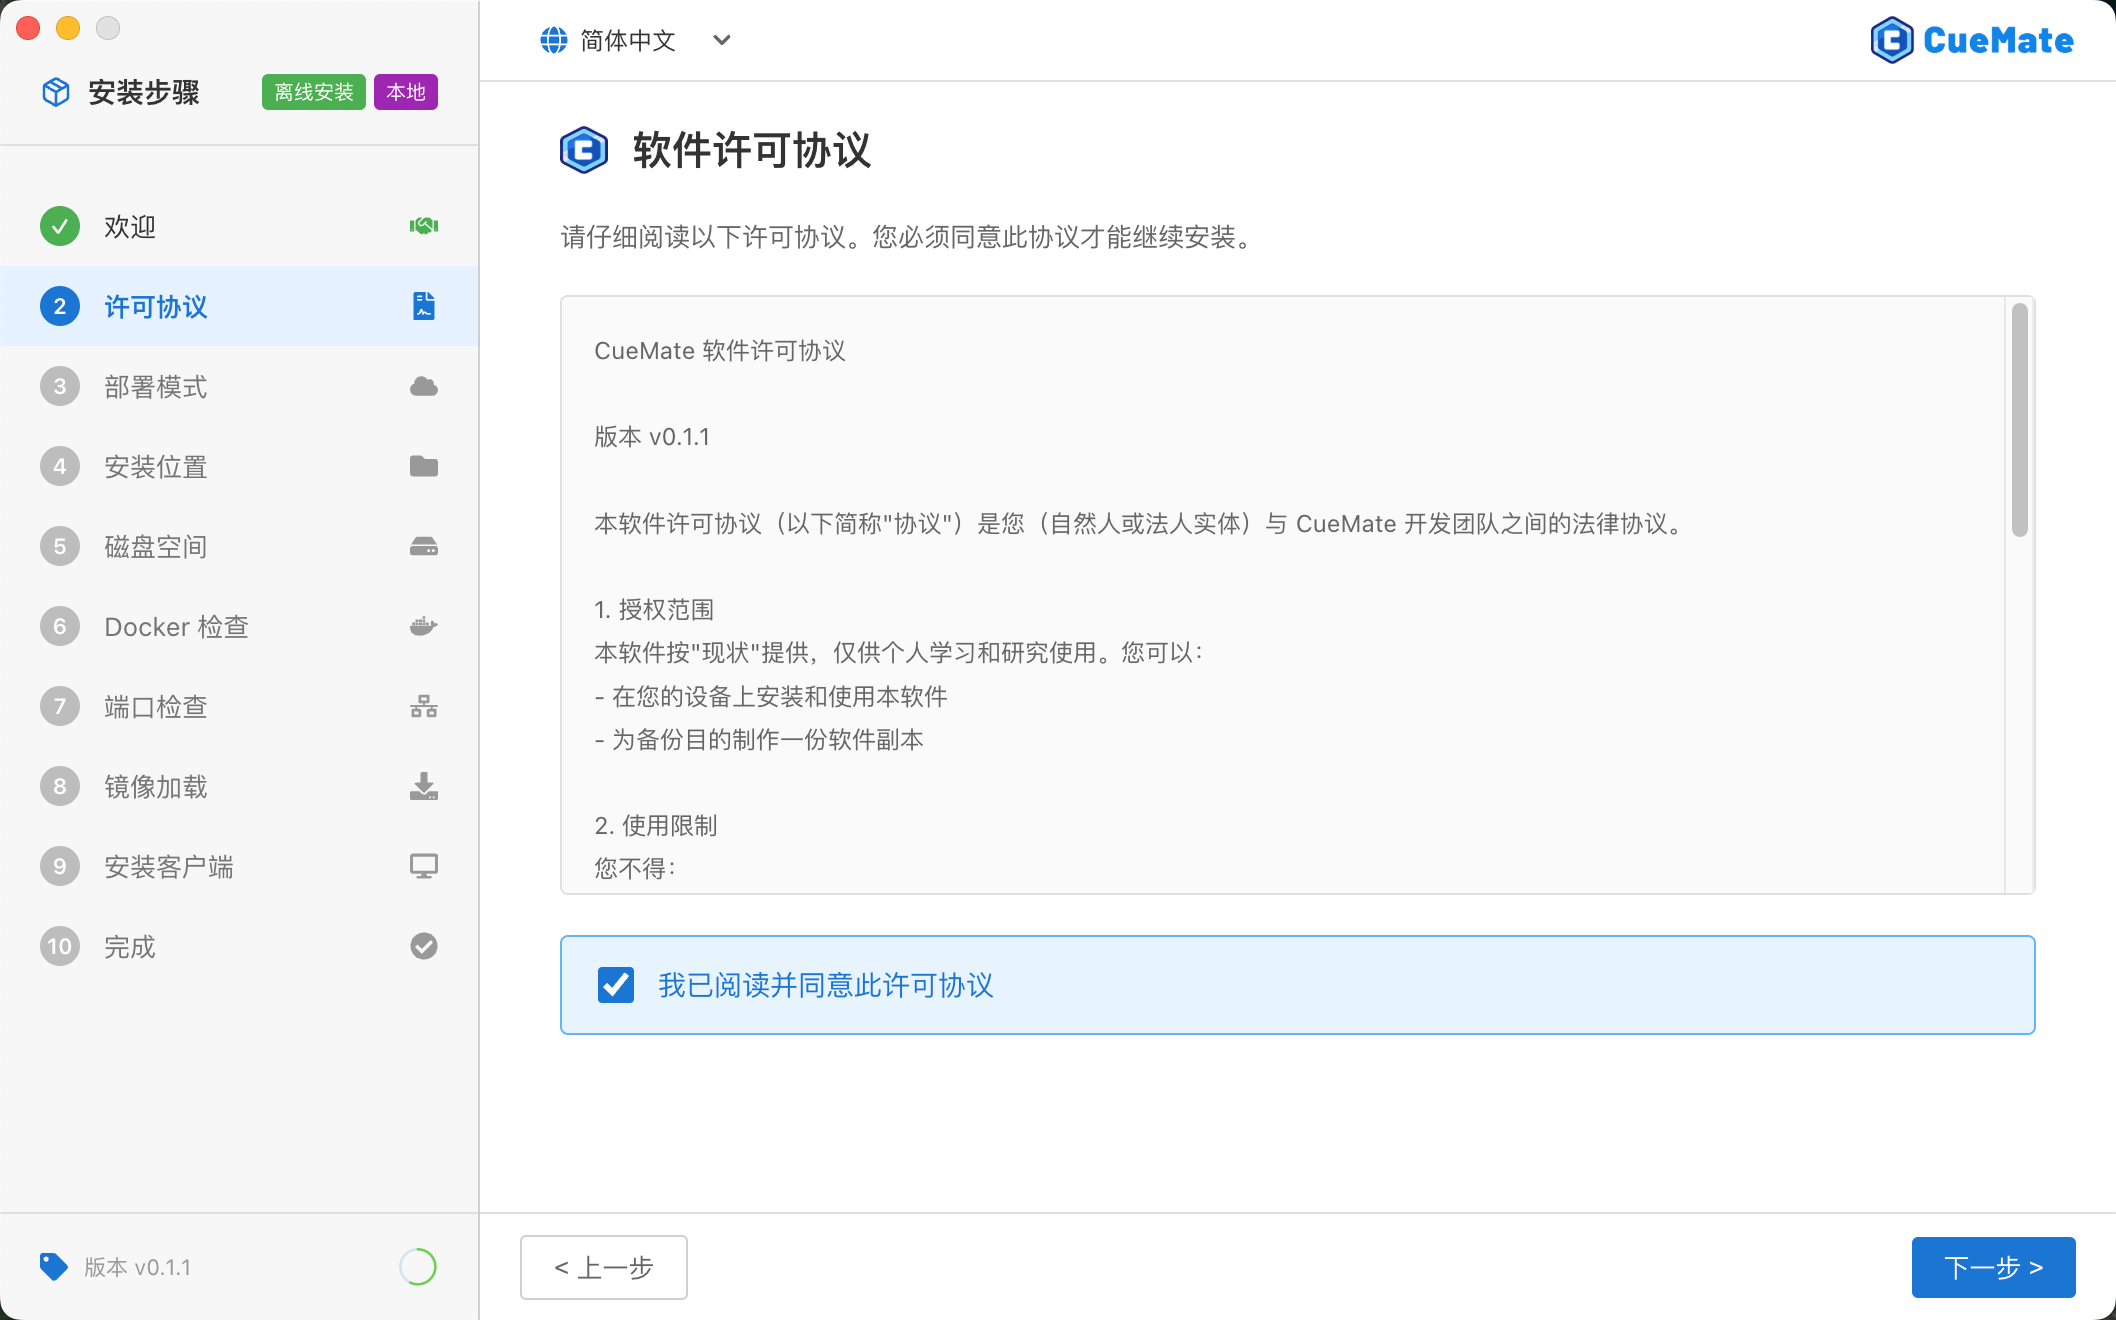
If you agree to the terms, check "I agree to the license agreement", then click the Next button.
3.3 Step 3: Deployment Mode
Select CueMate's deployment mode.
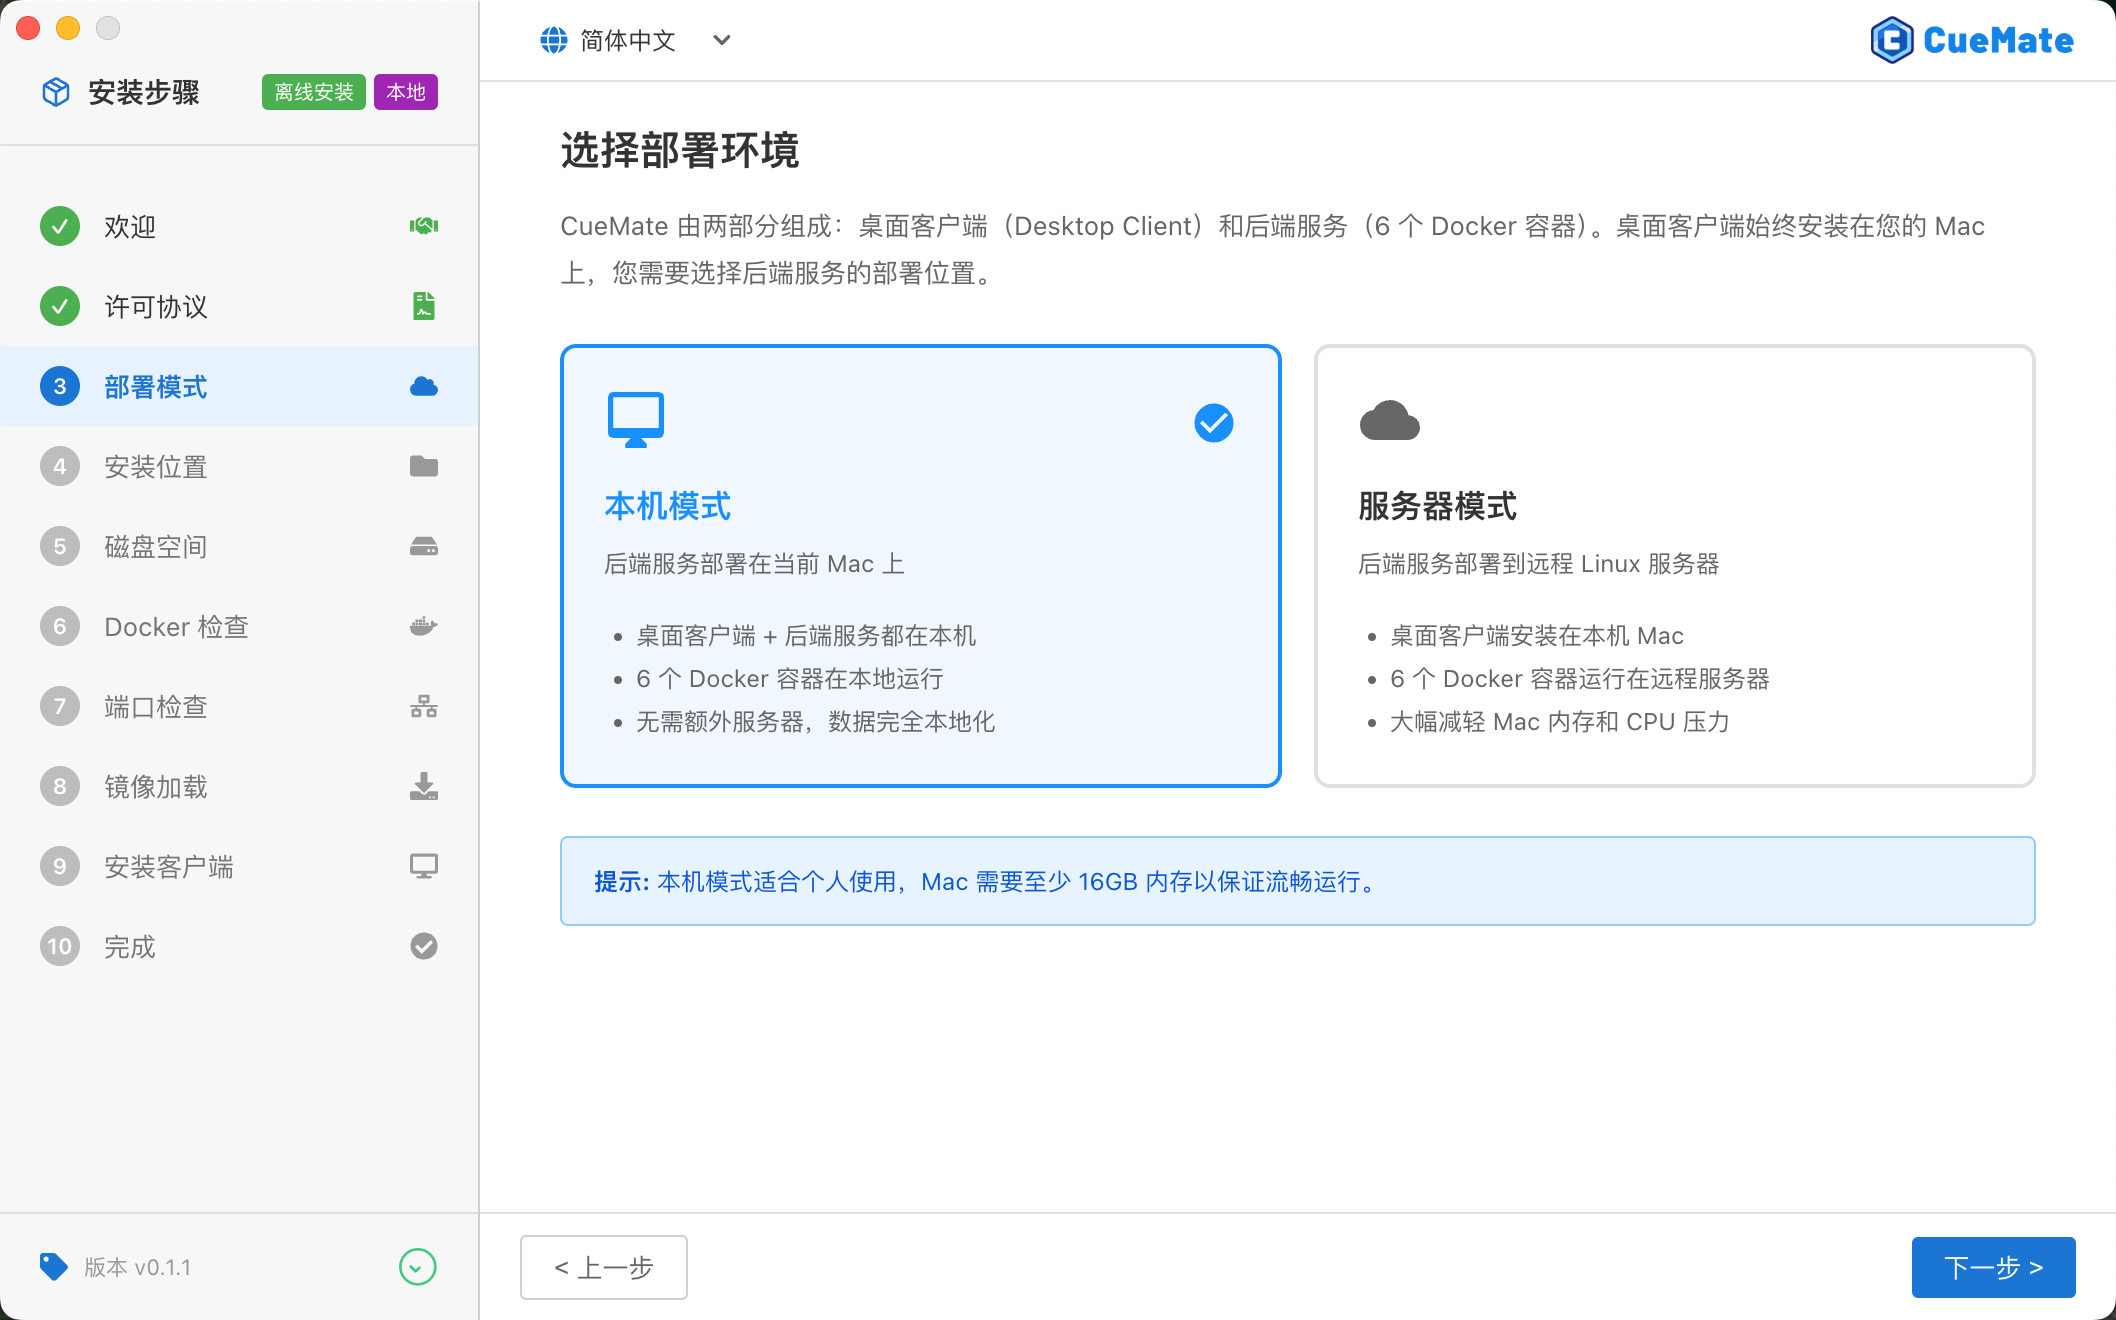
| Mode | Description | Suitable Scenarios |
|---|---|---|
| Local Mode | All services run on local Mac, ready to use out of the box | Personal use, local development, first-time experience |
| Server Mode | Backend services deployed to remote Linux server, local only runs lightweight client | Multi-device sharing, stronger server resources, team collaboration |
Local Mode (Default Recommended):
- All services run locally, no additional configuration required
- Data stored locally, better privacy
- Suitable for most users
Server Mode:
- Requires a Linux server (Ubuntu 20.04+ or CentOS 7+)
- Local Mac only acts as client, low resource usage
- Supports multiple Macs sharing the same backend service
- Installation wizard will guide you to configure server SSH connection information
TIP
If you're unsure which mode to choose, we recommend selecting Local Mode. You can switch to Server Mode later in system settings.
Server Mode Configuration Requirements
If you choose Server Mode, ensure the remote Linux server meets the following conditions:
Server Hardware Requirements:
| Item | Minimum Requirement | Recommended |
|---|---|---|
| CPU | 2 cores | 4 cores or more |
| Memory | 4GB | 8GB or more |
| Disk | 20GB available space | 50GB SSD |
| System | Ubuntu 20.04+ / CentOS 7+ | Ubuntu 22.04 LTS |
Server Software Requirements:
- Docker 20.10+ and Docker Compose 2.0+
- Installation wizard will automatically detect, prompts if not installed
Security Group/Firewall Port Configuration:
The server needs to open the following ports for local client access to backend services:
| Port | Protocol | Service | Purpose | Must Open |
|---|---|---|---|---|
22 | TCP | SSH | Installation wizard connects to server | Yes |
3001 | TCP | Web API | Backend API | Yes |
3002 | TCP | LLM Router | Large model routing | Yes |
3003 | TCP | RAG Service | Knowledge retrieval | Yes |
3004 | TCP | Web Service | Main interface access | Yes |
8000 | TCP | ChromaDB | Vector database | Yes |
10095 | TCP | ASR | Speech recognition | Yes |
IMPORTANT
Cloud Server Security Group Configuration:
- For cloud servers like AWS, Azure, GCP, Alibaba Cloud, Tencent Cloud, etc., you need to add inbound rules in the "Security Group" section of the console
- Source can be set to
0.0.0.0/0(allow all IPs) or specify your local public IP - It's recommended to only allow your office network IP for better security
Cloud Server Security Group Configuration Example (Using Alibaba Cloud as Example):
- Log in to Alibaba Cloud console and go to ECS instance page
- Click instance ID to enter instance details
- Click "Security Groups" in the left menu
- Click "Configure Rules" button
- Click "Add Rule" and add the following inbound rule:
Protocol Type: Custom TCP
Port Range: 22,3001-3004,8000,10095
Source: 0.0.0.0/0 (or your public IP)
Description: CueMate service ports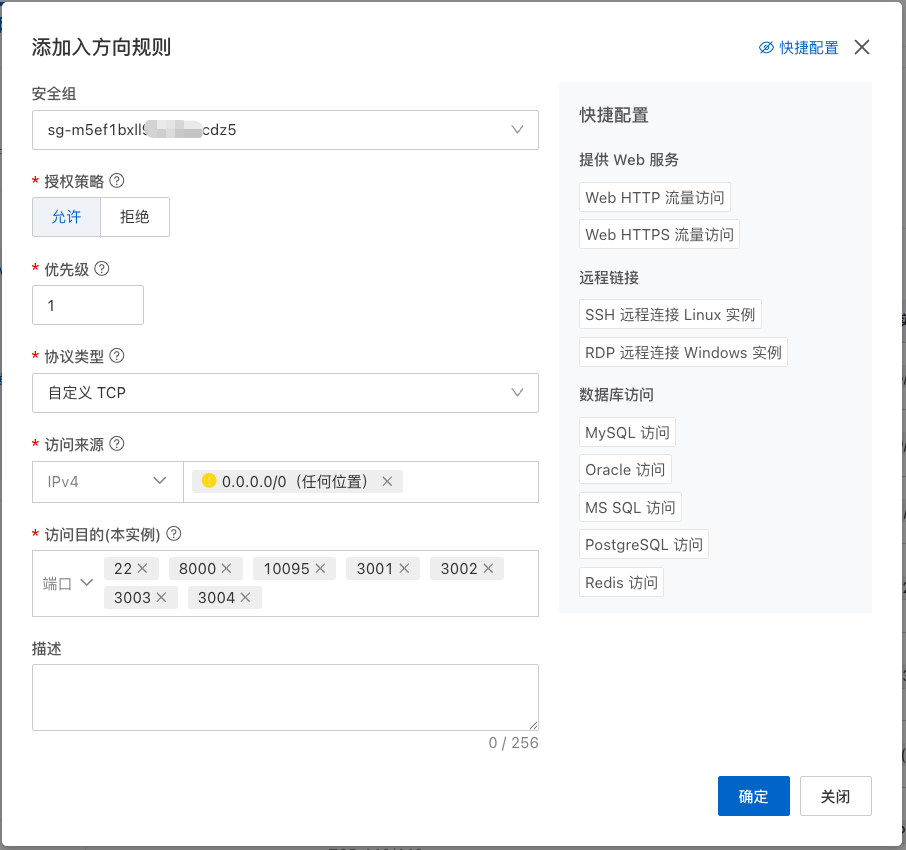
After selecting the deployment mode, click the Next button to continue.
3.4 Step 4: Installation Location
Based on the deployment mode selected in the previous step, the interface will differ.
Local Mode
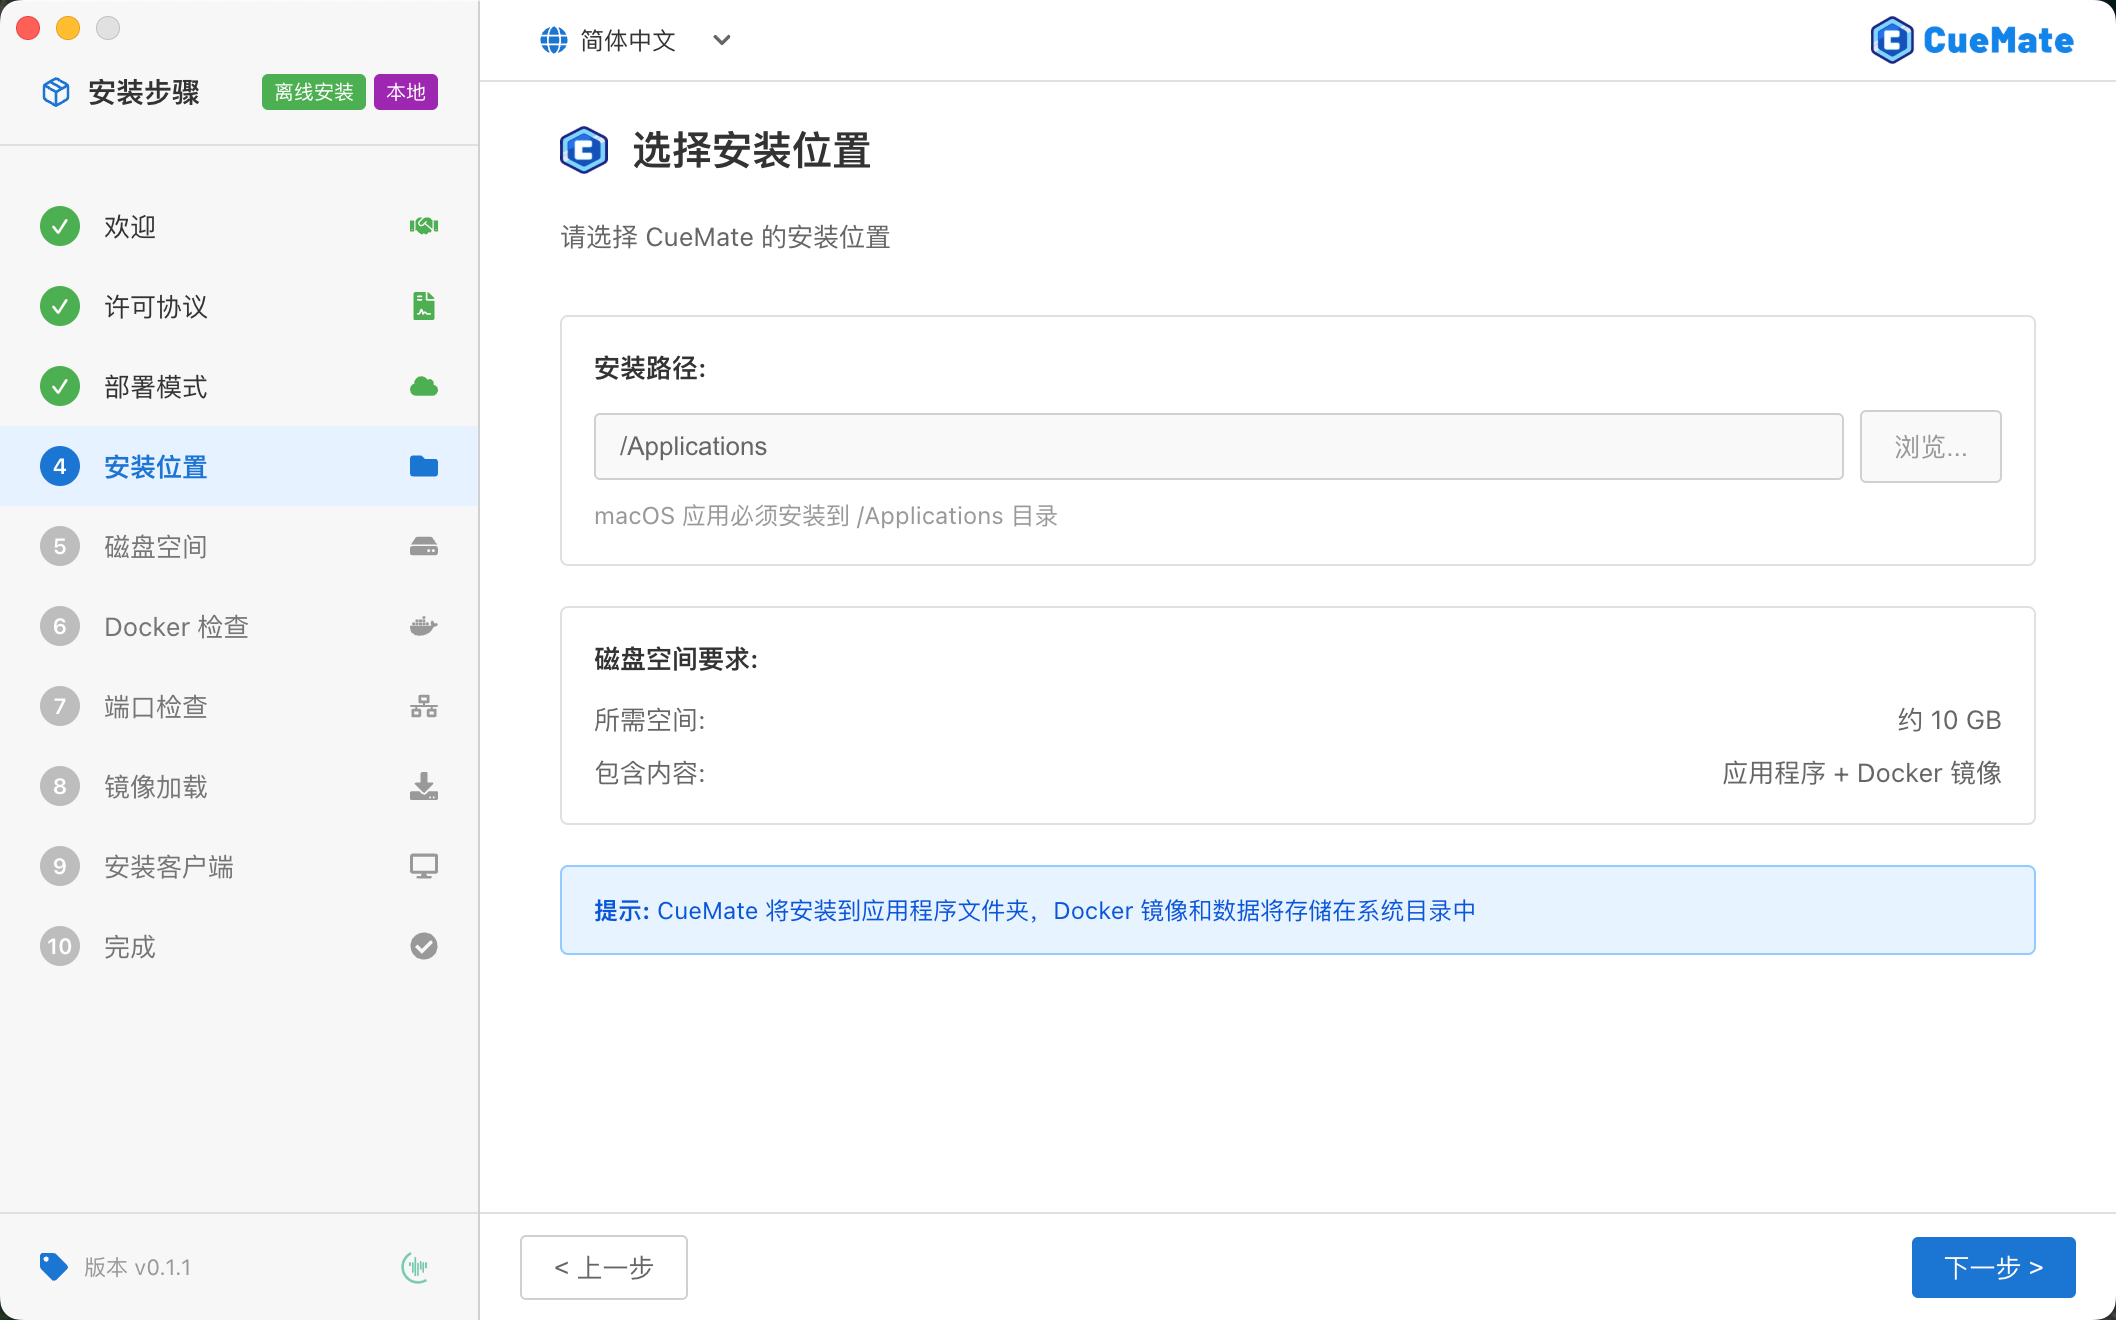
- Installation Path: Fixed to
/Applications, macOS applications must be installed to this directory - Disk Space Requirement: About 10GB (application + Docker images)
TIP
Docker images and runtime data will be automatically stored in system directories, no manual configuration needed.
Server Mode
Server mode requires configuring SSH connection information for the remote server.

Local Client Installation Path:
- Fixed to
/Applications, same as local mode
Remote Server Configuration:
- Server Address: Remote server IP address or domain name
- SSH Port: Default 22
- Username: SSH login username (e.g., root)
- Server Name: Custom name for easy identification
- Authentication Method: Password authentication or key authentication (click the eye icon to view input content)
- Deploy Path (Advanced Option): Backend service installation path on the server, default
/opt/cuemate
TIP
Server configuration is stored in ~/Library/Application Support/cuemate-desktop-client/config/server.json, you can manually edit this file to modify configuration. After installation, you can also modify server configuration through the tray menu. See Tray Menu - Server Configuration.
After filling in, click the Test Connection button to verify configuration:
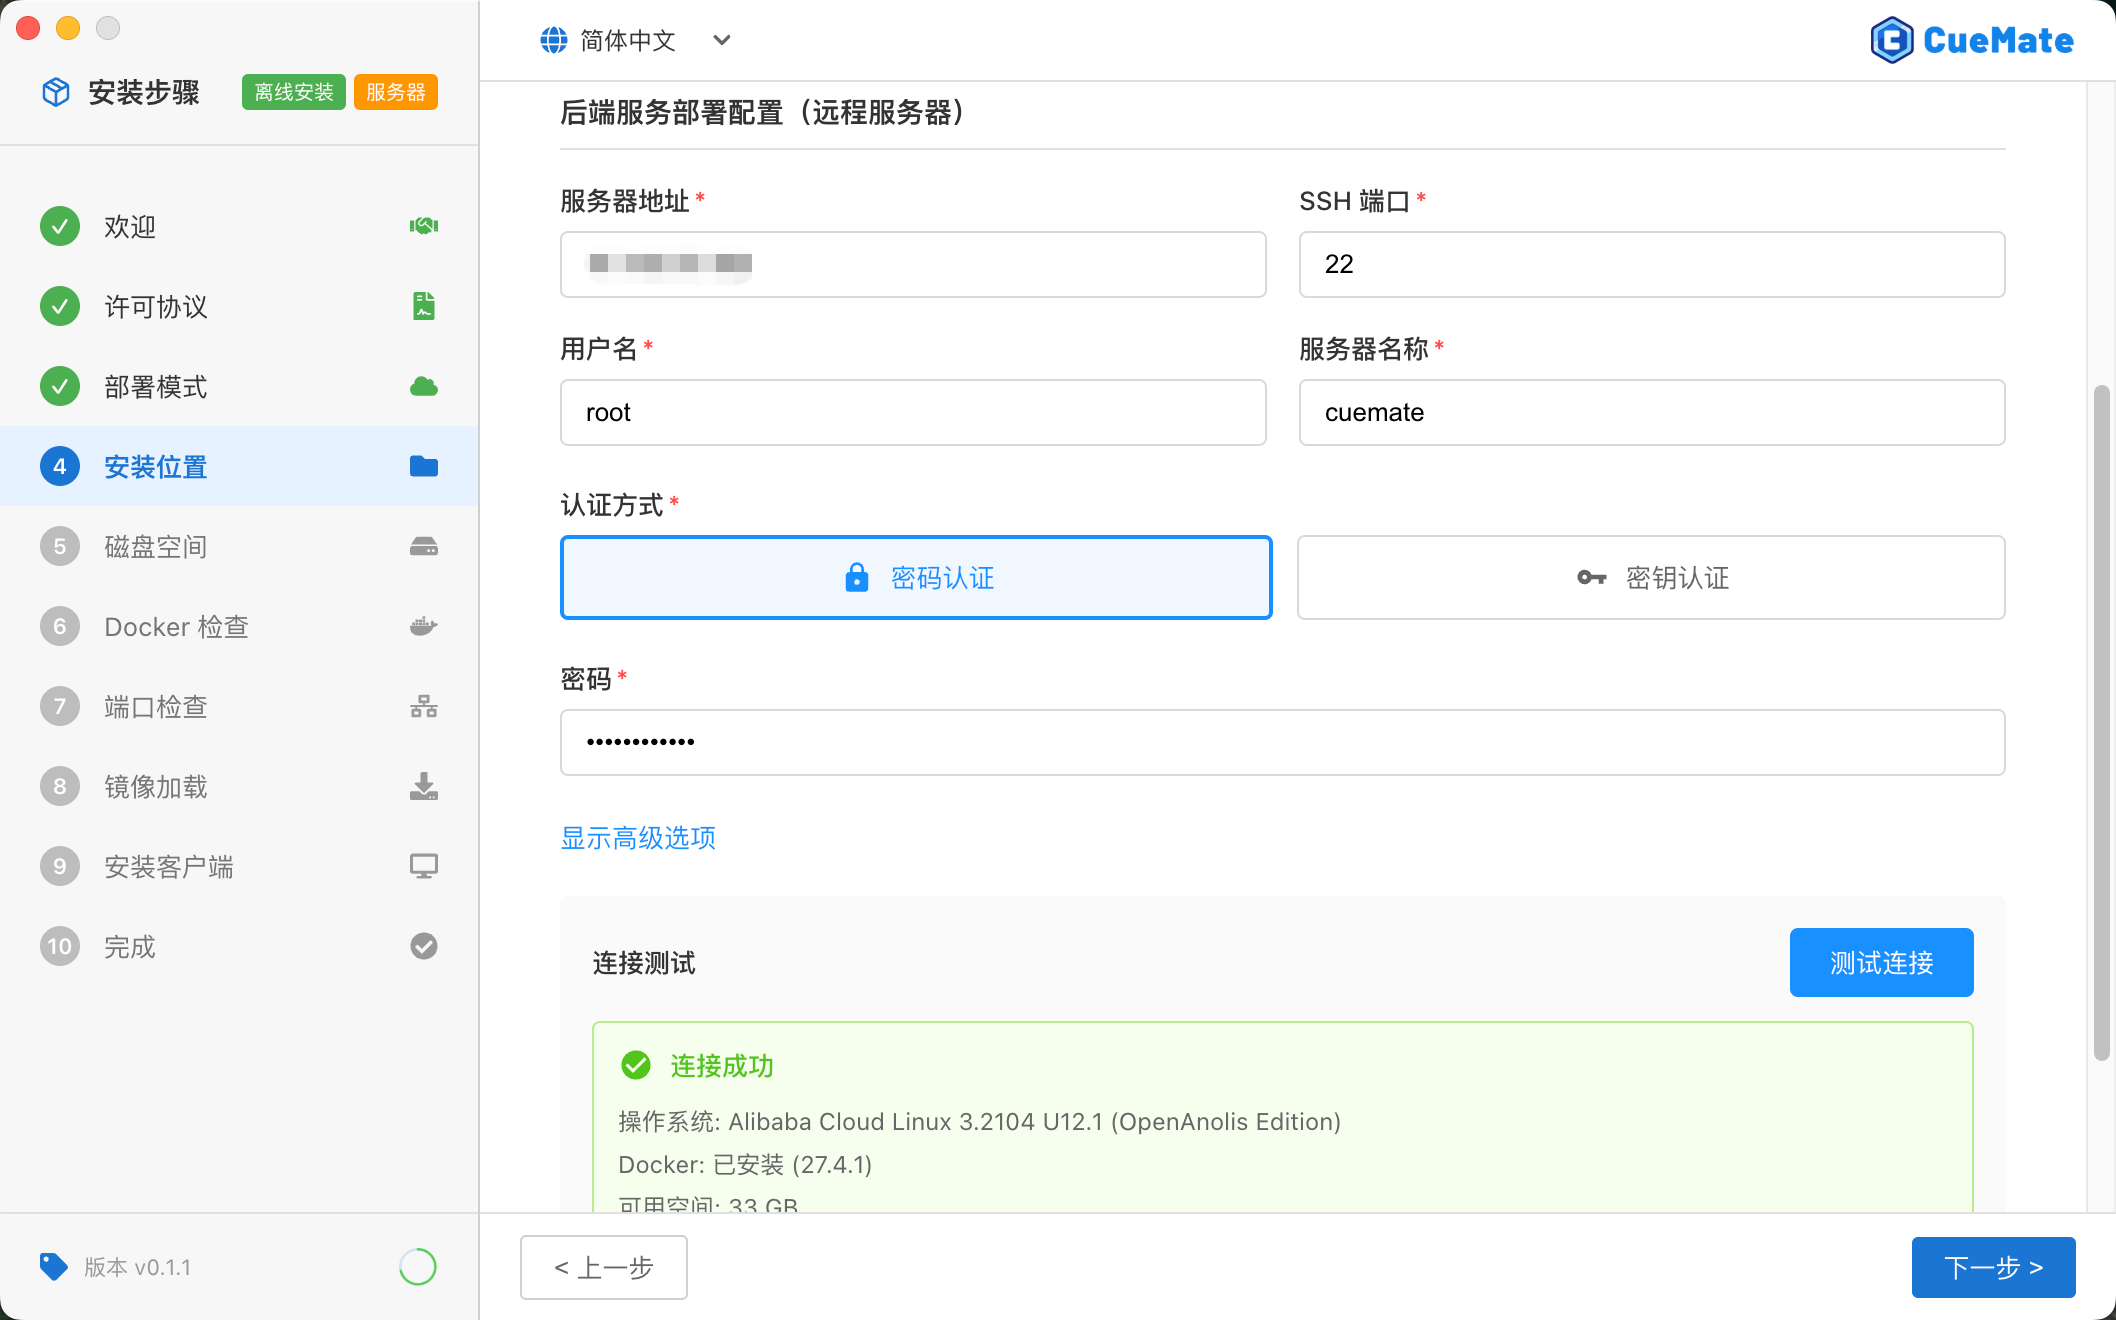
After the test passes, click the Next button to continue.
3.5 Step 5: Disk Space Check
The installation wizard will automatically check if disk space meets installation requirements.
Local Mode
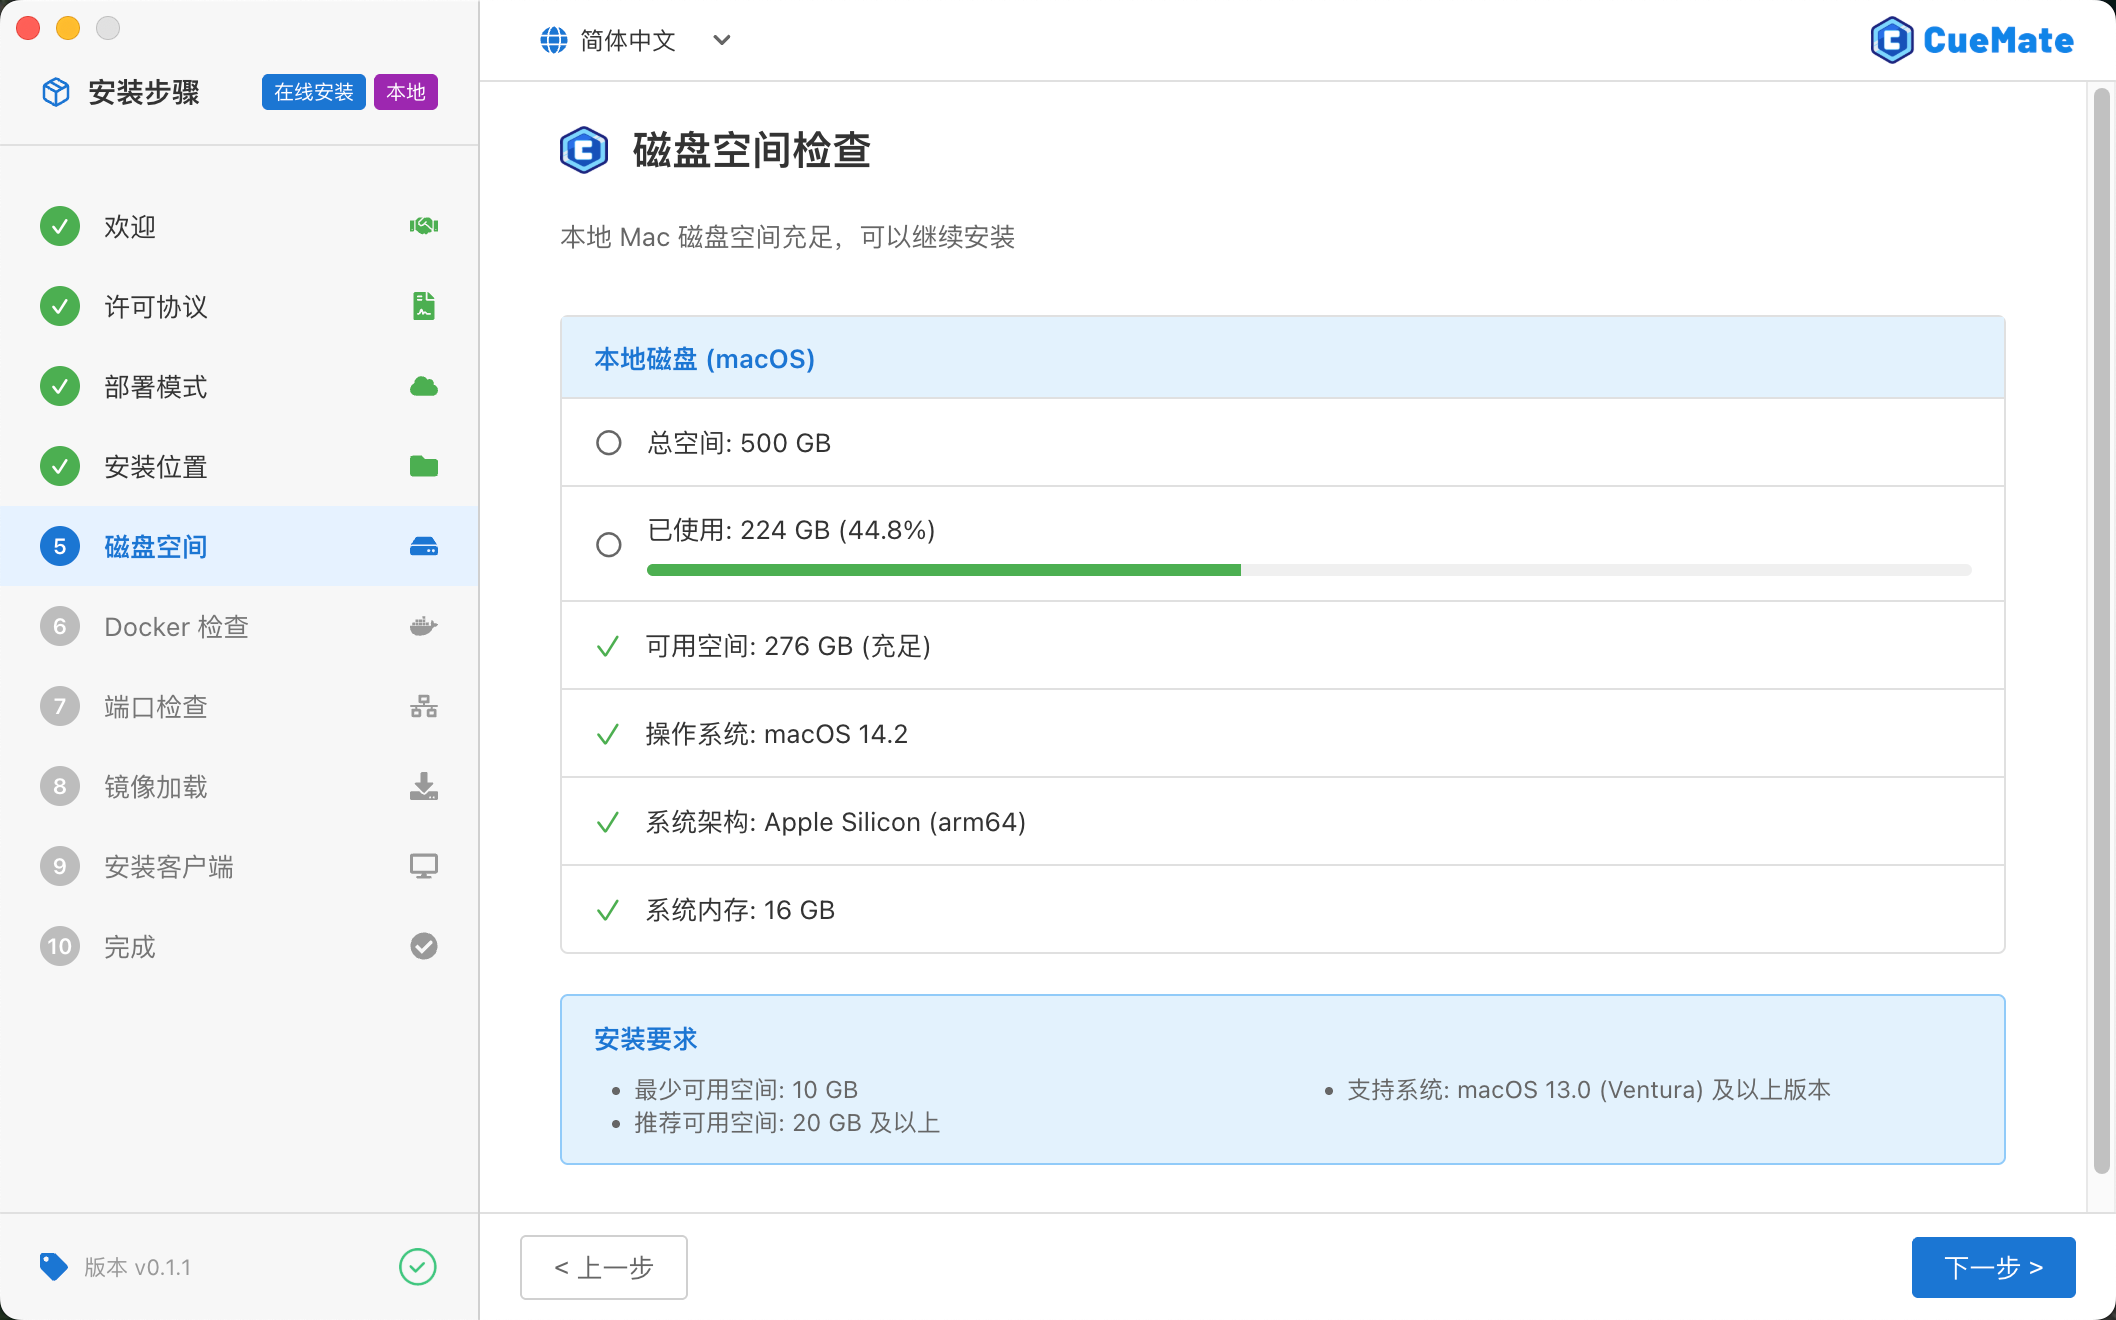
Checks local Mac's disk space, displaying:
- Total space, used space, available space
- Operating system version, architecture, memory size
Server Mode
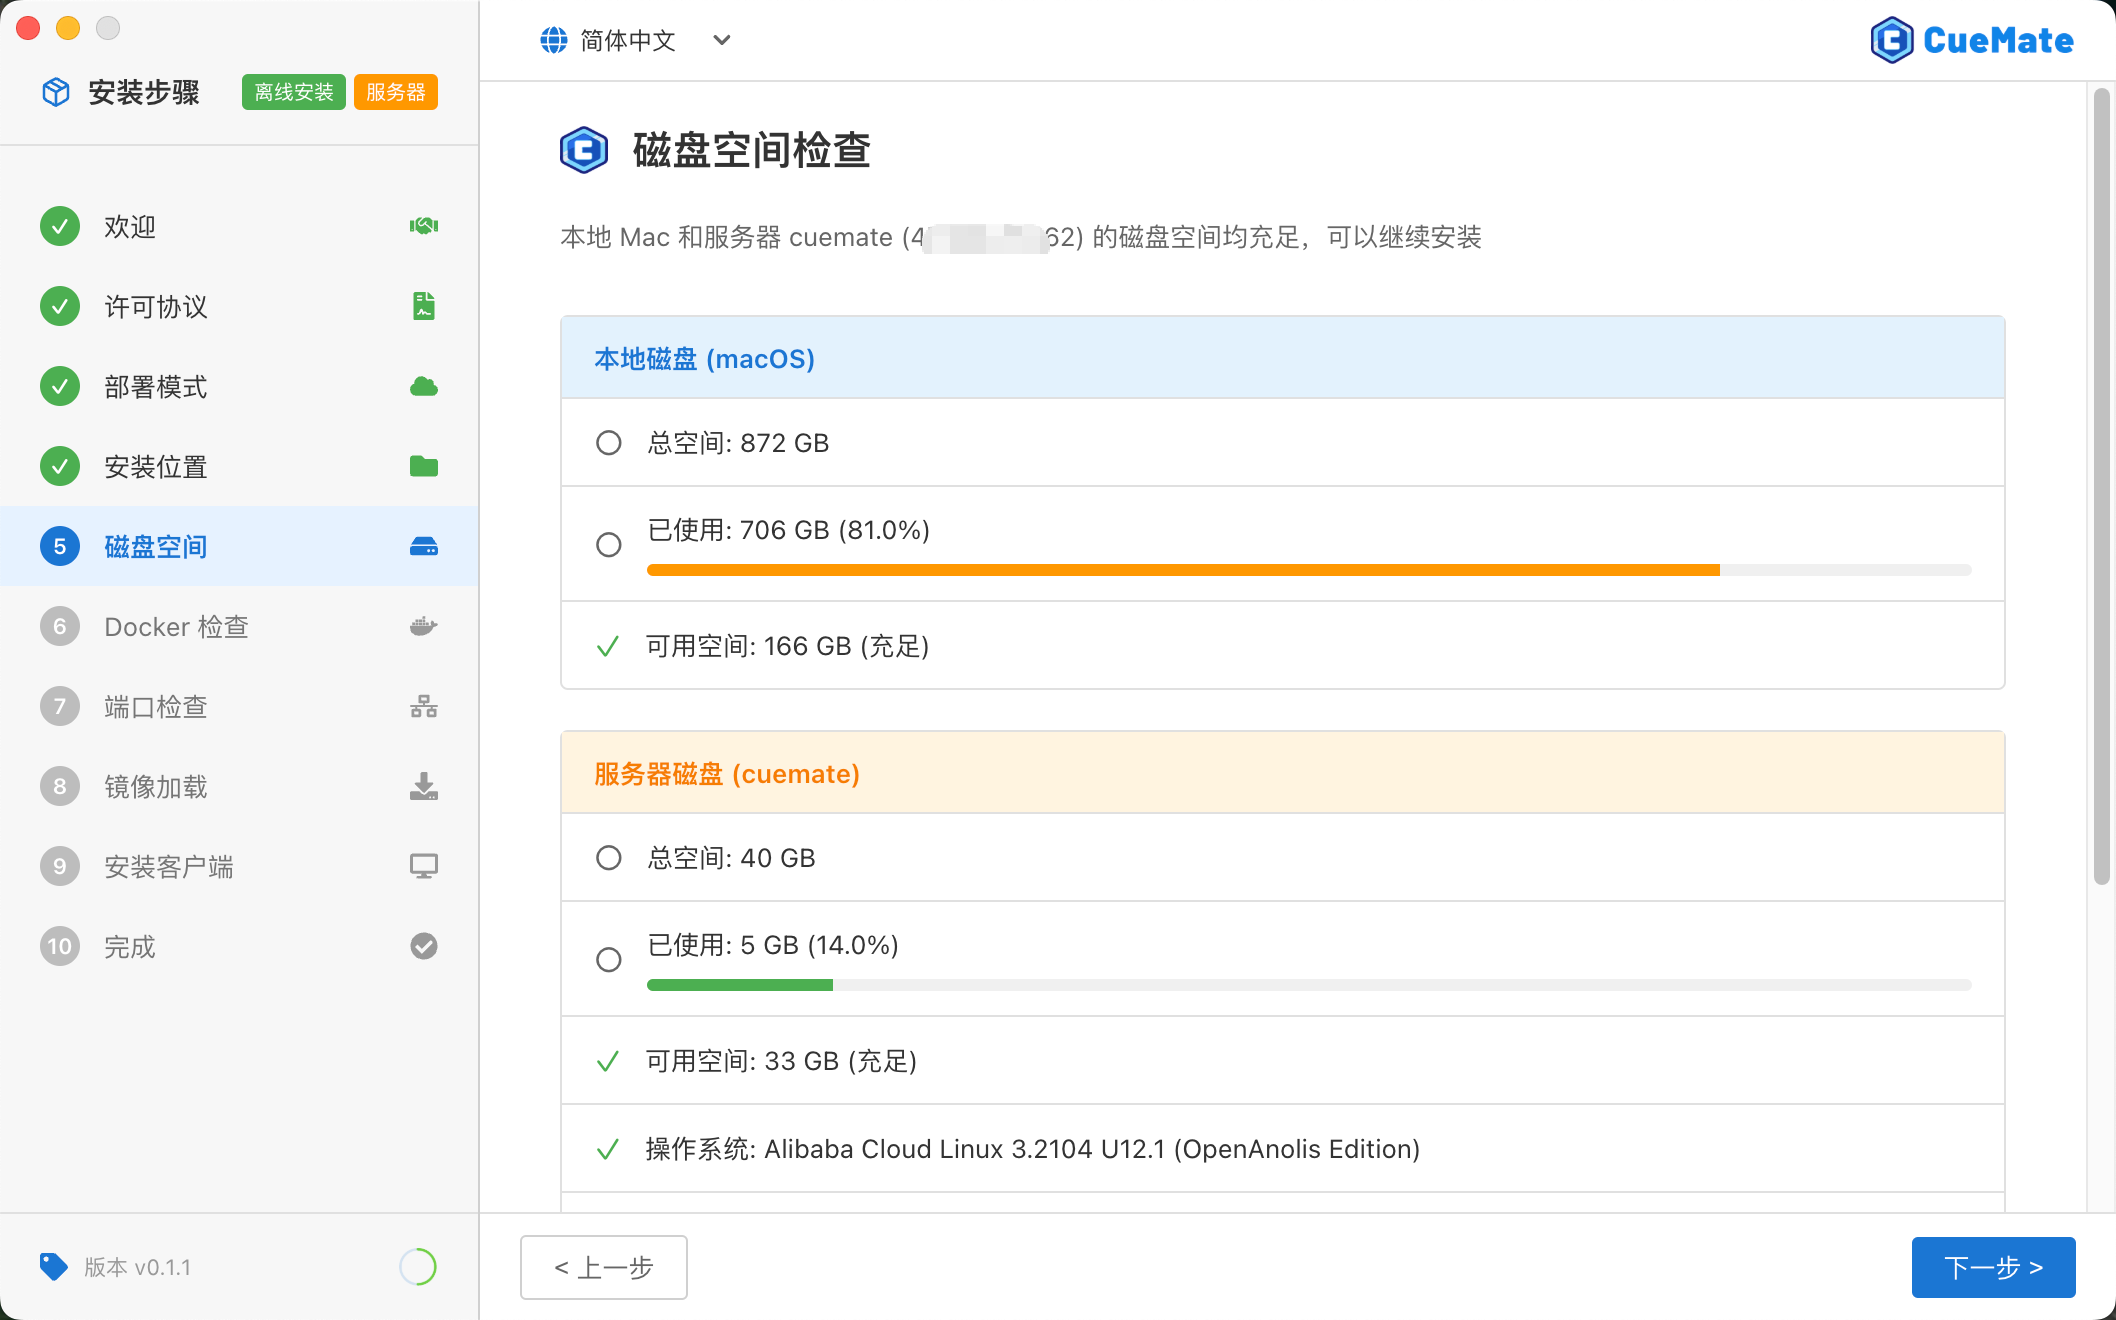
Checks disk space at two locations:
- Local Disk (macOS): For installing desktop client, requires about 2GB
- Server Disk: For deploying backend services, requires about 10GB
IMPORTANT
Space Requirements:
- Local Mode: About 10GB (app + Docker images + data)
- Server Mode: Local about 2GB + Server about 10GB
Automatically proceeds to next step after check passes. If space is insufficient, please clean up disk and click "Re-check".
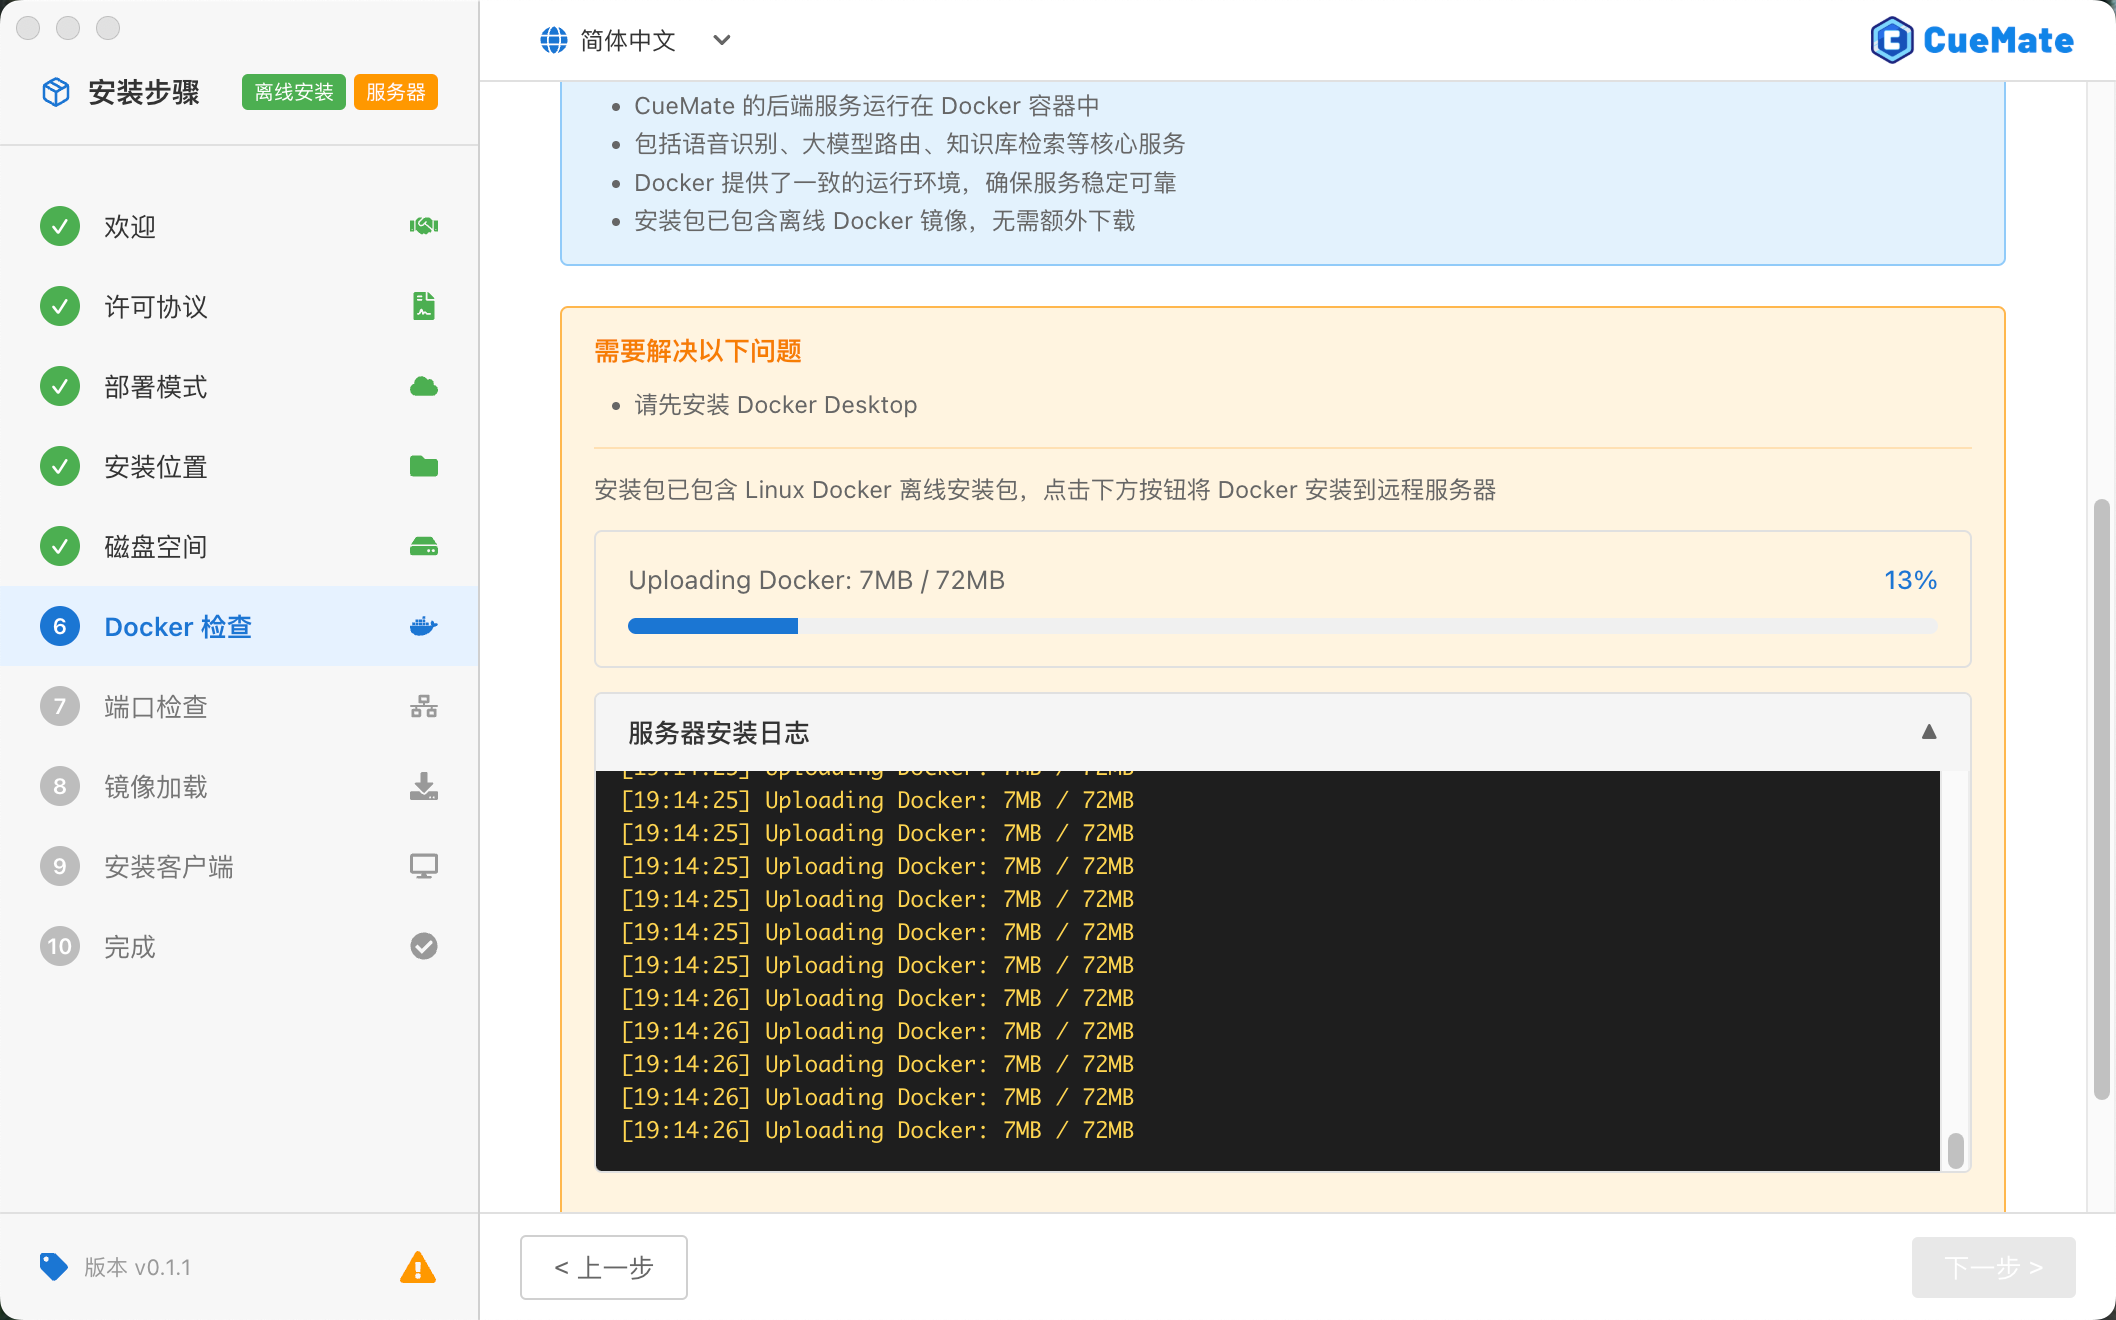
3.6 Step 6: Docker Check
The installation wizard will check if the Docker environment is ready.
Local Mode

Checks local Mac's Docker Desktop:
- Whether Docker Desktop is installed
- Whether Docker Engine is running
- Whether Docker Compose is available
If Docker is not installed:
- Offline Package: Click "Install to Local" button to automatically install the built-in Docker Desktop
- Online Package: Click "Download Docker Desktop" button to jump to official download page
Server Mode
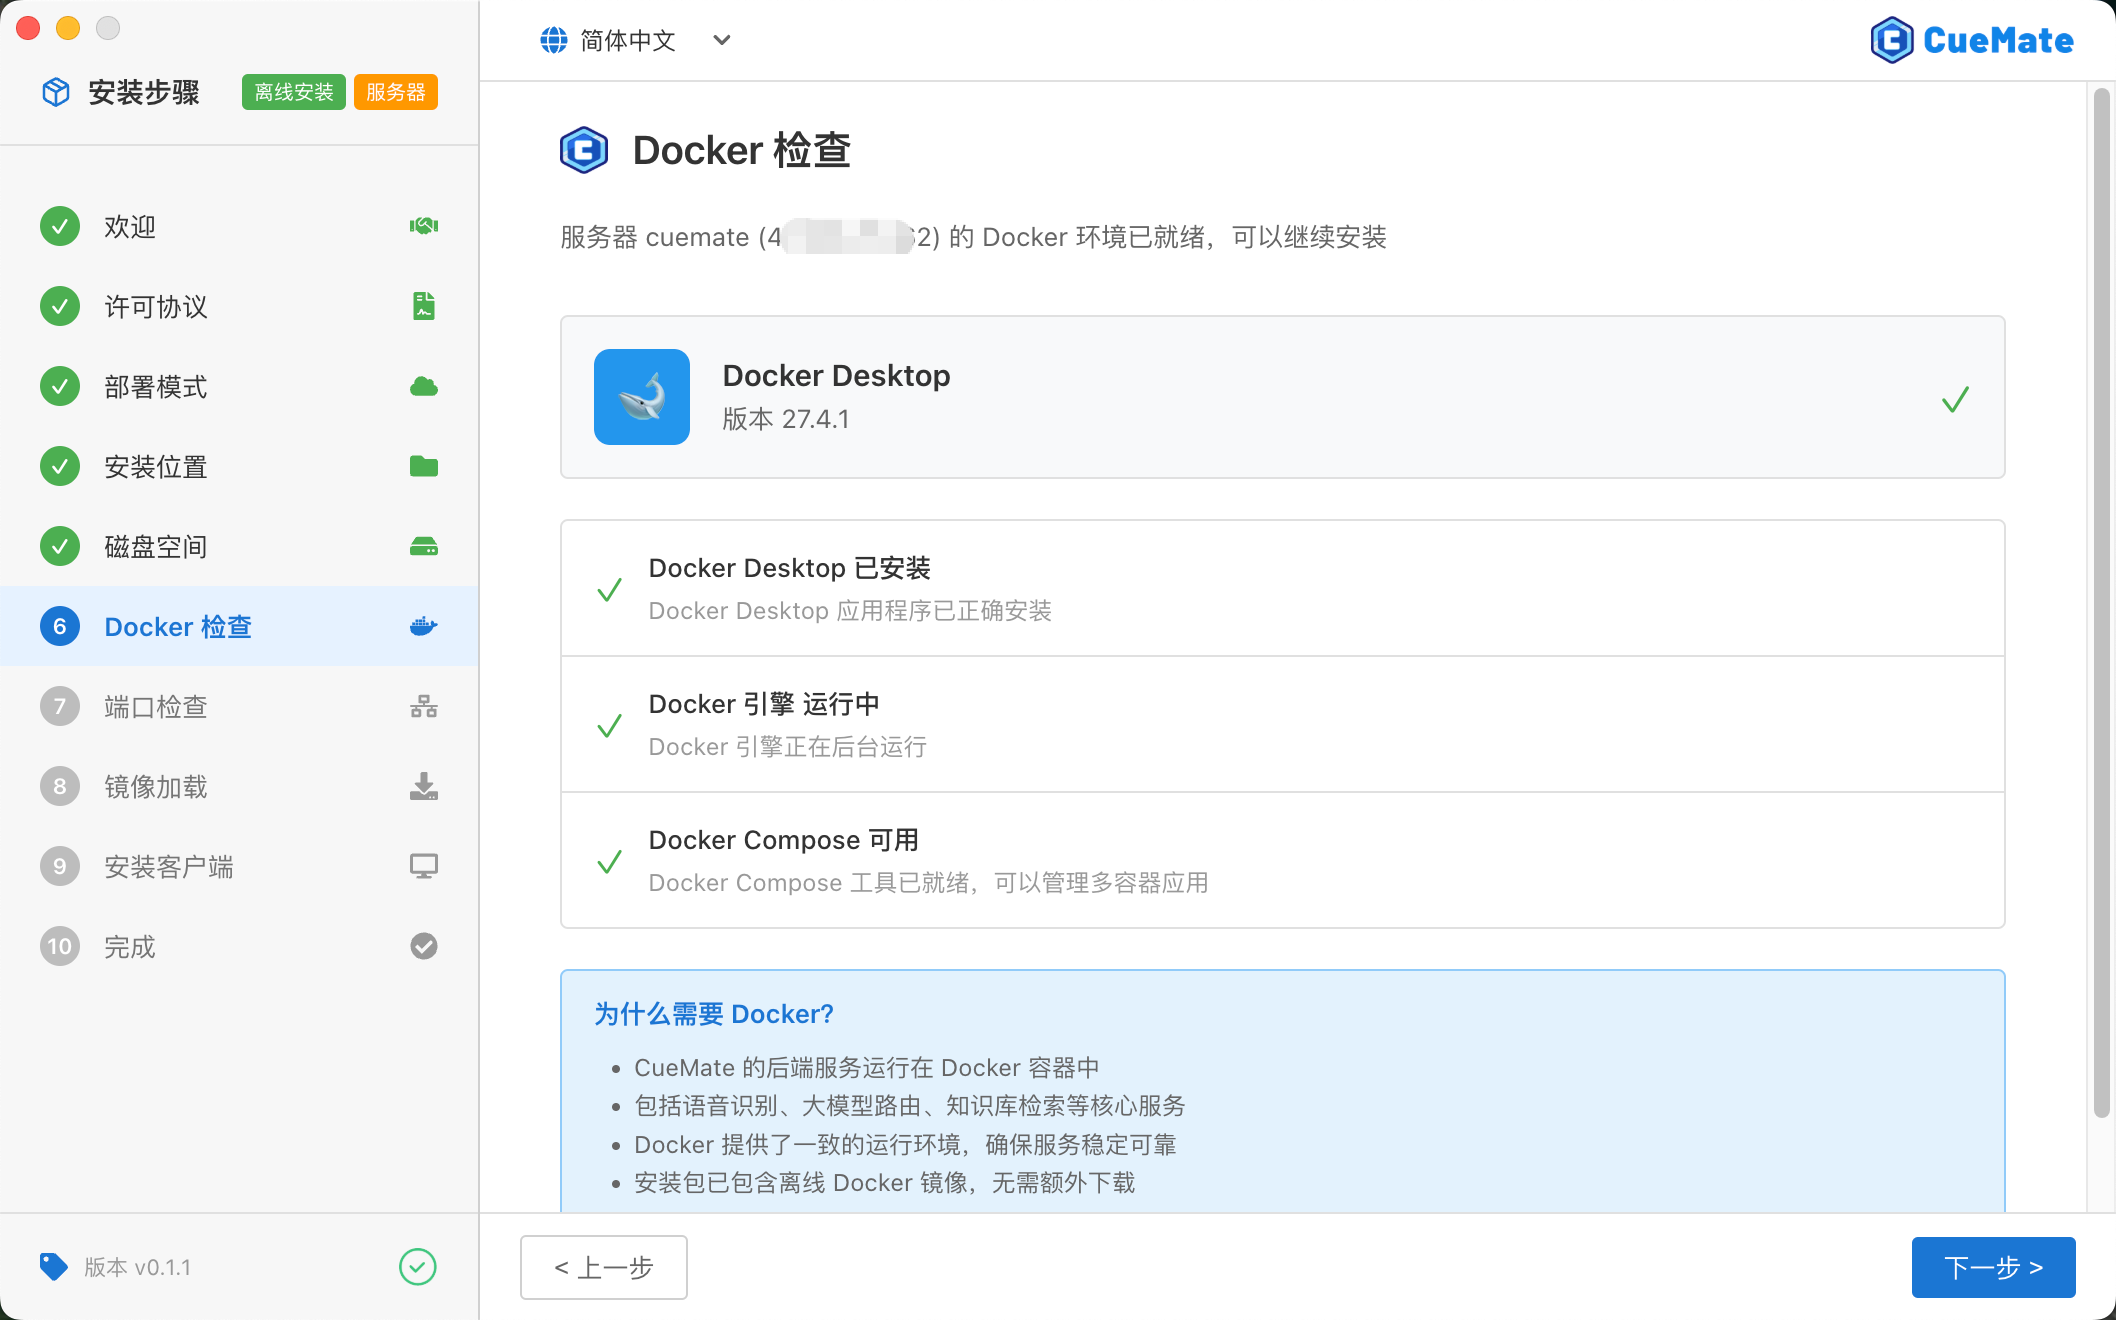
Checks remote Linux server's Docker:
- Whether Docker Engine is installed
- Whether Docker service is running
- Whether Docker Compose is available
If Docker is not installed:
- Offline Package: Click "Install to Server" button to automatically install Docker on the remote server via SSH
- Online Package: Click "View Docker Docs" button to jump to Docker Engine installation documentation
After check passes, click the Next button to continue.
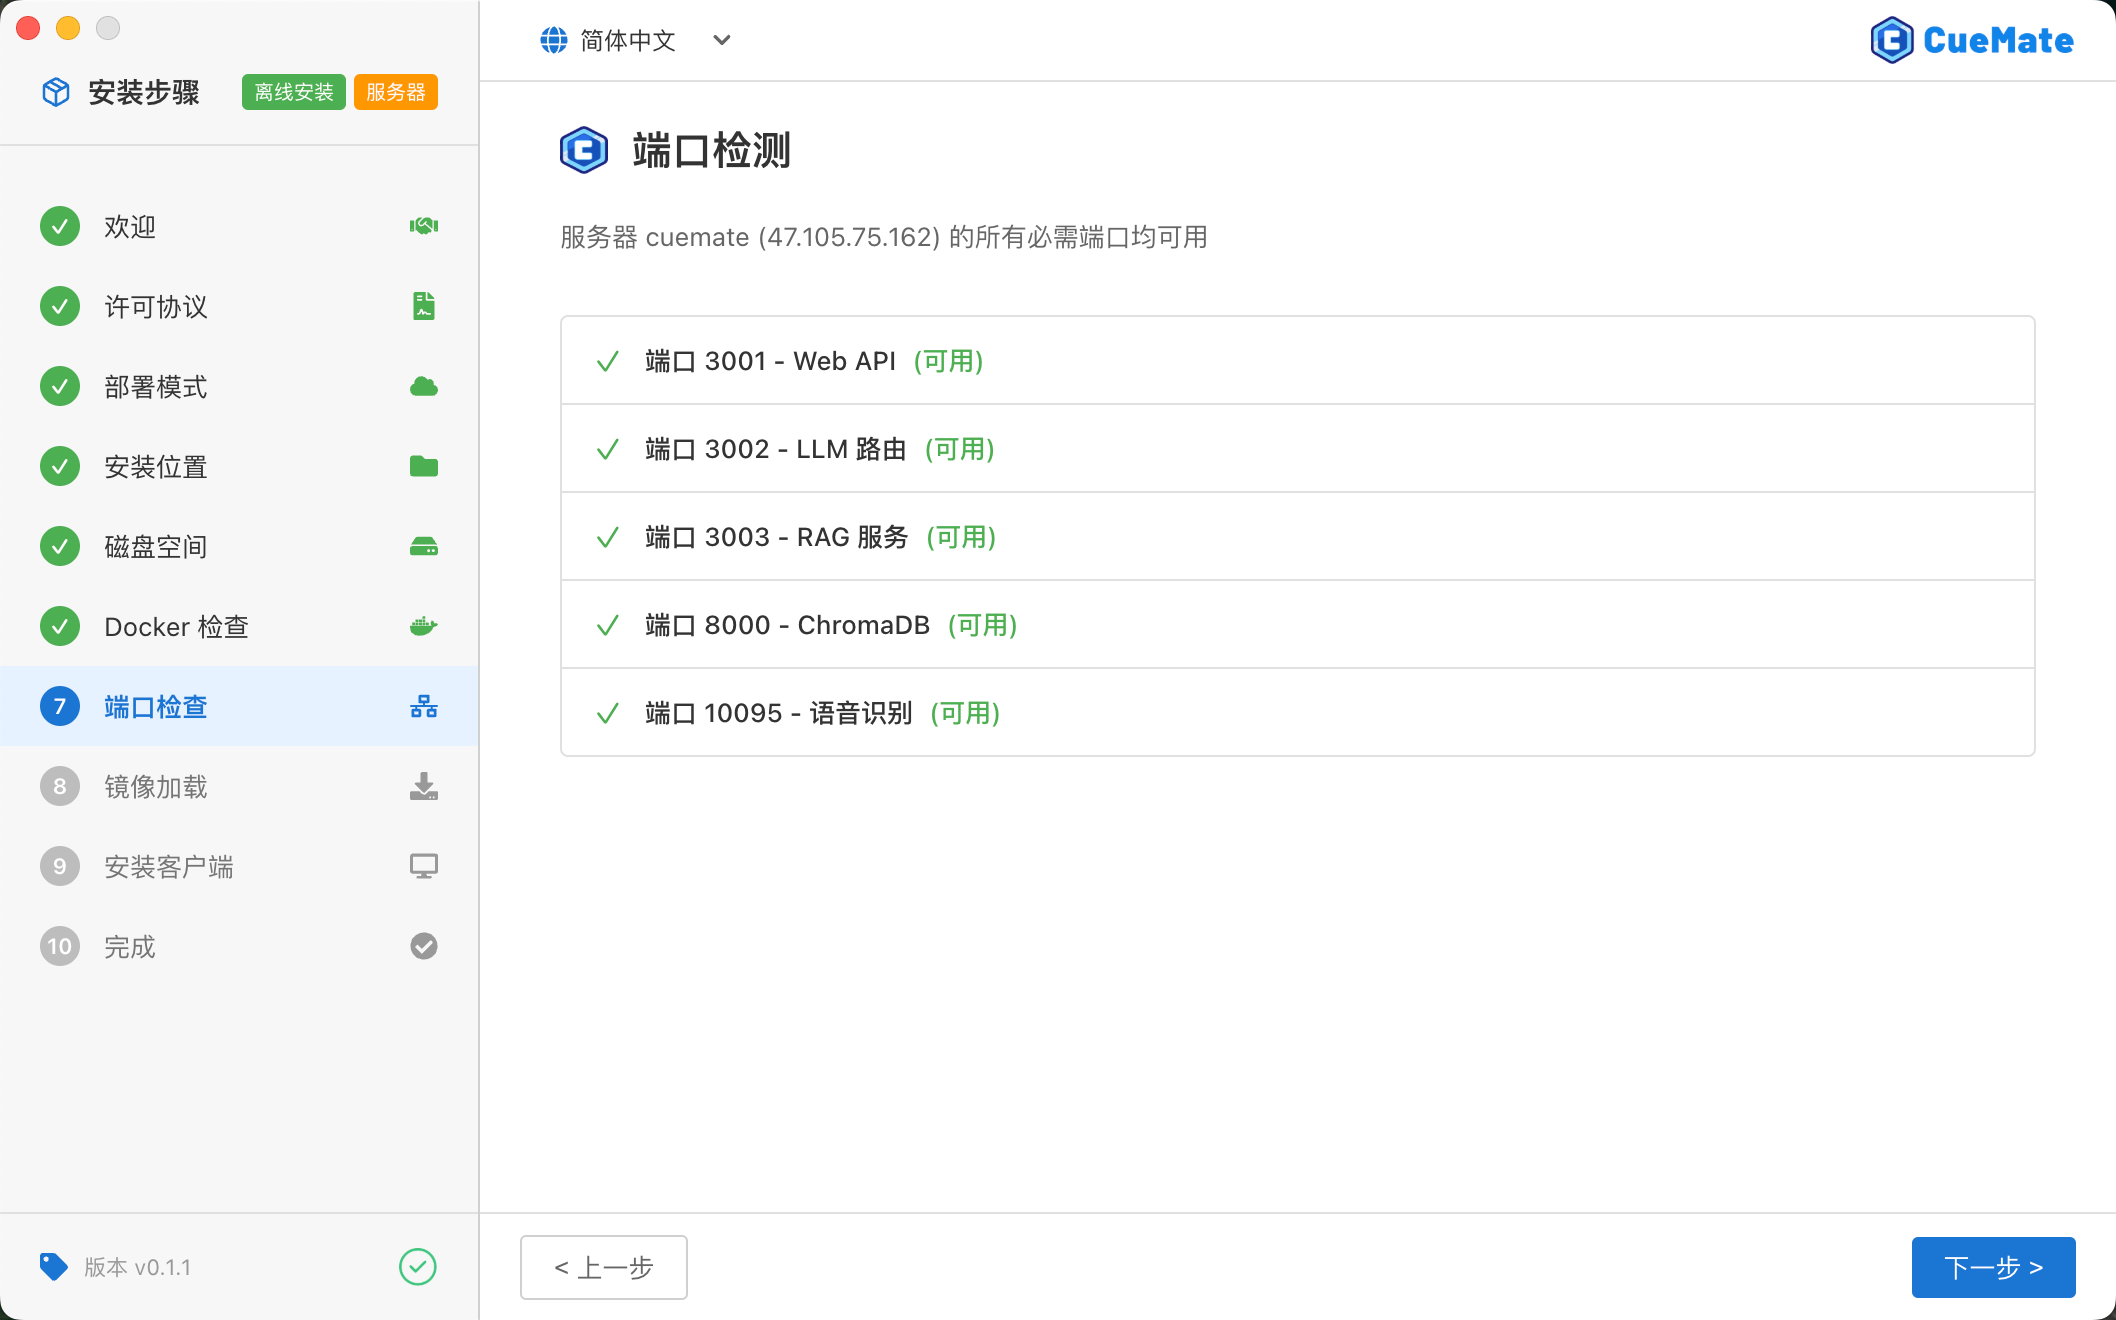
3.7 Step 7: Port Check
The installation wizard will check if the network ports required by CueMate are occupied.
Local Mode

Checks port availability on local Mac, checking 6 ports:
| Port | Service | Status Display |
|---|---|---|
3001 | Web API Service | (Available) or (Unavailable) |
3002 | LLM Router Service | (Available) or (Unavailable) |
3003 | RAG Service | (Available) or (Unavailable) |
3004 | Web Service | (Available) or (Unavailable) |
8000 | ChromaDB Vector Database | (Available) or (Unavailable) |
10095 | Speech Recognition Service | (Available) or (Unavailable) |
Server Mode
Checks port availability on remote server, checking the same ports as local mode:
| Port | Service | Status Display |
|---|---|---|
3001 | Web API Service | (Available) or (Unavailable) |
3002 | LLM Router Service | (Available) or (Unavailable) |
3003 | RAG Service | (Available) or (Unavailable) |
3004 | Web Service | (Available) or (Unavailable) |
8000 | ChromaDB Vector Database | (Available) or (Unavailable) |
10095 | Speech Recognition Service | (Available) or (Unavailable) |
If port conflicts are detected:
- Click the "End Process" button next to the port to terminate the program occupying that port
- Or click "Auto-resolve All Conflicts" button for batch processing
After port check passes, click the Next button to continue.
3.8 Step 8: Image Loading
The installation wizard starts loading CueMate's backend service images. A label next to the page title shows the current deployment environment.
Local Mode
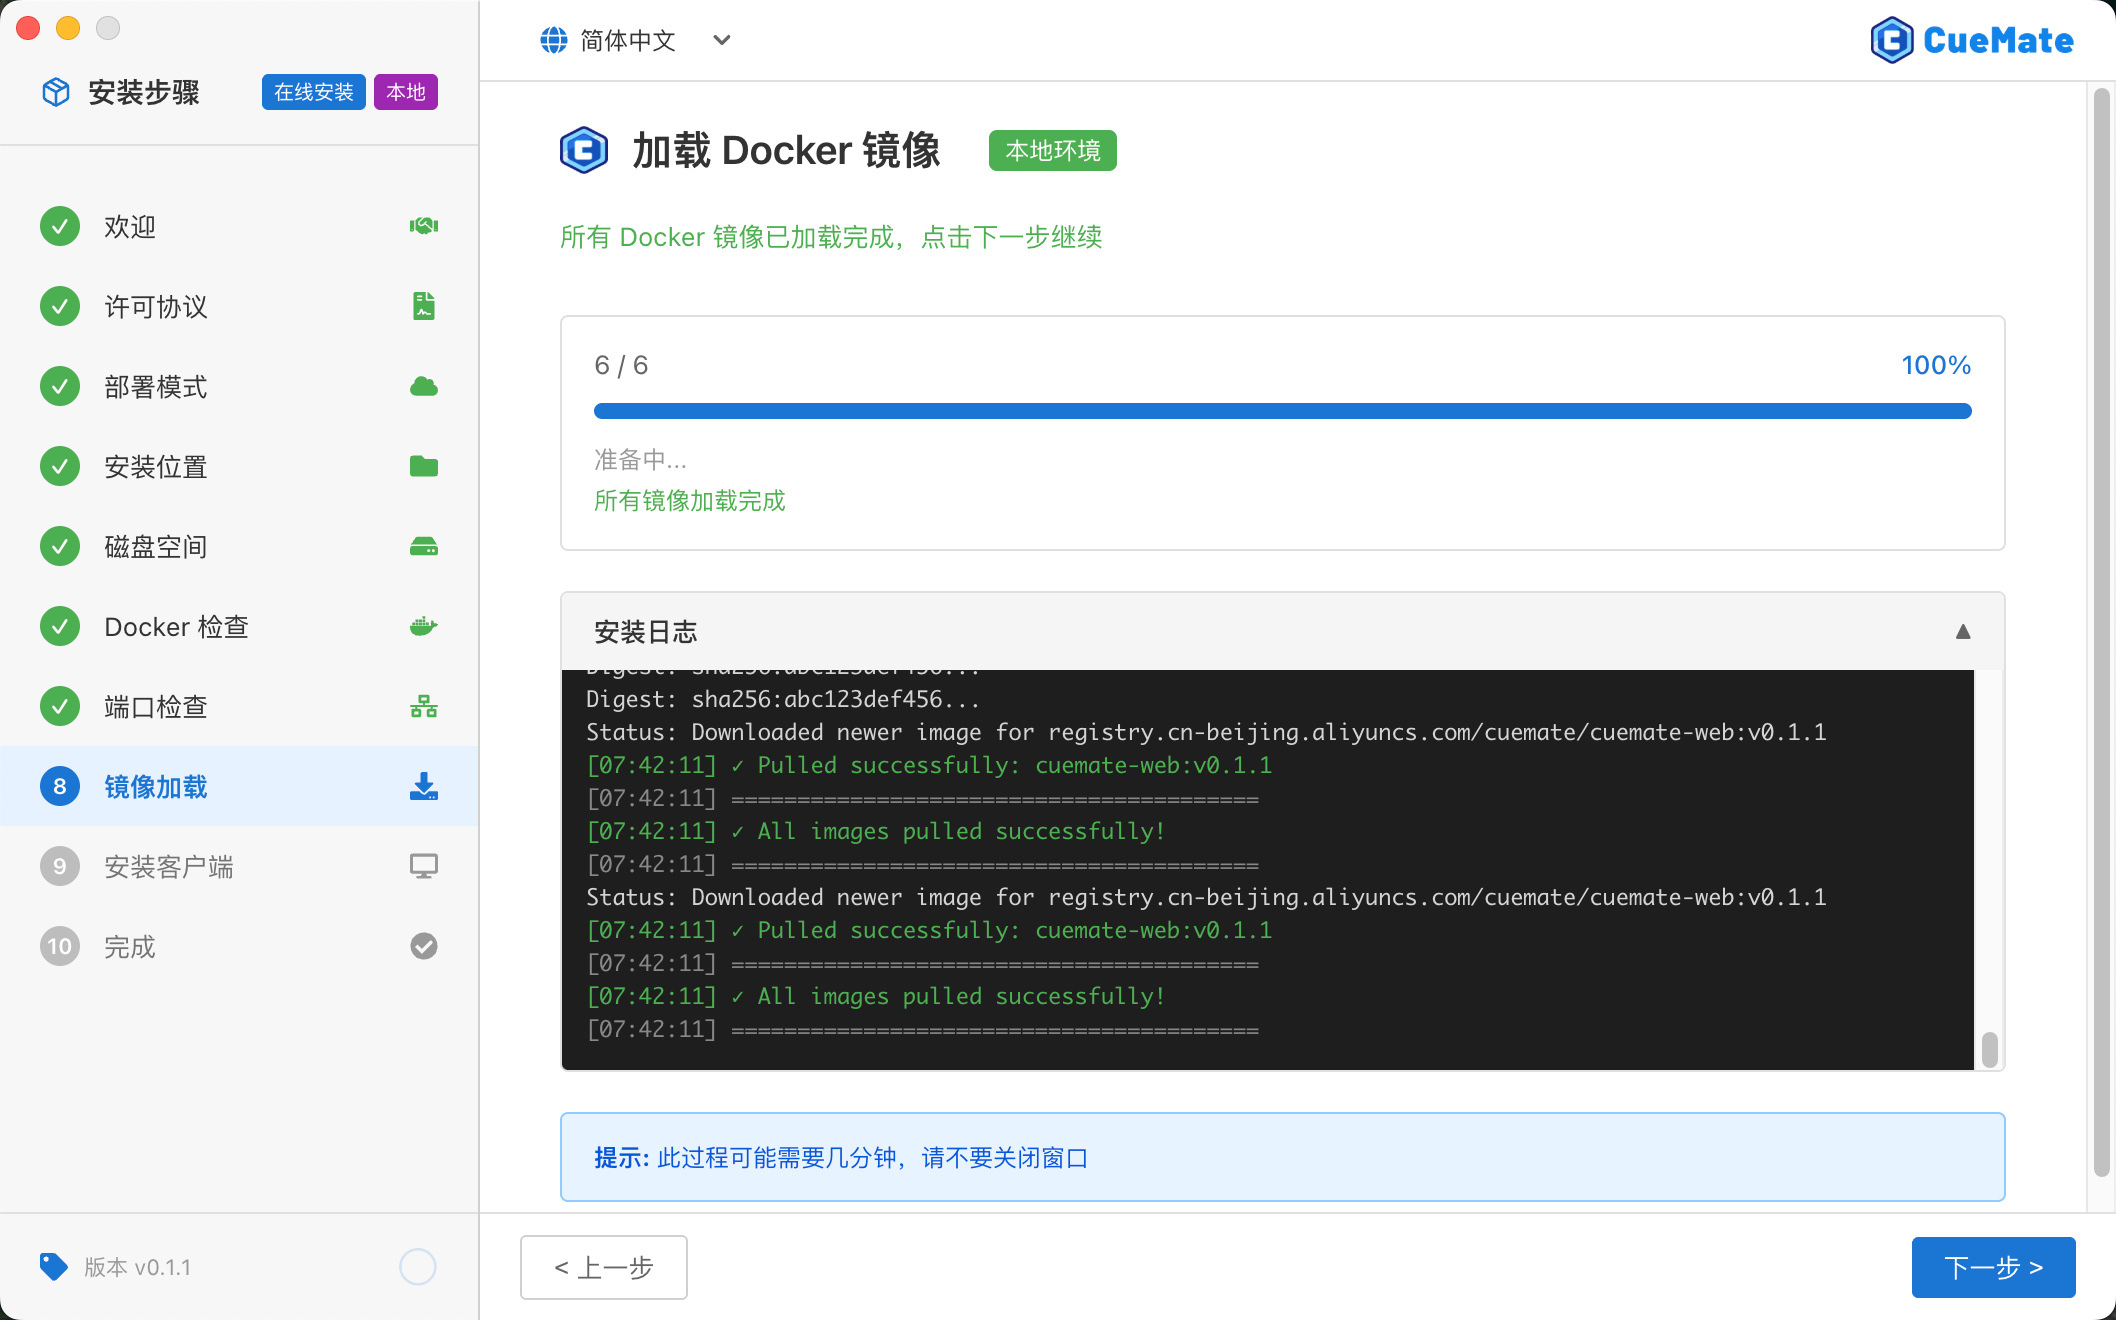
Label shows "Local Environment", images load to local Mac's Docker environment:
- Offline Package: Executes
docker loadto load pre-built images from the installation package - Online Package: Executes
docker pullto pull images from Docker Hub
Estimated time: 1-2 minutes (offline) or 5-10 minutes (online, depending on network speed)
Server Mode

Label shows "Server", images load to remote Linux server:
- Offline Package: Uploads image tar files to server via SCP, then executes
docker loadvia SSH - Online Package: Executes
docker pullon server via SSH
Estimated time: 5-15 minutes (depending on network speed and server performance)
WARNING
Please do not close the installation wizard, otherwise you will need to restart the loading process.
After image loading completes, click the Next button to continue.
3.9 Step 9: Install Client
After image loading completes, the installation wizard will enter the desktop client installation step.
Local Mode
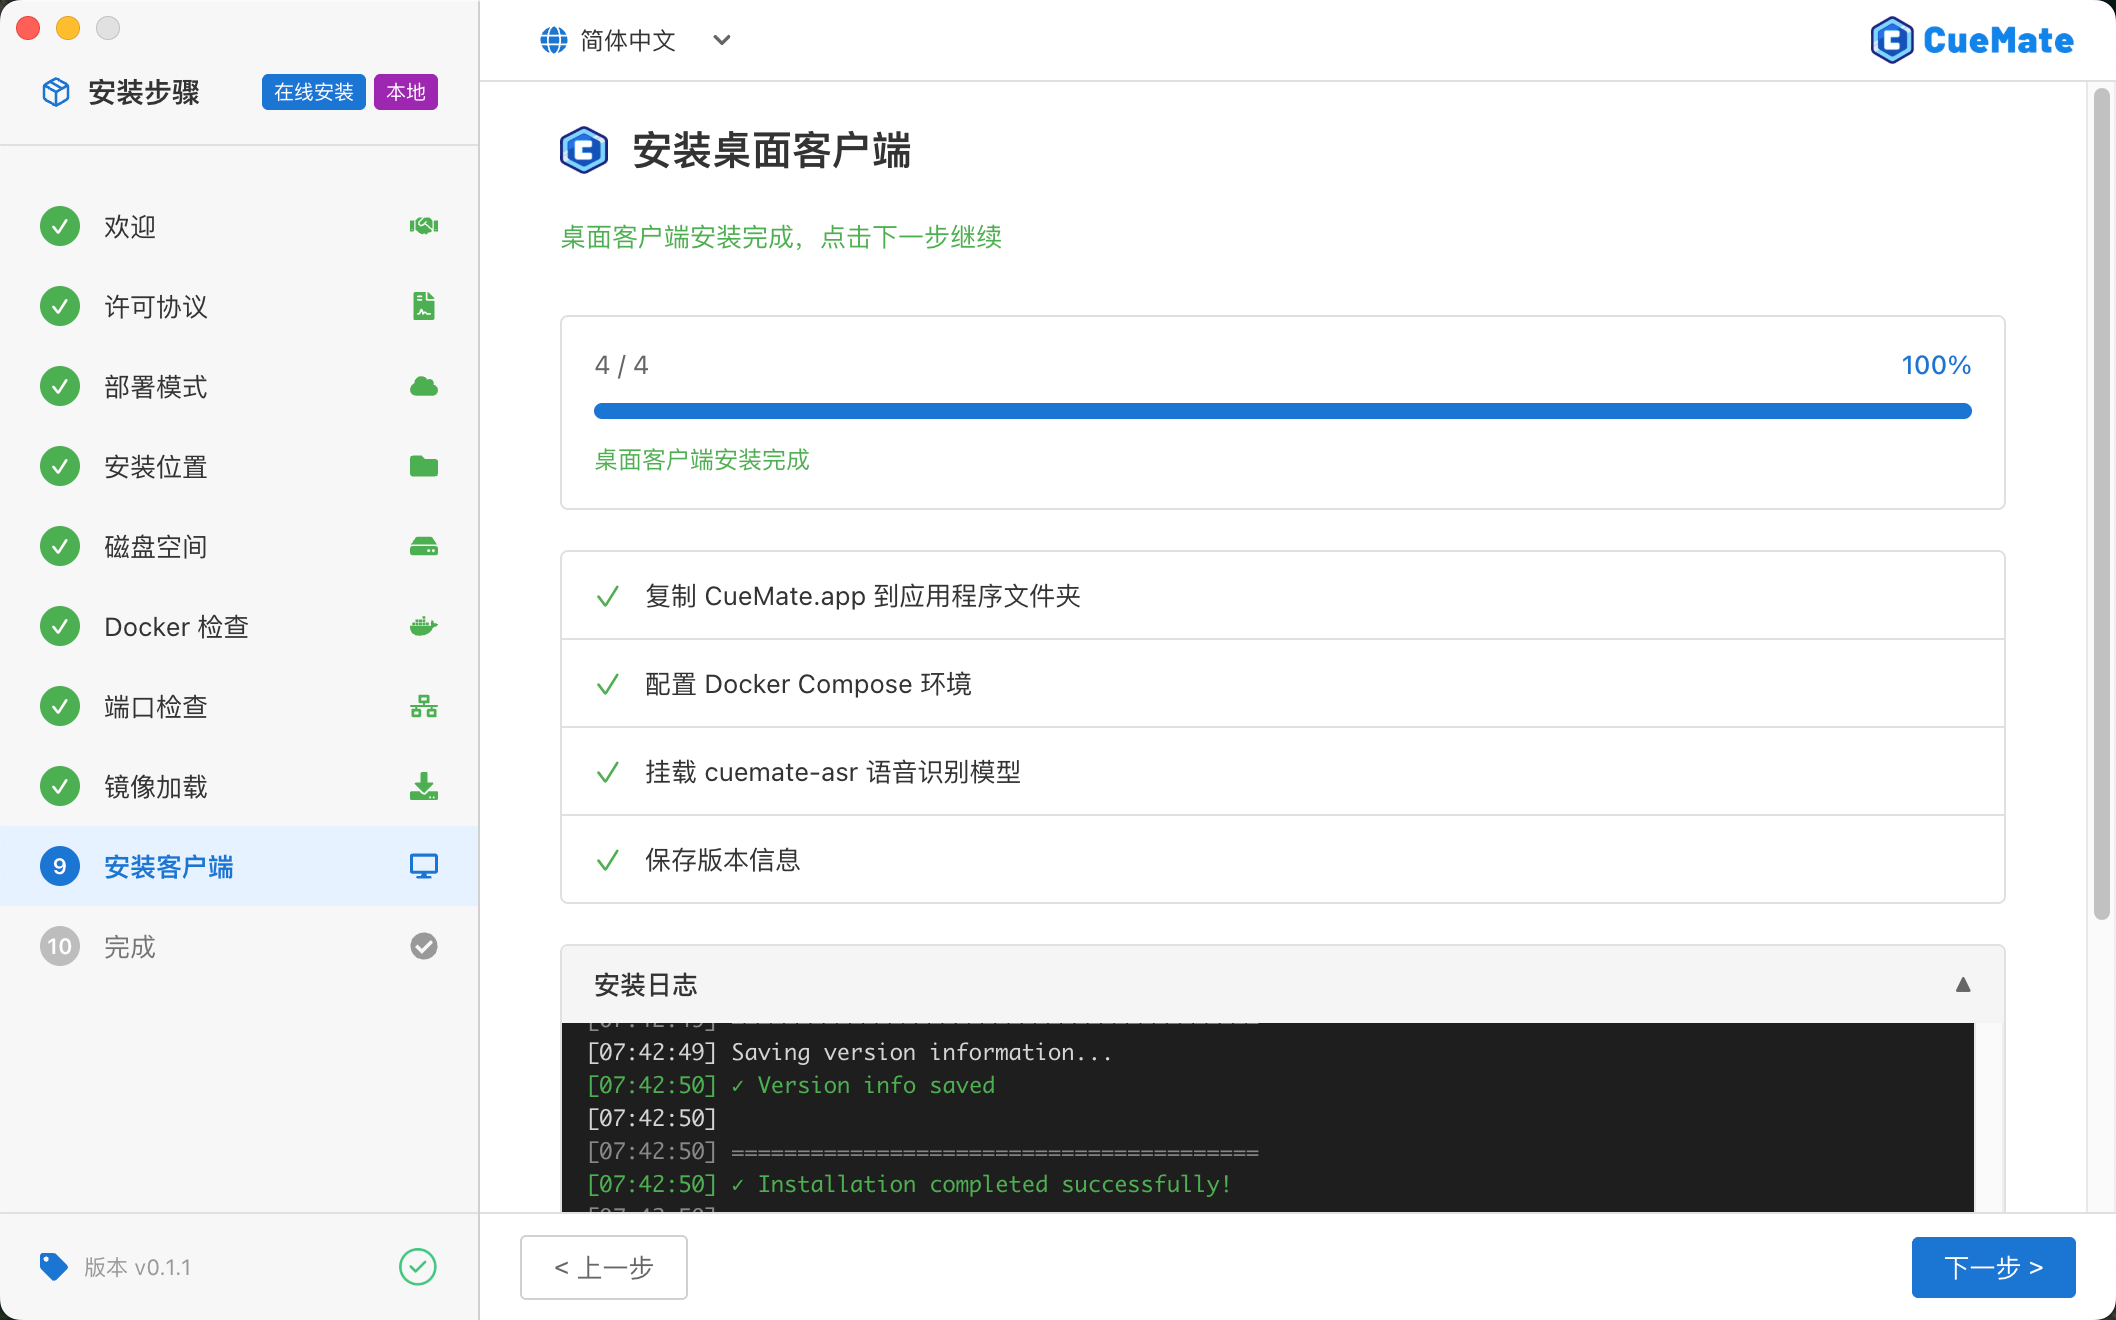
Executes 4 steps:
- Copy CueMate.app: Install to
/Applicationsdirectory - Configure Docker Compose: Copy docker-compose.yml to local data directory
- Mount ASR Speech Model: Extract model to
~/Library/Application Support/cuemate-desktop-client/data/funasr_models/ - Save Version Info: Record installation version
Estimated time: About 1 minute
Server Mode
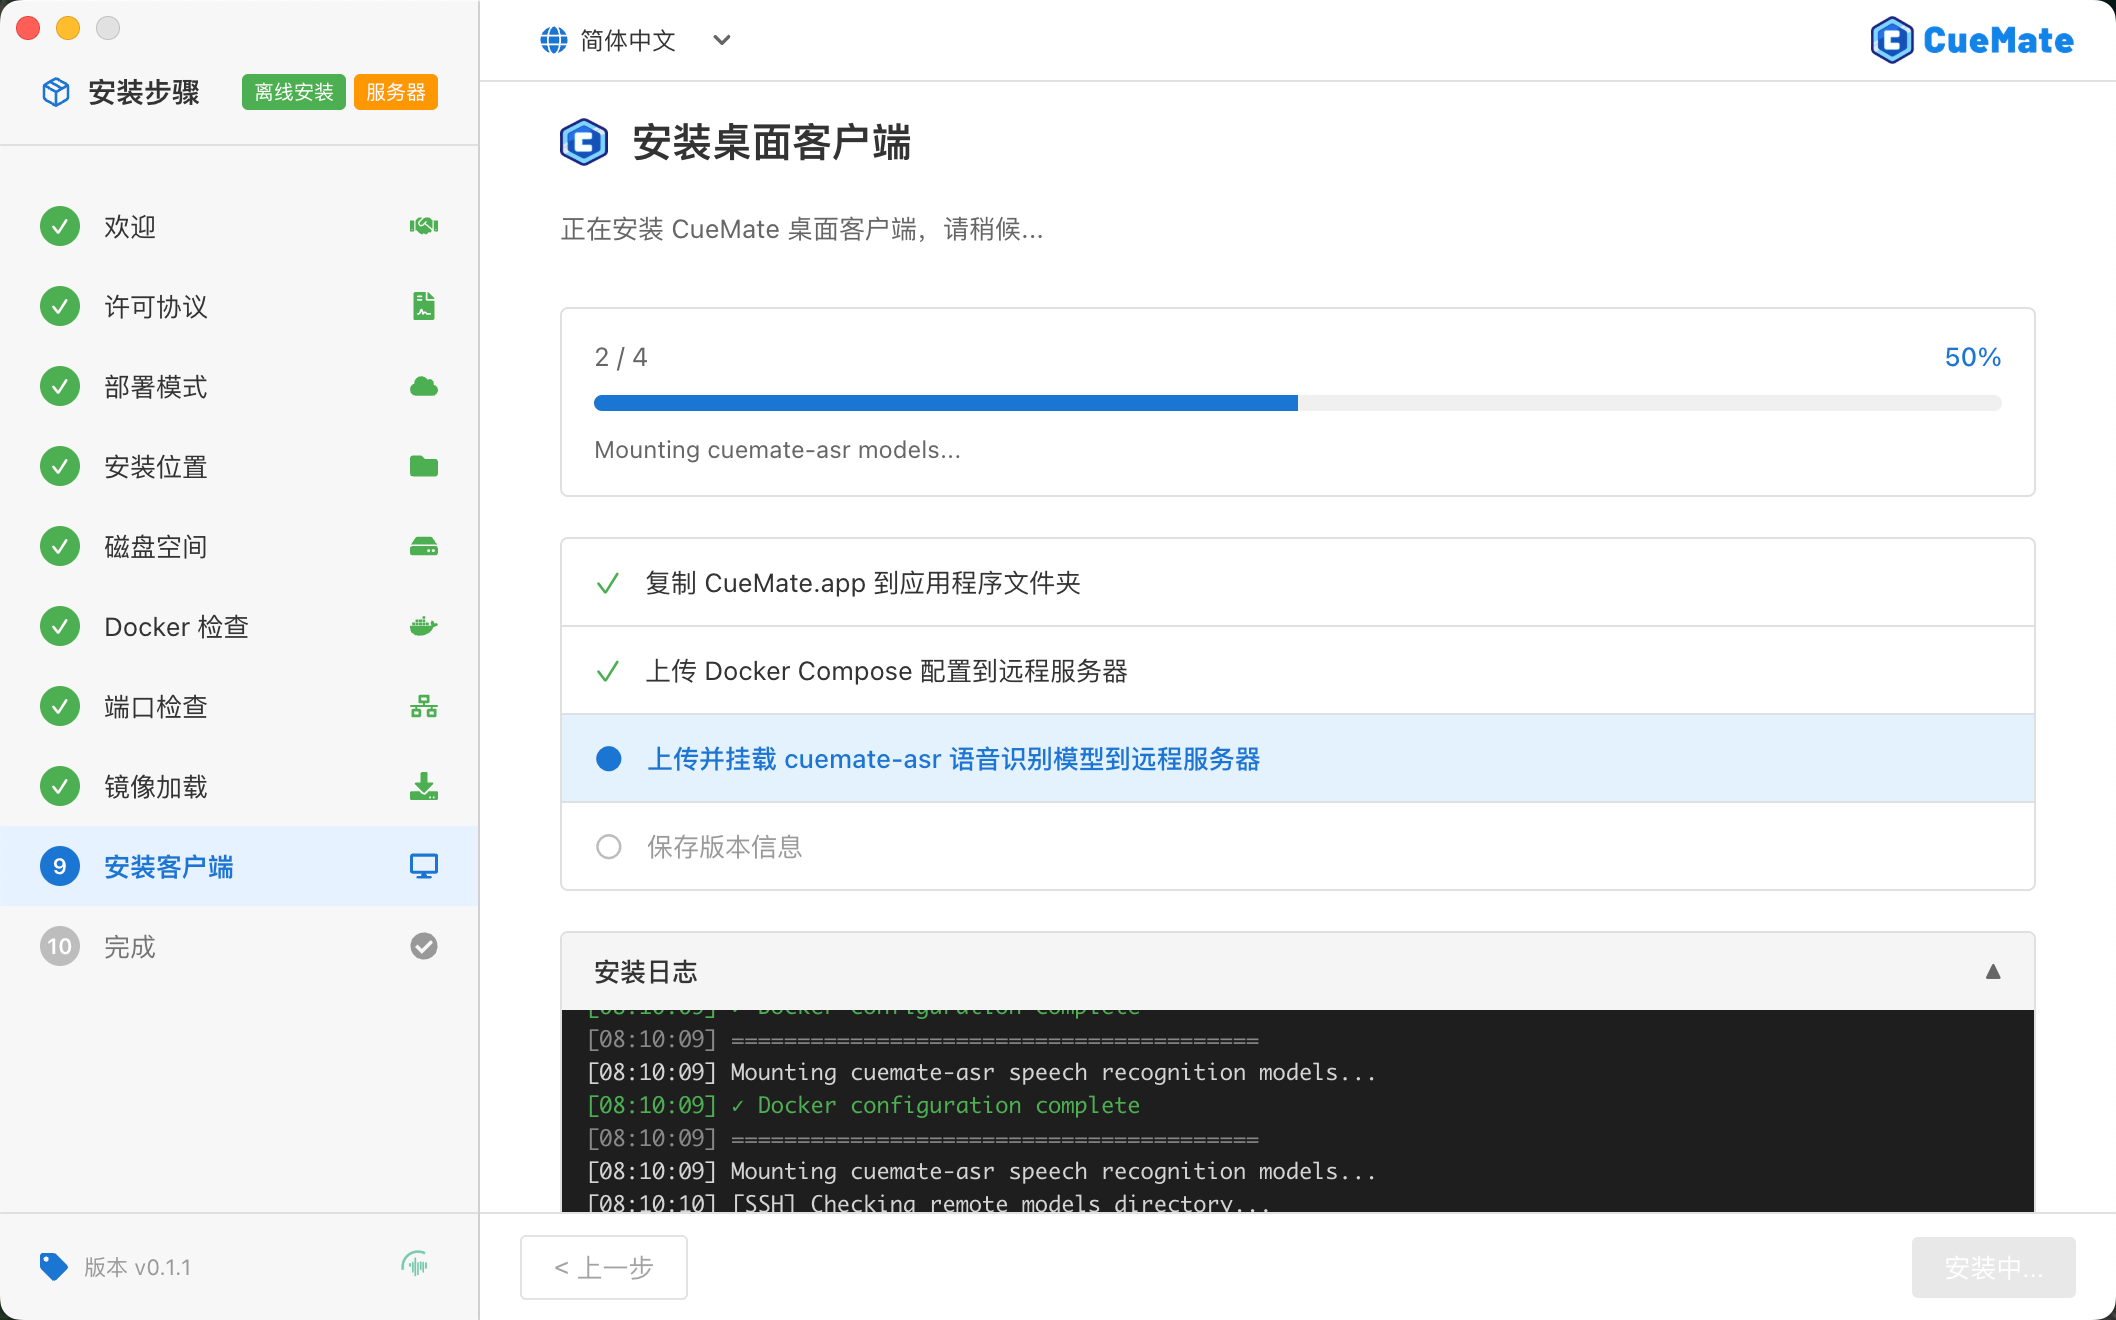
Executes 4 steps:
- Copy CueMate.app: Install to local
/Applicationsdirectory - Configure Docker Compose: Upload docker-compose.yml to remote server
/opt/cuemate/via SSH - Mount ASR Speech Model: Upload ~1GB model file to server via SCP and extract to
/opt/cuemate/data/funasr_models/ - Save Version Info: Record installation version
Estimated time: Several minutes to over ten minutes (depending on network speed)
TIP
Please ensure you complete this step before closing the wizard, otherwise the desktop client will not be properly installed.
After installation completes, click the Next button to proceed to the final step.
3.10 Step 10: Complete
When all steps are complete, the installation wizard will display the success screen.

Click the Finish button, and the installation wizard will automatically:
- Close the installation window
- Launch the CueMate desktop application
4. First Use
4.1 System Permission Authorization
CueMate requires necessary system permissions when using speech recognition features.
4.1.1 Microphone Permission
When using the microphone feature for the first time, the system will automatically pop up an authorization prompt. Please click the Allow button to grant CueMate access to the microphone.
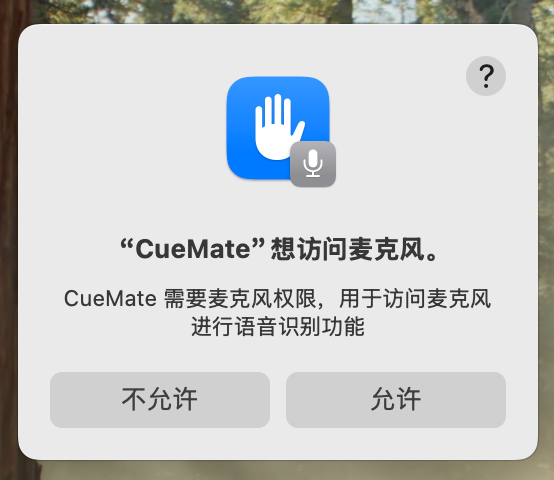
If you accidentally clicked "Don't Allow" or closed the authorization window:
- Open System Settings > Privacy & Security
- Find and click Microphone in the left menu
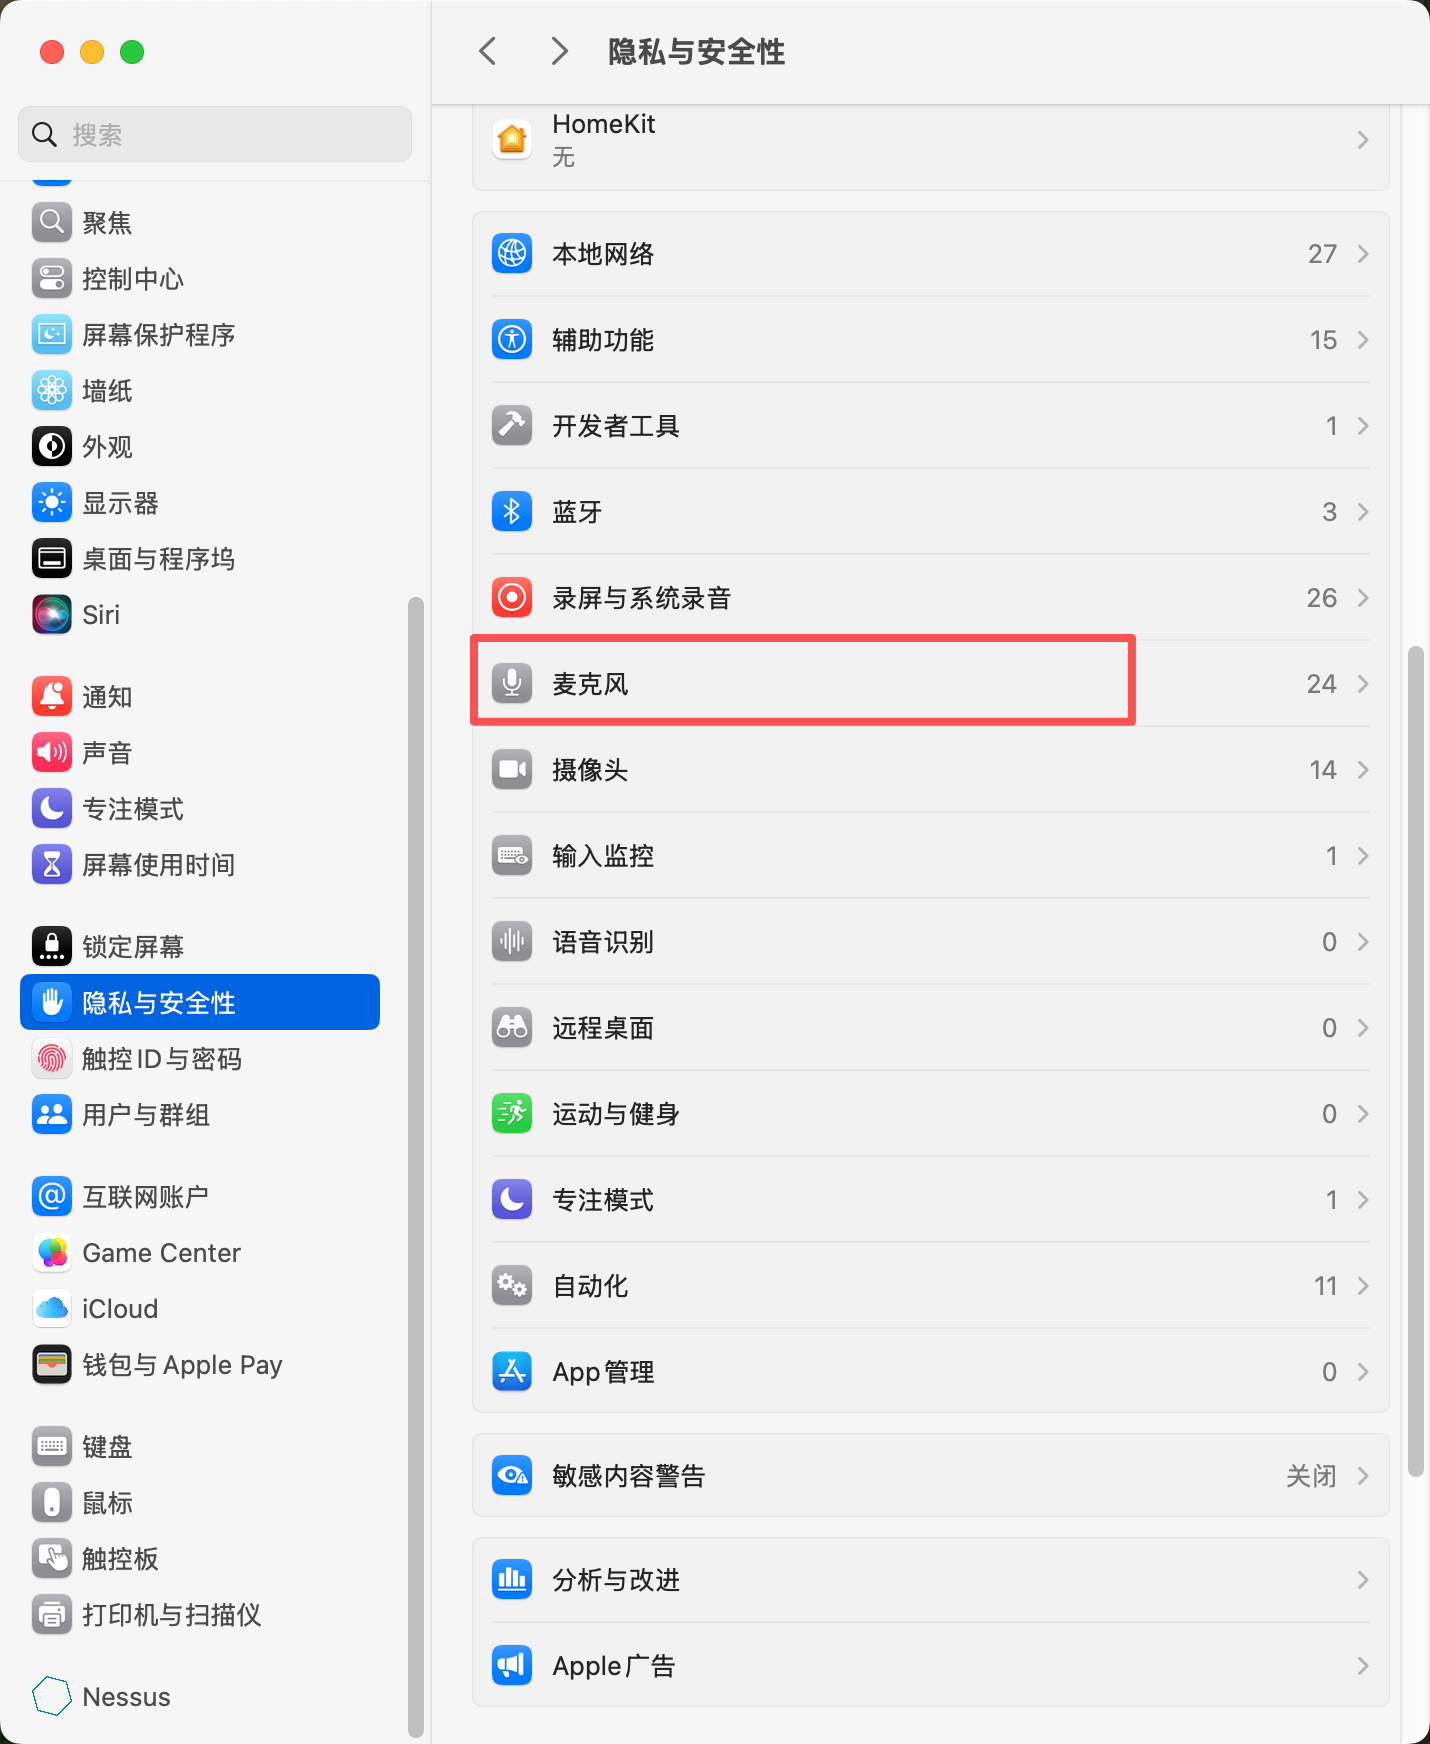
- Find CueMate in the right application list and toggle the switch to enable microphone permission
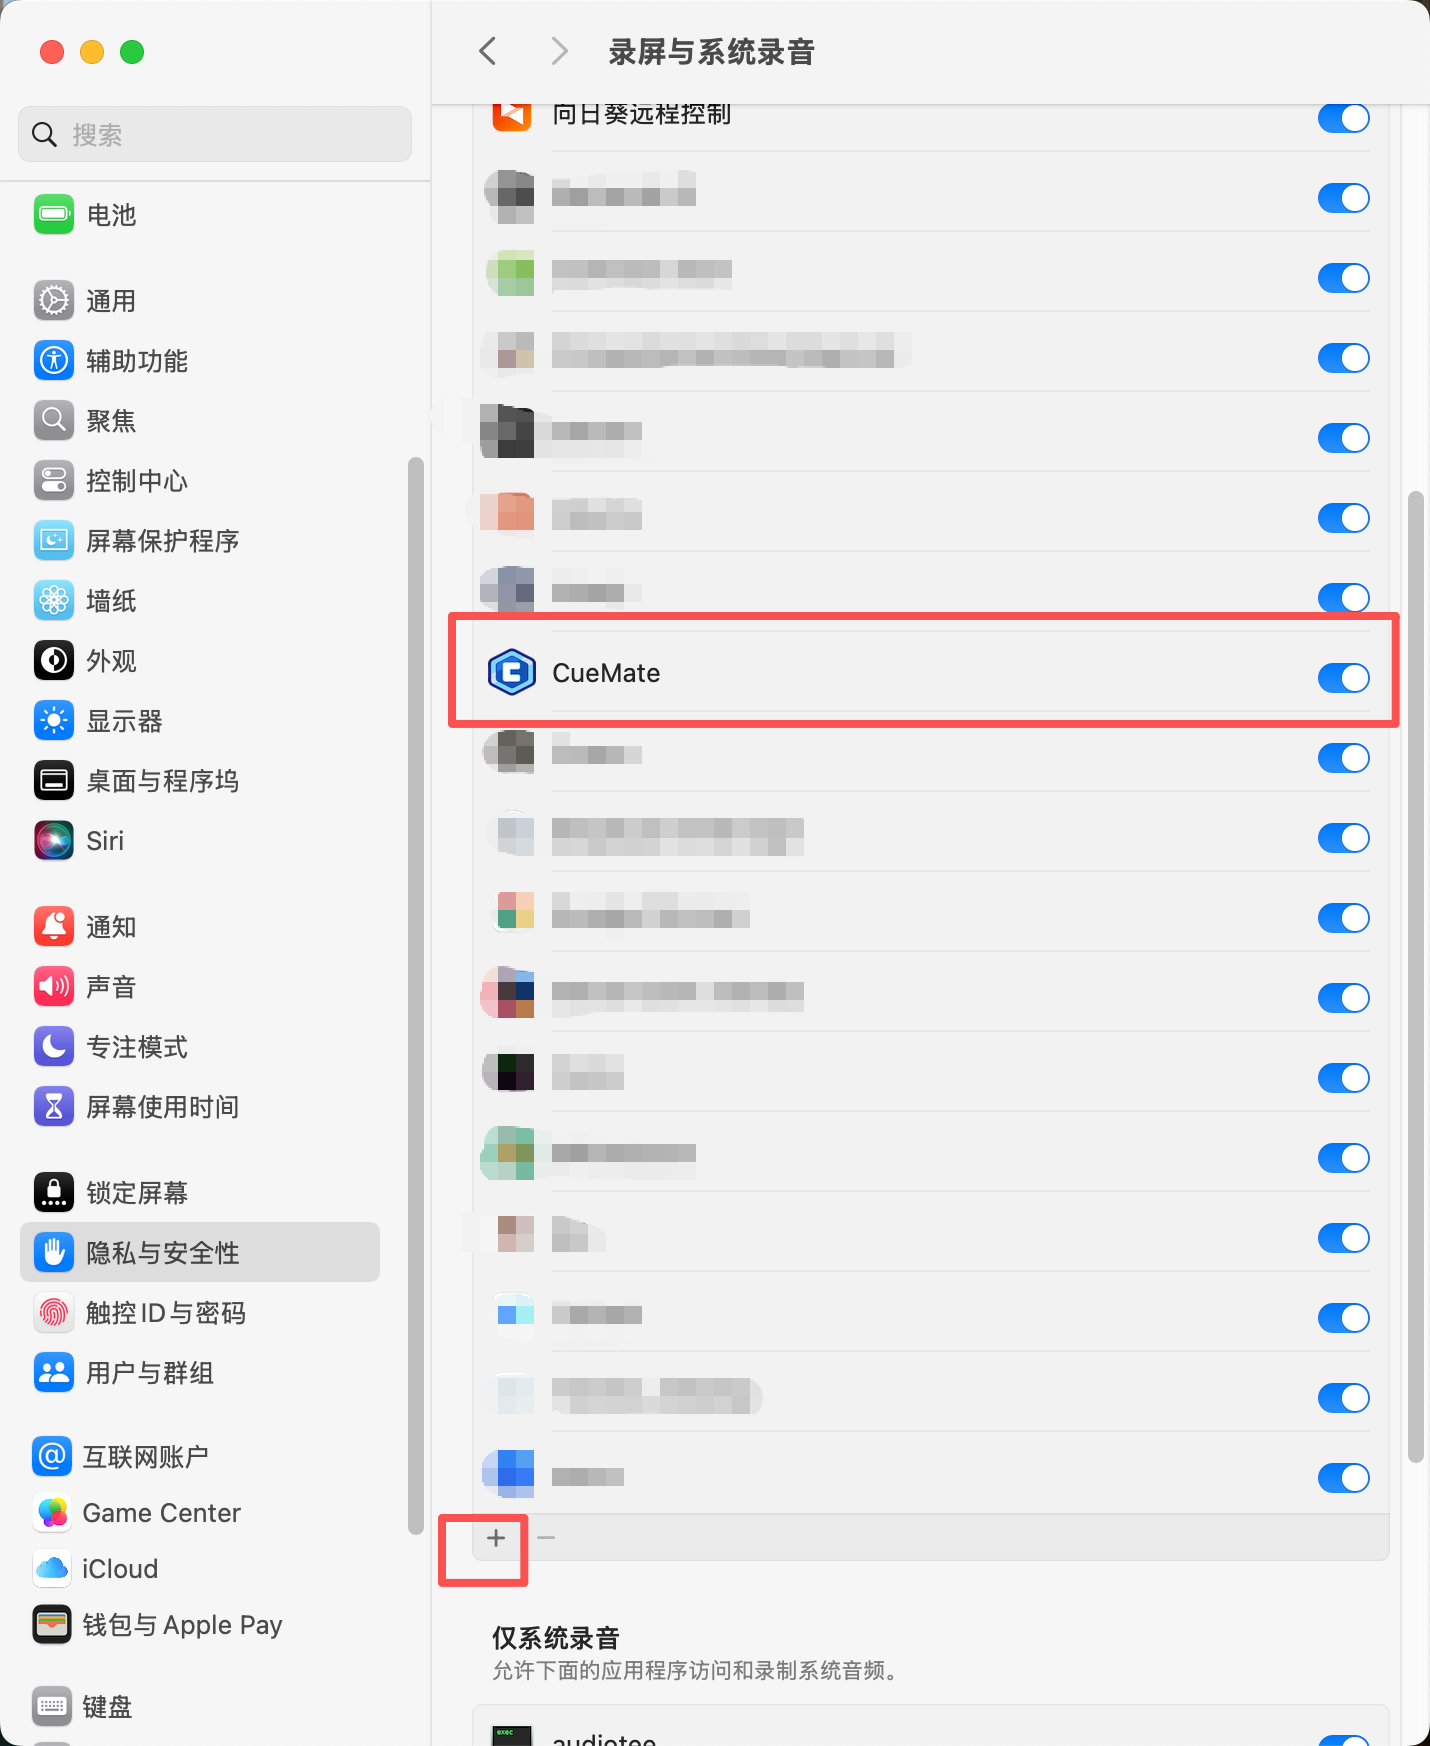
4.1.2 Screen Recording & System Audio Permission
To enable interviewer voice recognition, CueMate requires "Screen Recording & System Audio" permission to capture system audio.
NOTE
Why is this permission needed?
- CueMate uses "Screen Recording & System Audio" permission to capture system audio
- Only used for audio capture, does not record screen visuals
- Used to recognize interviewer voice played by interview software (such as Zoom, Teams, etc.)
When testing the speaker feature for the first time, the system will automatically pop up an authorization prompt. Please click the Allow button to grant CueMate access to system audio.
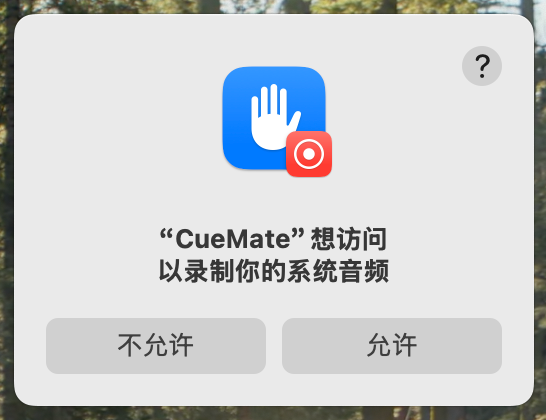
If you accidentally clicked "Don't Allow" or closed the authorization window:
- Open System Settings > Privacy & Security
- Find and click Screen Recording in the left menu

- Find CueMate in the right application list and toggle the switch to enable system audio capture permission
- If CueMate is not in the list, click the "+" button at the bottom of the list to add it manually
TIP
After authorization, no need to restart the app, just return to CueMate to use the feature
4.2 Login to System
After installation, search for the CueMate app icon in Launchpad and single-click to open the application.

After the app starts, the login screen will appear:
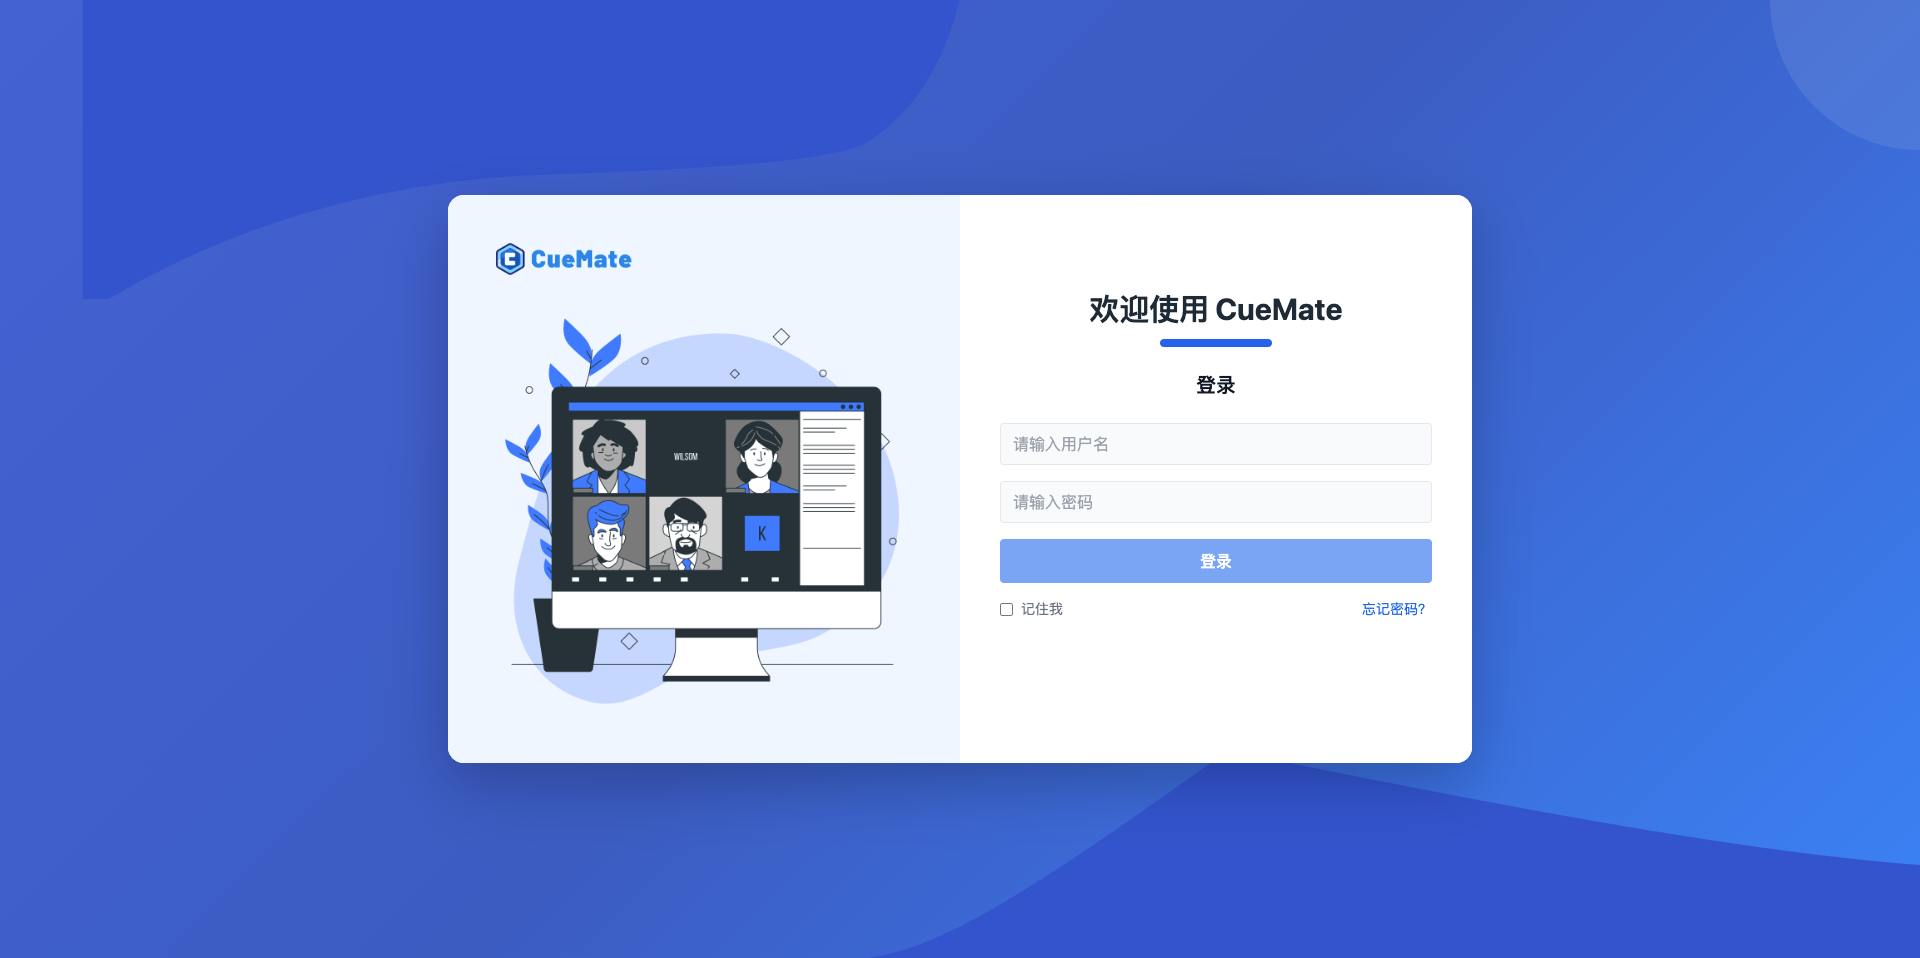
Built-in Account Information:
- Username:
admin - Password:
cuemate
Enter the above account information on the login screen and click the Login button to enter the system.
4.3 Getting Started
After successful login, CueMate's control window will float at the top center of the screen.
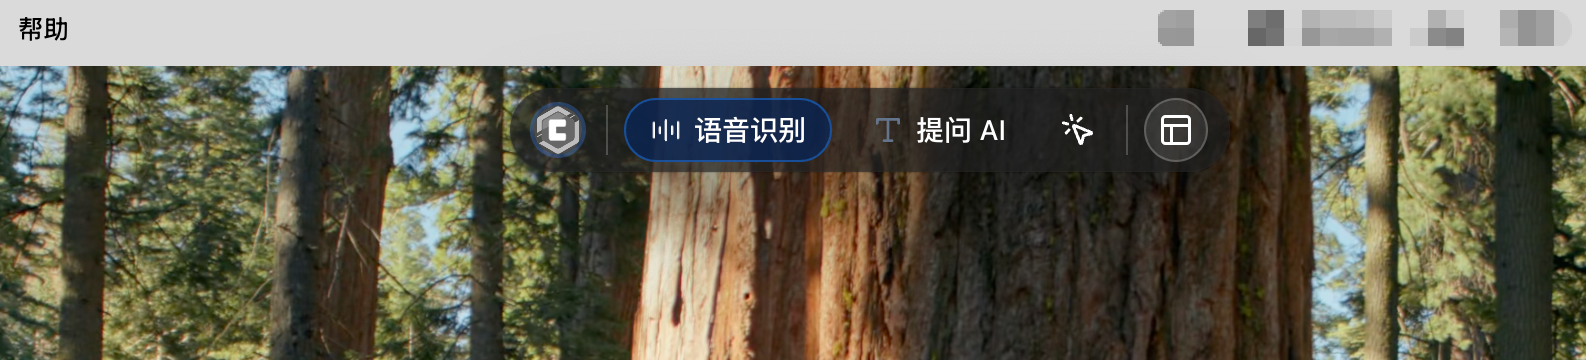
Control Window Button Description (from left to right):
- CueMate Icon: Click to open CueMate official website
- Voice Recognition: Click to start voice recognition, opens interview feature window
- Ask AI: Click to open AI question window for quick AI queries
- Interactive Mode: Toggle window click-through mode (Interactive/Click-through)
- Main App Window: Click to open main application window for backend management interface
- Show/Hide: Click to hide or show control bar and all windows
Additionally, CueMate will display an icon in the menu bar for quick access to common features.
5. FAQ
5.1 Installation Wizard Won't Open
Problem: No response after double-clicking the installation wizard icon
Solution:
- Confirm you have followed the steps in the "Handle Security Prompt" section to allow opening the app in system settings
- Try right-clicking the installation wizard icon and selecting "Open"
- If still unable to open, please re-download the installation package
5.2 Insufficient Disk Space
Problem: Installation wizard prompts insufficient disk space
Solution:
- Clean up disk, ensure at least 10GB available space
- Delete unnecessary files and applications
- Empty the Trash
- Return to installation wizard and click "Re-check"
5.3 Docker Desktop Won't Start
Problem: Installation wizard prompts Docker cannot start
Possible Causes:
- macOS version too low
- System virtualization feature not enabled
- Docker Desktop installation incomplete
Solution:
- Confirm macOS version meets requirements (13 or higher)
- Reinstall Docker Desktop
- Restart Mac and try again
5.4 Port Conflict Cannot Be Resolved
Problem: Installation wizard prompts port is occupied and auto-resolve failed
Solution:
- Note down the conflicting port number and program name
- Manually quit these programs:
- Open "Activity Monitor" (Applications > Utilities)
- Find the program occupying the port
- Select the program and click the "×" button in the top left to force quit
- Return to installation wizard and click "Re-check"
5.5 Image Loading Failed
Problem: Installation wizard fails at "Image Loading" step
Possible Causes:
- Network connection interrupted
- Docker service abnormal
- Insufficient disk space
Solution:
- Check network connection
- Confirm Docker Desktop is running
- Check disk space
- Click "Retry" button to re-execute loading
5.6 Permission Granted But Still Can't Use
Problem: Microphone permission has been granted but voice recognition still doesn't work
Solution:
- Completely quit CueMate:
- Click the CueMate icon in the menu bar
- Select "Quit CueMate"
- Restart CueMate
- Test voice feature again
If still unable to use, go to System Settings > Privacy & Security > Microphone to confirm CueMate is checked.
5.7 Main App Window Won't Open
Problem: No response after clicking the "Main App Window" button in the control window
Solution:
- Confirm CueMate app is running (icon in menu bar)
- Confirm backend services are running normally (click menu bar icon to check service status)
- If service is abnormal, click menu bar icon and select "Restart Services"
- Wait for services to restart (about 30 seconds), then try opening main app window again
6. Uninstall CueMate
6.1 Uninstall Steps
- Quit CueMate app (click menu bar icon > Quit)
- All backend Docker services will automatically stop when quitting
- Open the "Applications" folder and drag CueMate.app to Trash
- Clean data files (optional):
- Open Finder
- Press
Command + Shift + G - Enter
~/Library/Application Support - Find the
cuemate-desktop-clientfolder and delete it
- Empty the Trash
Note:
- Deleting the
cuemate-desktop-clientfolder will erase all your interview records, configurations, and speech recognition models (~1.6GB) - If you plan to reinstall CueMate in the future, it's recommended to keep this folder to save time on re-downloading/extracting models
Next Steps
After installation, we recommend:
- Read the Quick Start Guide to learn basic usage
- Check the Feature Manual to explore all CueMate features
- Configure AI Models to start using intelligent features
- Perform Voice Test to ensure audio devices work properly
If you encounter issues, check the FAQ or contact technical support.
Enjoy using CueMate, and good luck with your interviews!