Position List
The Position List page is used to manage created positions, supporting viewing and editing position information and resume content, using AI to optimize resumes, and deleting positions. The page uses a left-right layout with the position list on the left and the editing area on the right.
1. Browse Position List
1.1 Enter Position List
Click "Position List" in the top menu to enter the position management page.
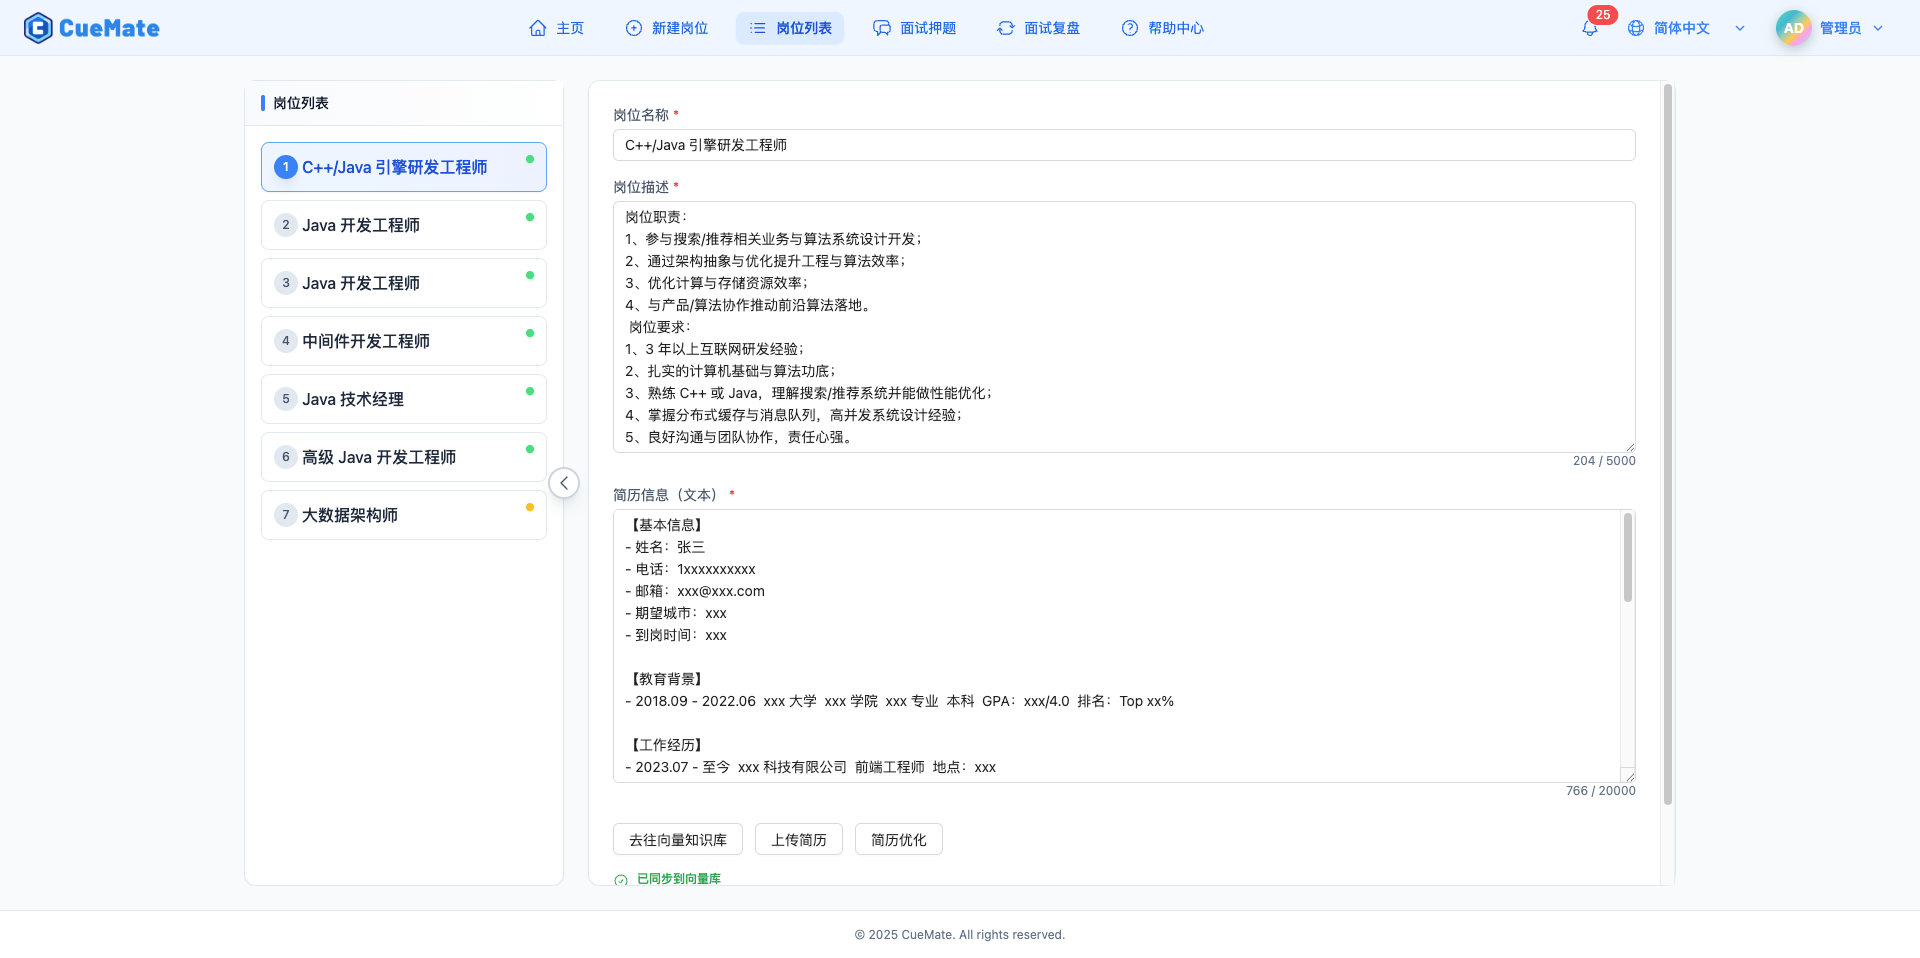
1.2 View Position List
The left sidebar displays all created positions.
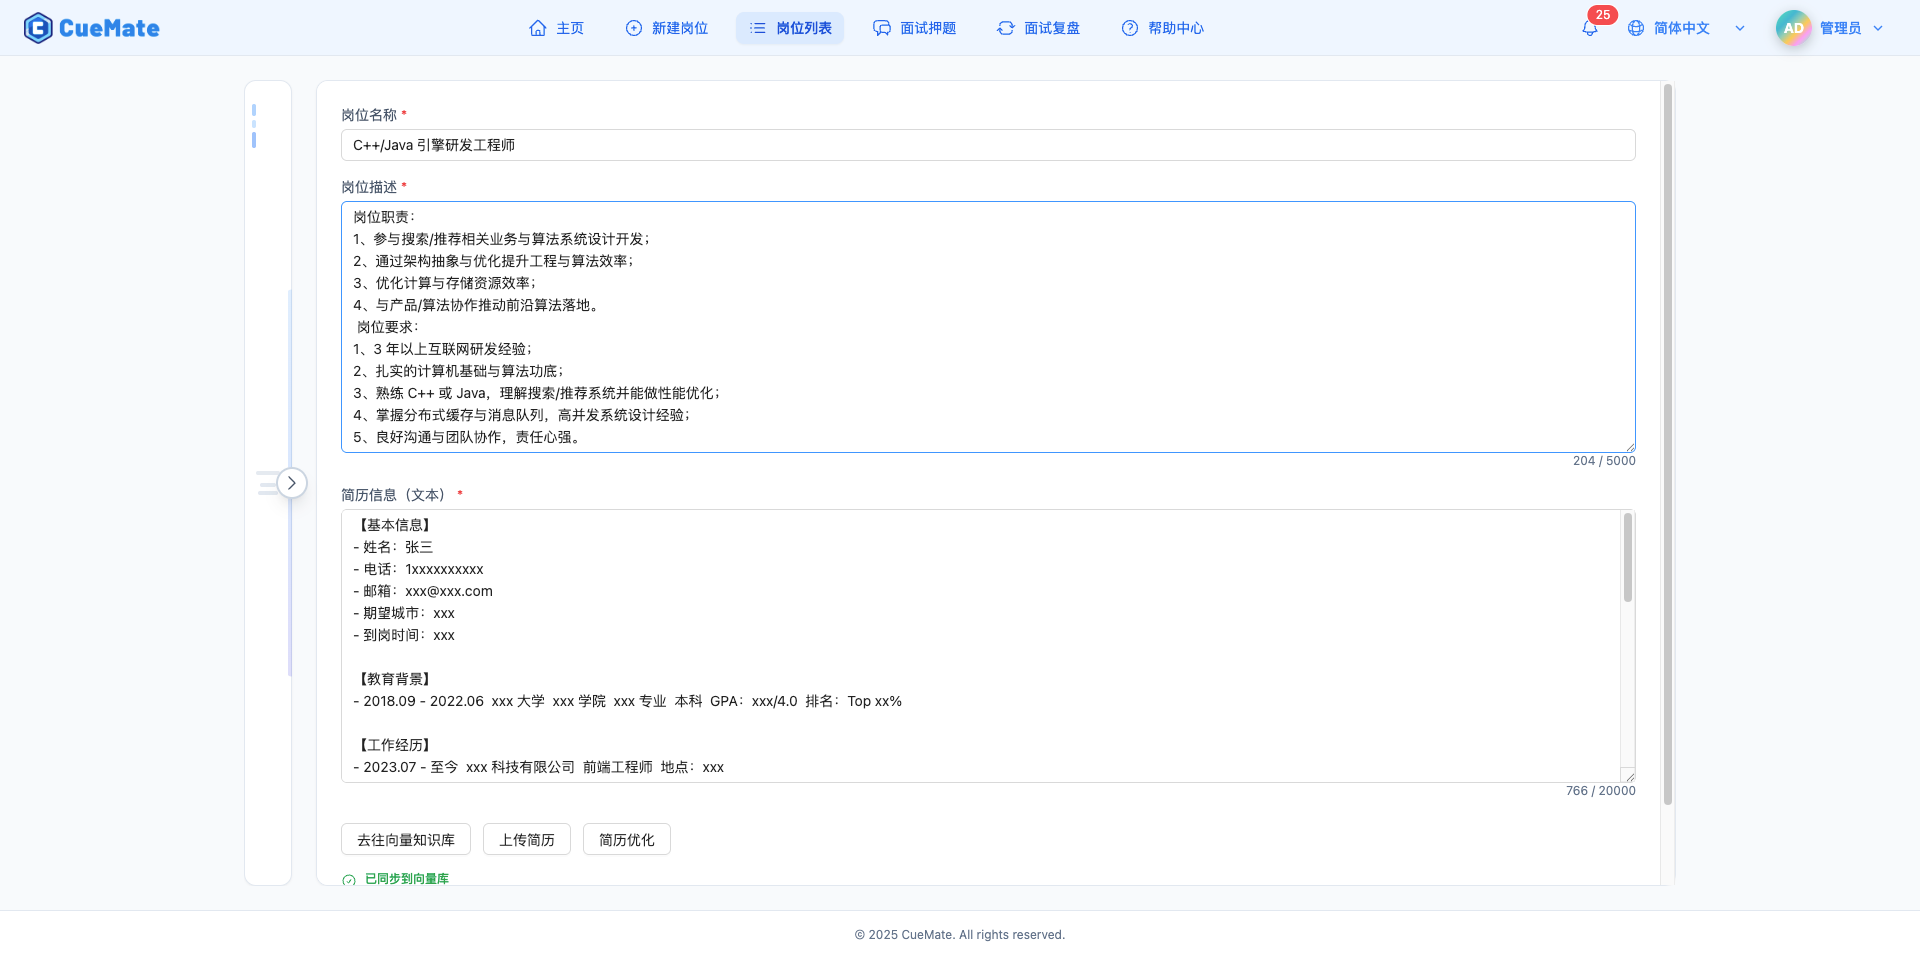
Note: The sidebar is expanded by default, listing all position titles. Click a position to view and edit detailed information on the right. If there are many positions, you can scroll to view. The sidebar can be collapsed by clicking the collapse button.
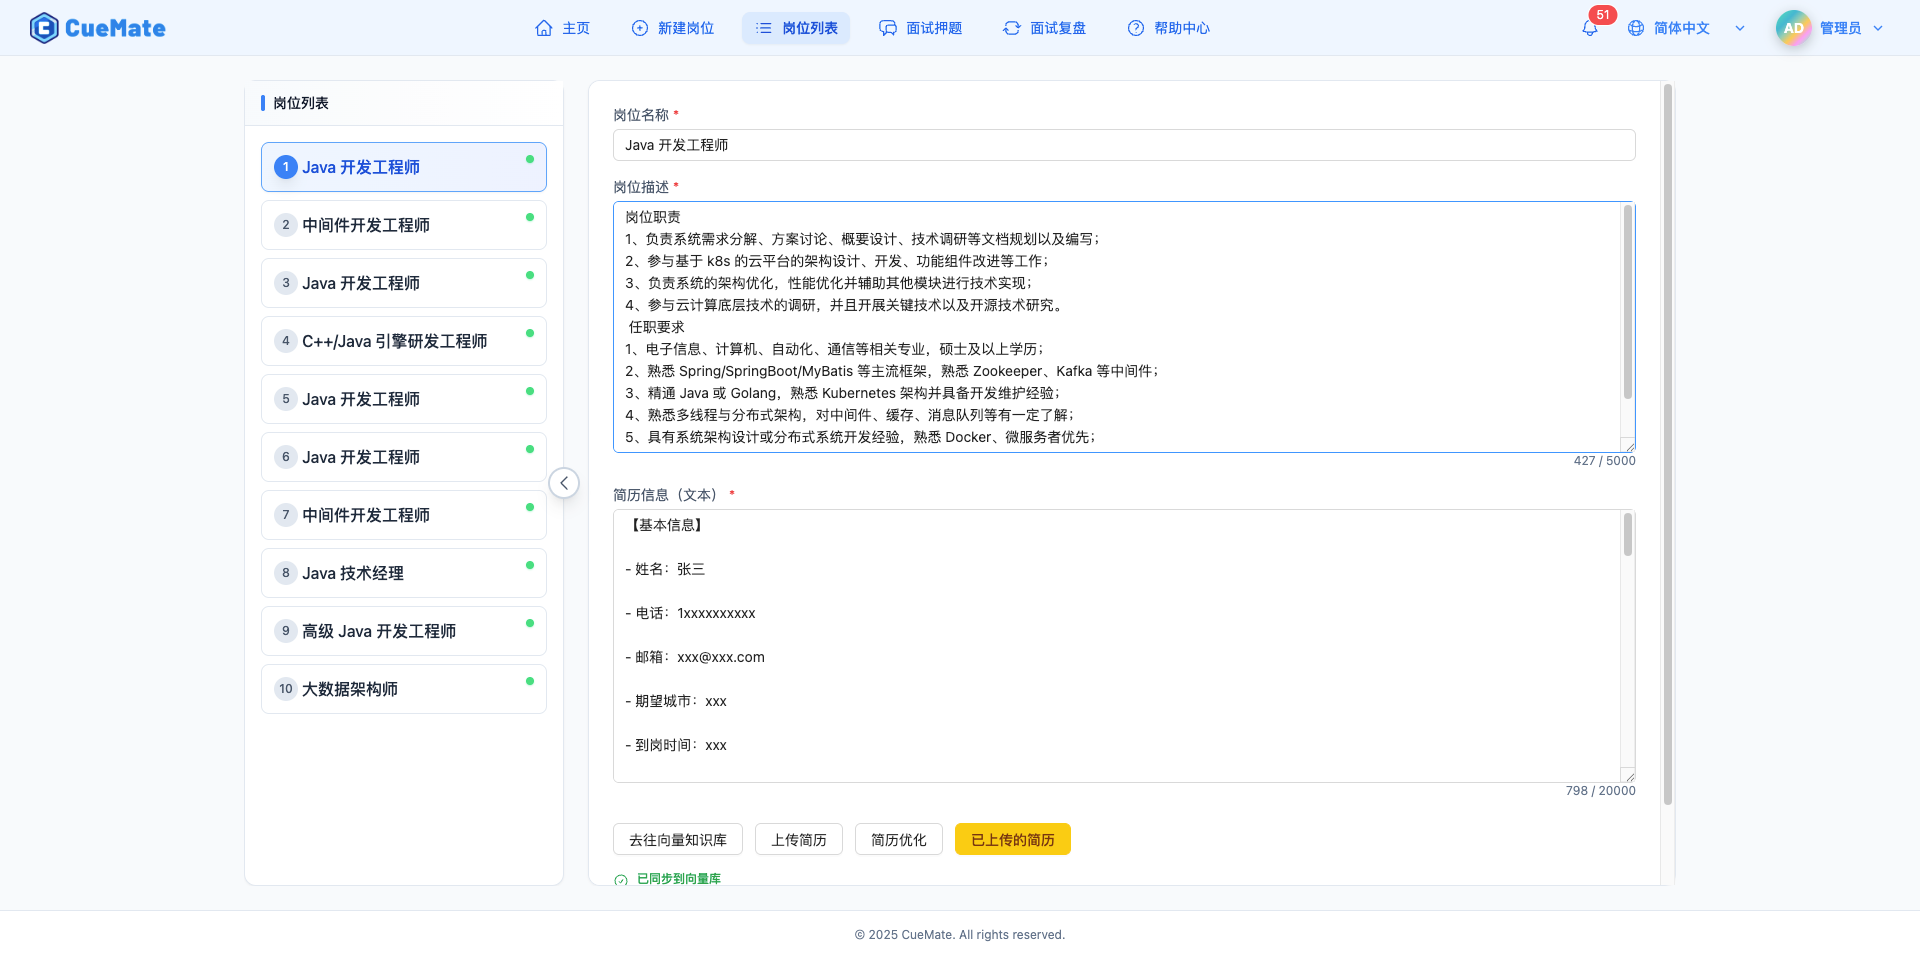
2. View and Edit Positions
2.1 Select Position
Click any position in the left list to display its detailed information on the right.
2.2 Edit Position Title
Modify the position name in the "Position Title" input field at the top right.
Note: The position title is displayed in multiple places including Home and interview training. Use a concise and clear name. Changes require clicking "Save Changes" to take effect.
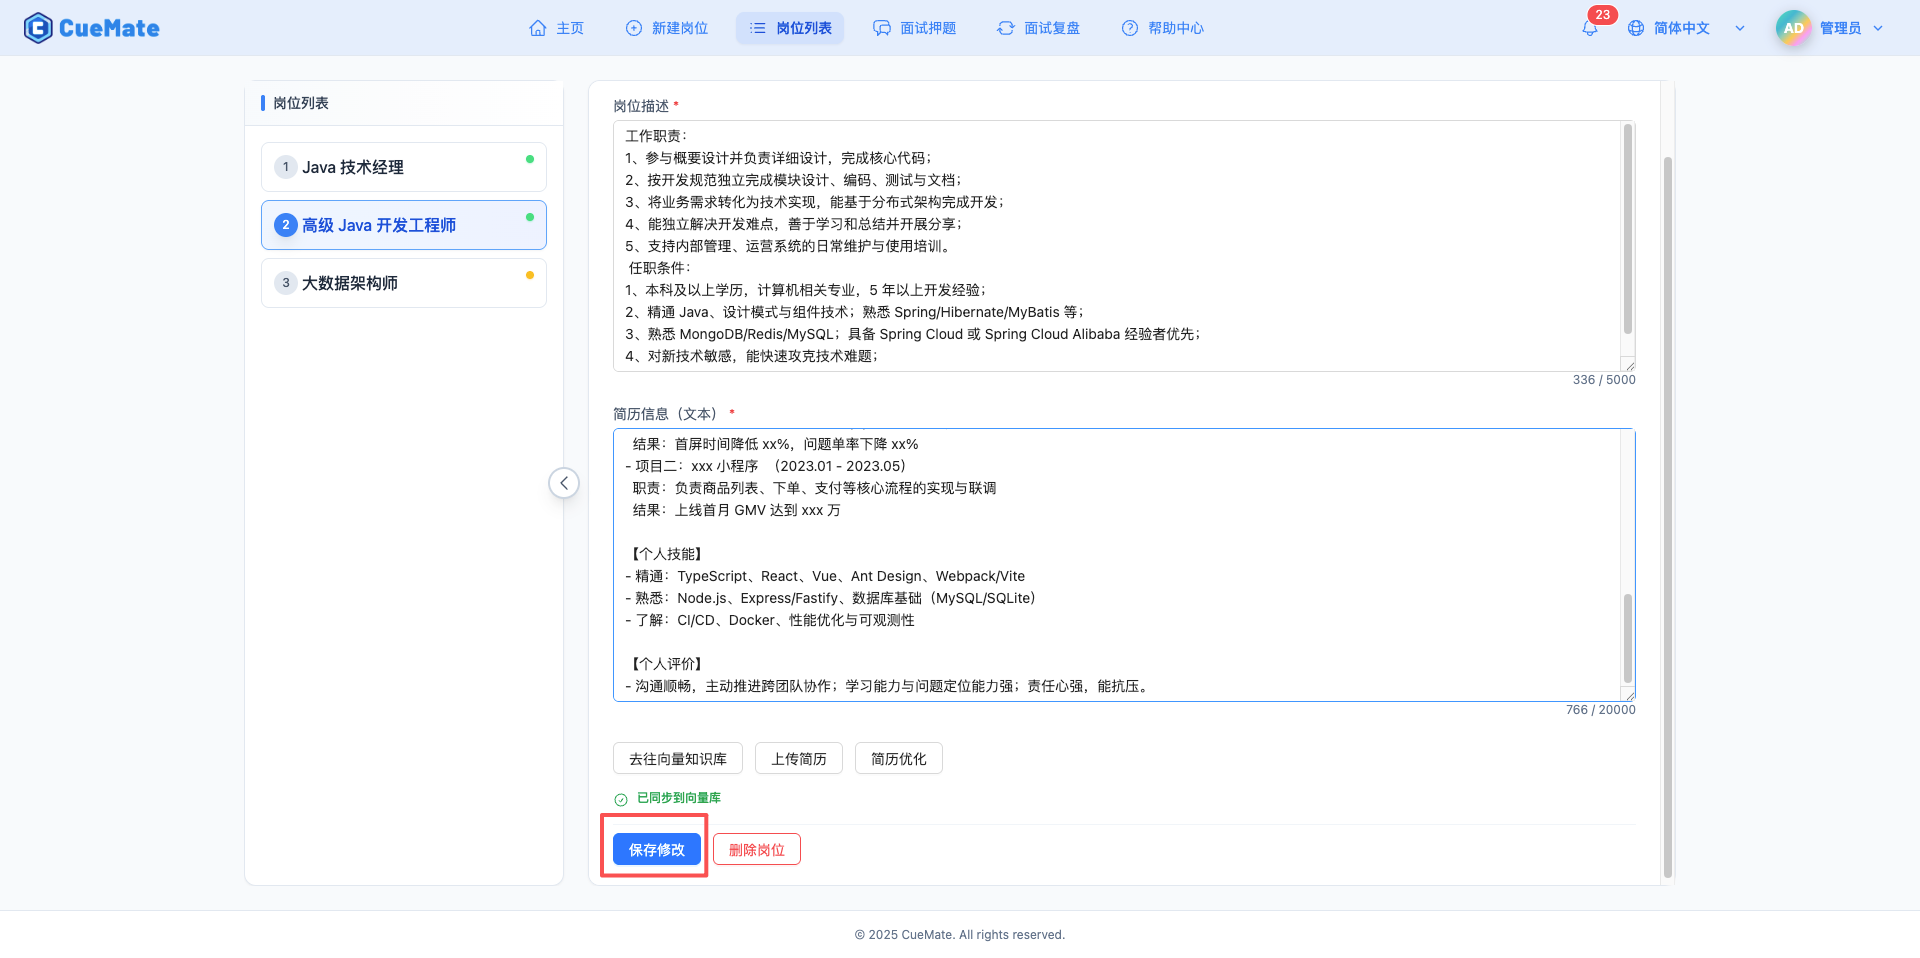
2.3 Edit Position Description
Modify the job description content in the "Position Description (JD)" text area.
NOTE
Importance of Position Description:
- Generate Interview Questions: During mock interviews, the system generates targeted interview questions based on skill requirements and job responsibilities in the JD
- AI Answer Suggestions: During interview training, AI provides more accurate answer suggestions based on JD and resume content
- Knowledge Base Retrieval: RAG retrieval references keywords in the JD to improve answer relevance
Modification Tips:
- Update JD content as position requirements change
- Add missing technical stacks or responsibility requirements
- Remove outdated skill requirements
WARNING
Important: After modifying the JD, you need to resync to the vector database for changes to take effect. Otherwise, interview training may still use the old JD content.
2.4 Edit Resume Content
Modify resume information in the "Resume Content" text area.
NOTE
Purpose of Resume Content:
- Match Analysis: Compare resume and JD to analyze skill match
- Personalized Suggestions: AI provides answers more aligned with personal background based on project experience in resume
- Weakness Identification: Find skills required by JD but missing from resume for focused preparation
Modification Scenarios:
- Add new project experience
- Update technical stack and tools
- Optimize project descriptions to highlight achievements
2.5 Save Changes
After editing position or resume content, click the "Save Changes" button.
Save Process:
- Update position information in database
- Display save success message
IMPORTANT
Sync Status:
- After saving, if the bottom status indicator turns red, it means position data has been modified but not synced to the vector database
- To use the latest position information in interview training, go to the Vector Knowledge Base page to sync manually
- If the bottom status indicator is green, it's synced and ready to use
3. Resume Management
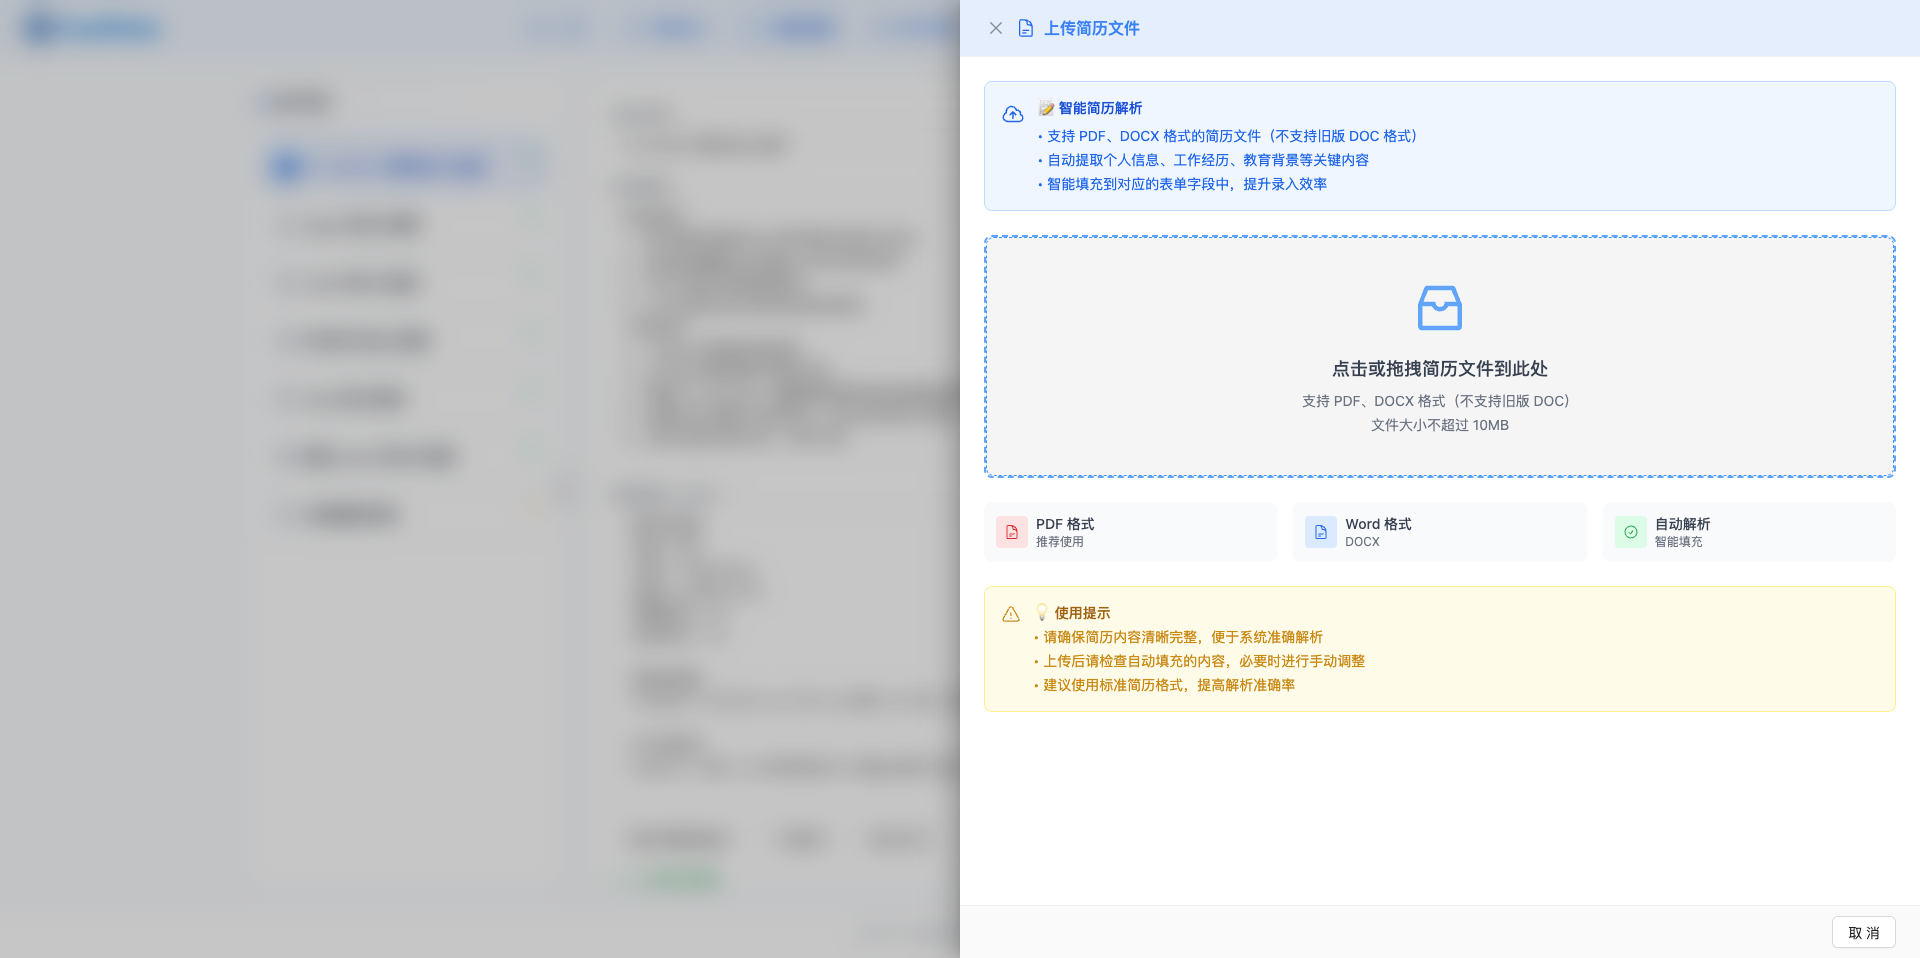
3.1 Upload Resume File
Click the "Upload Resume File" button to open the resume upload side panel.
Upload Process:
- Click or drag local resume file to upload area (PDF, DOCX; old DOC format not supported)
- System automatically extracts text content
- After successful extraction, resume content is automatically replaced in the editing area
Use Cases:
- Update resume to latest version
- Replace with a resume optimized for this position
- Correct previously incorrectly extracted resume content
NOTE
File Format:
- Supported Formats: PDF, DOCX
- Unsupported Format: Old DOC format (DOC 97-2003)
- File Size: Maximum 10MB
3.2 View Uploaded Resume File
3.2.1 When "Uploaded Resume" Button Appears
When a resume file has been uploaded for a position, a yellow "Uploaded Resume" button appears at the top of the page.
Display Conditions:
- Resume file has been successfully uploaded and saved to server
Button Style:
- Color: Yellow background (#facc15)
- Text: "Uploaded Resume" on desktop, "Uploaded" on mobile
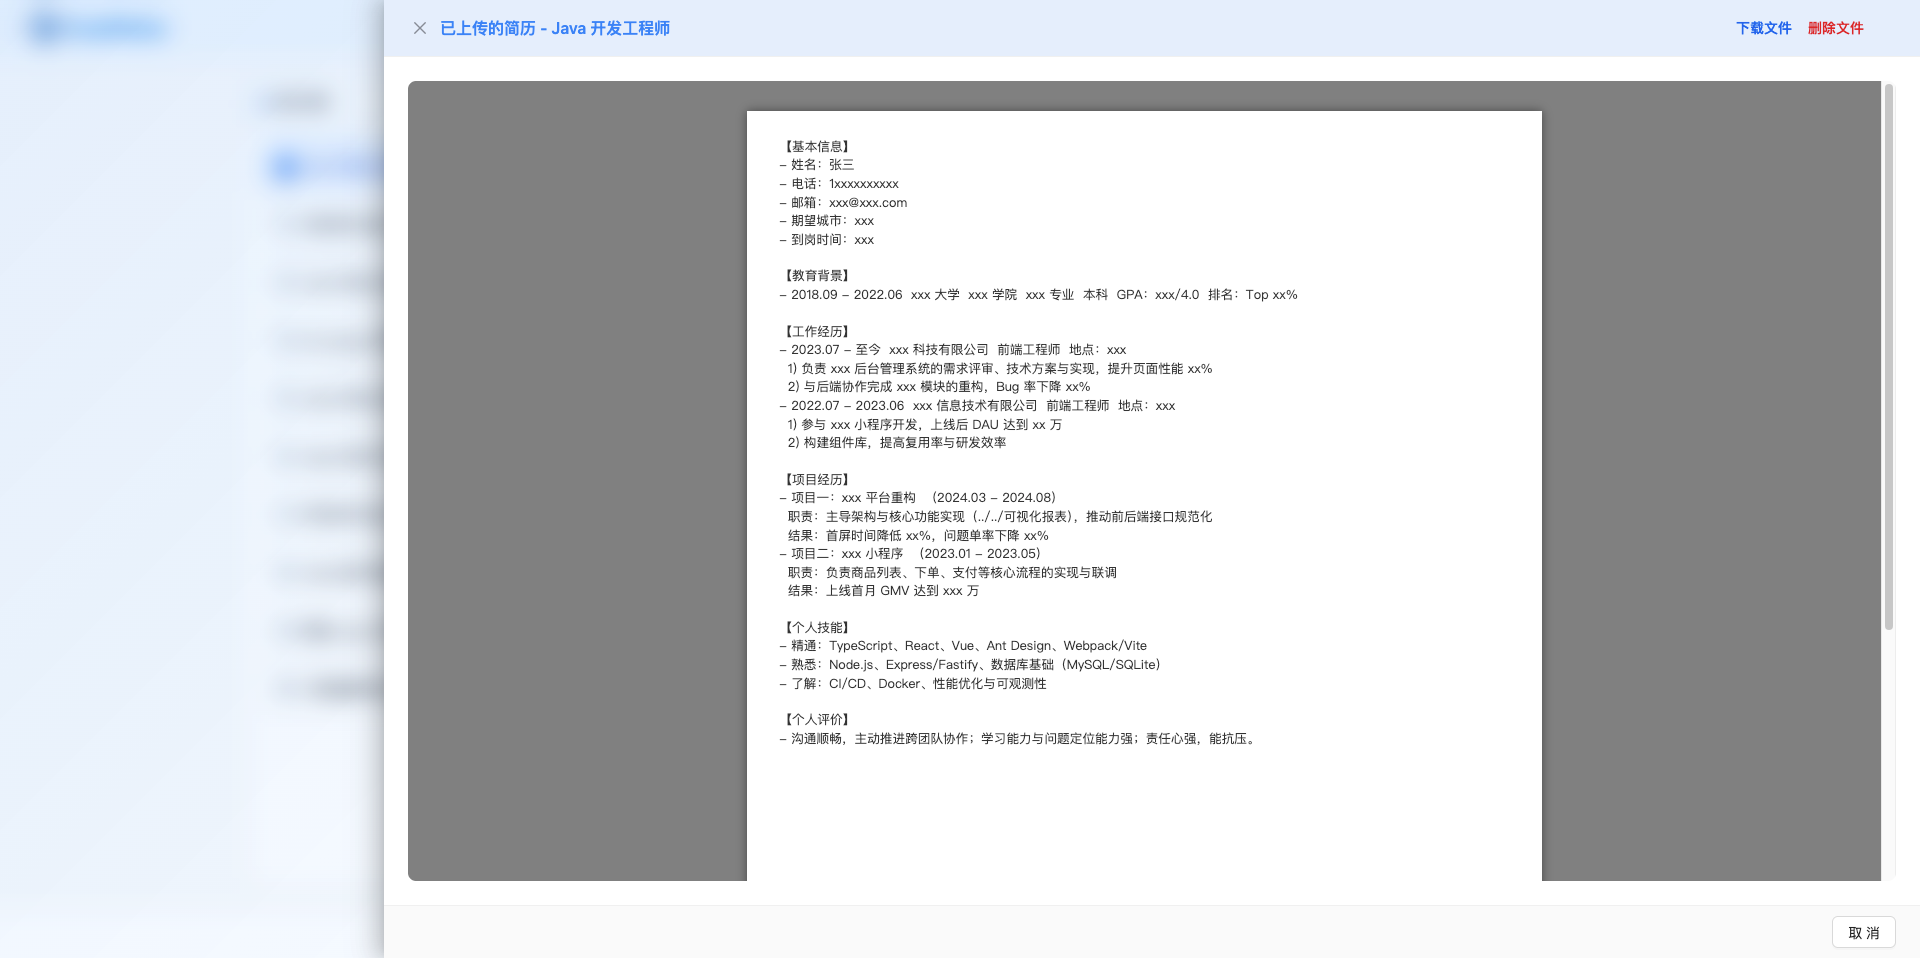
3.2.2 Open Resume Preview Window
Click the "Uploaded Resume" button to open the resume preview side panel.
Window Features:
- File Preview: Automatically selects preview method based on file format
- Download File: Click "Download File" button in top right corner to download resume
- Delete File: Click "Delete File" button to remove resume file record
3.2.3 Supported File Formats
Resume preview supports multiple file formats, each with different preview methods:
1. PDF Files:
- Uses browser's built-in PDF viewer
- Displays PDF content directly in window
- Supports standard PDF operations like zoom and page navigation
2. DOCX Files (Word Documents):
- Rendered using js-preview-docx library
- Preserves document formatting and styles
- Supports viewing tables, images, and other elements
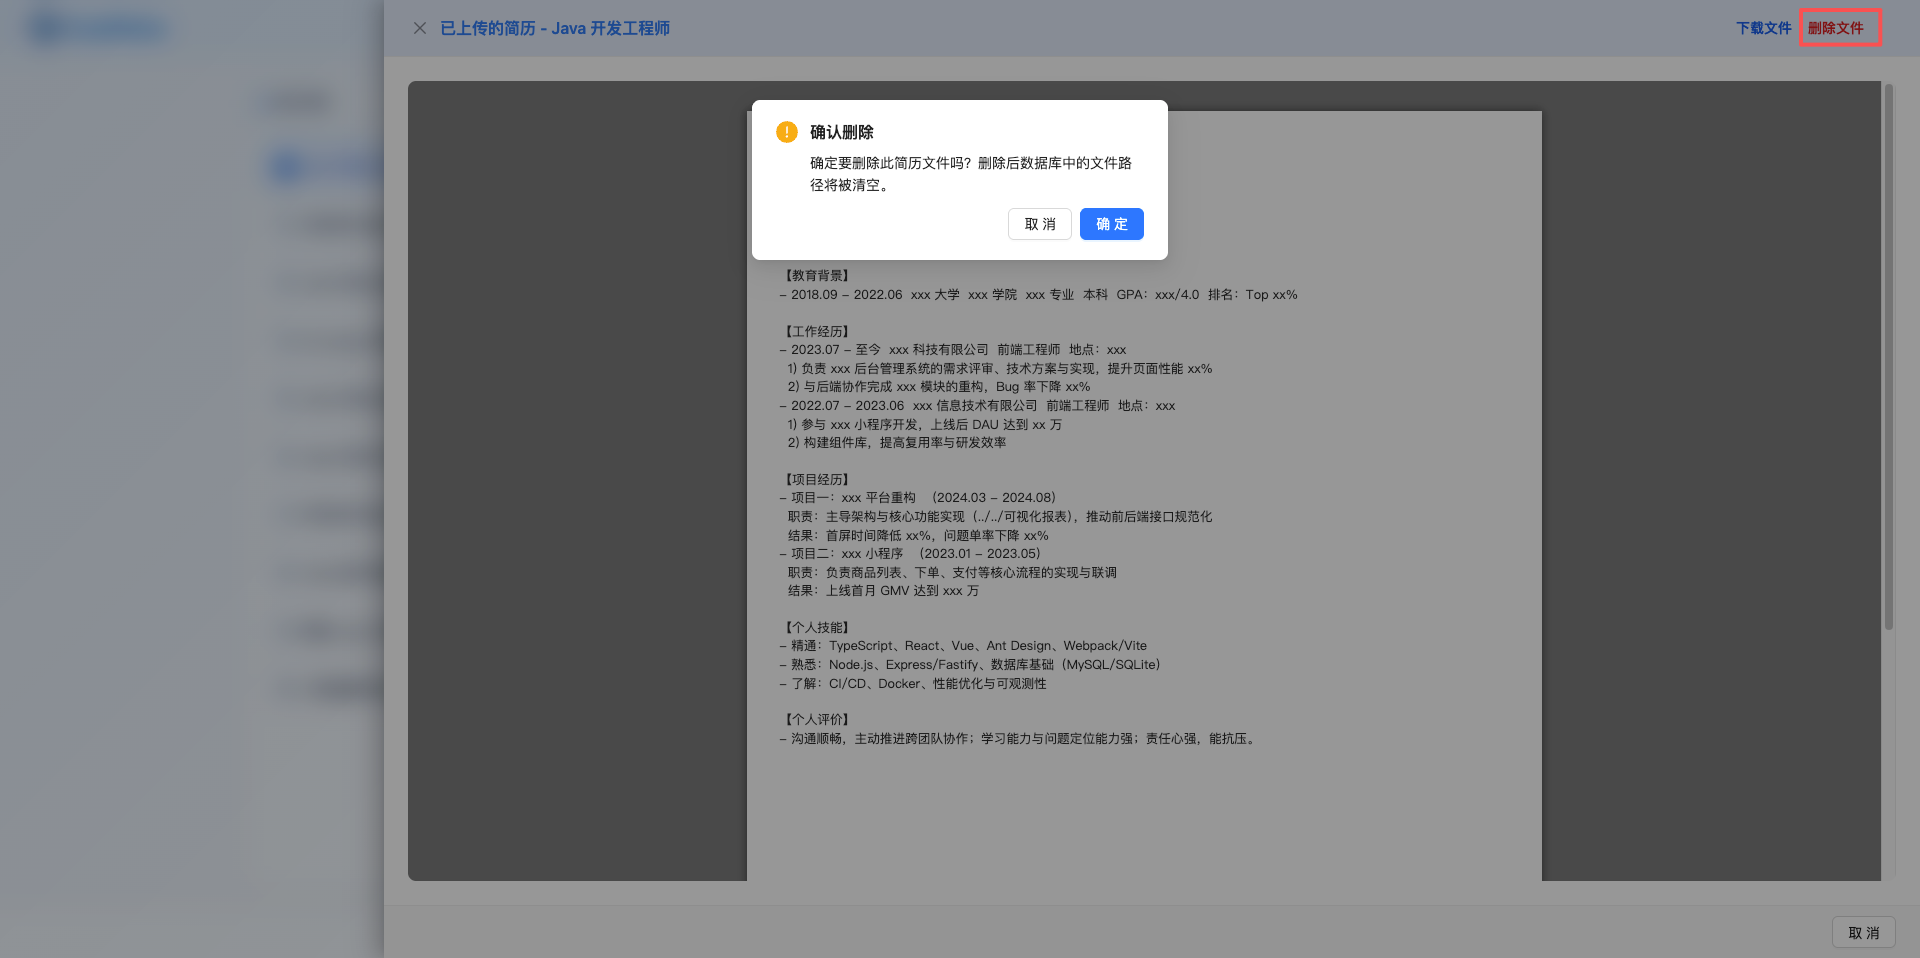
3.2.4 Delete Resume File
In the resume preview window, click the "Delete File" button in the top right corner to delete the resume file record.
Delete Process:
- Click "Delete File" button
- Confirmation dialog appears: "Are you sure you want to delete this resume file? The file path in the database will be cleared."
- After confirmation, delete operation executes
- "Resume file deleted" message displays
- Preview window closes automatically and position data refreshes
Delete Impact:
- Database Record: Clears the resume file directory for this position
- Button Hidden: "Uploaded Resume" button no longer displays
- File Retained: Physical file on server still exists (requires manual cleanup)
- Resume Content: Resume text content in editing area is not affected
WARNING
Notes:
- Delete operation only clears file path reference in database
- Physical file on server is not automatically deleted
- To completely delete the file, administrator needs to manually clean server files
3.3 AI Resume Optimization
3.3.1 Open Resume Optimization List
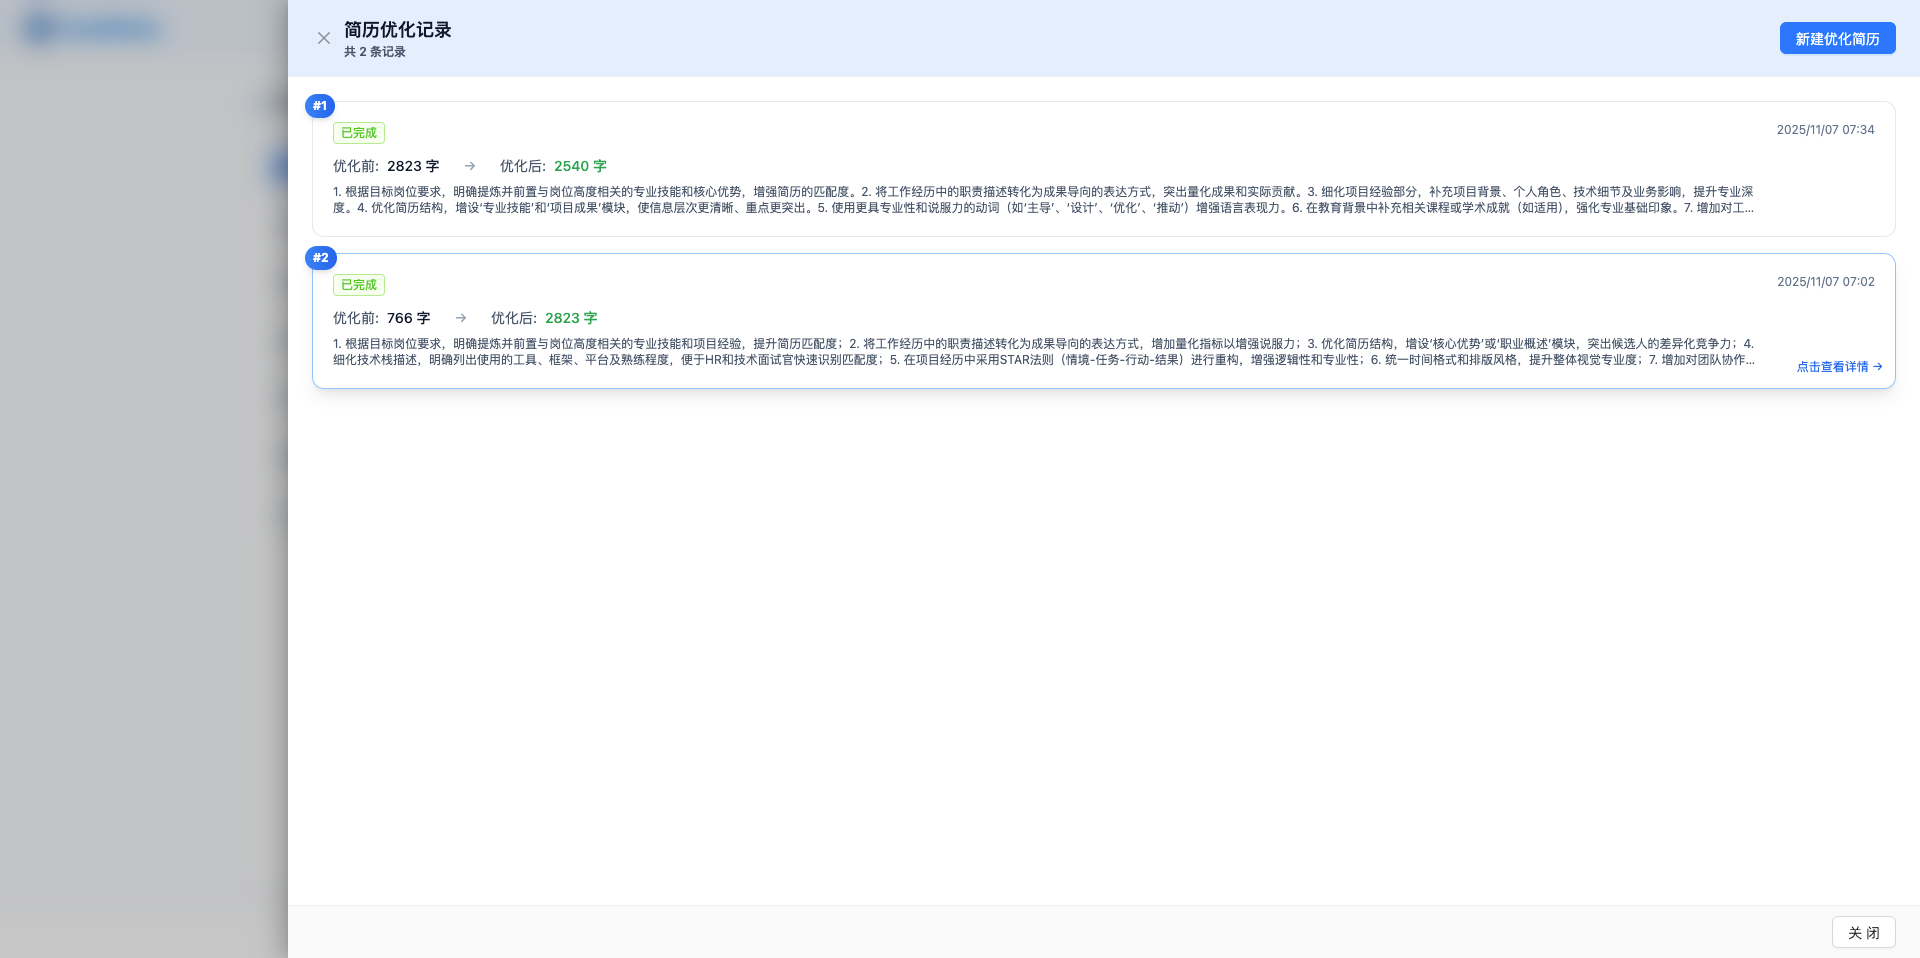
Click the "Resume Optimization" button to open the resume optimization record list side panel.
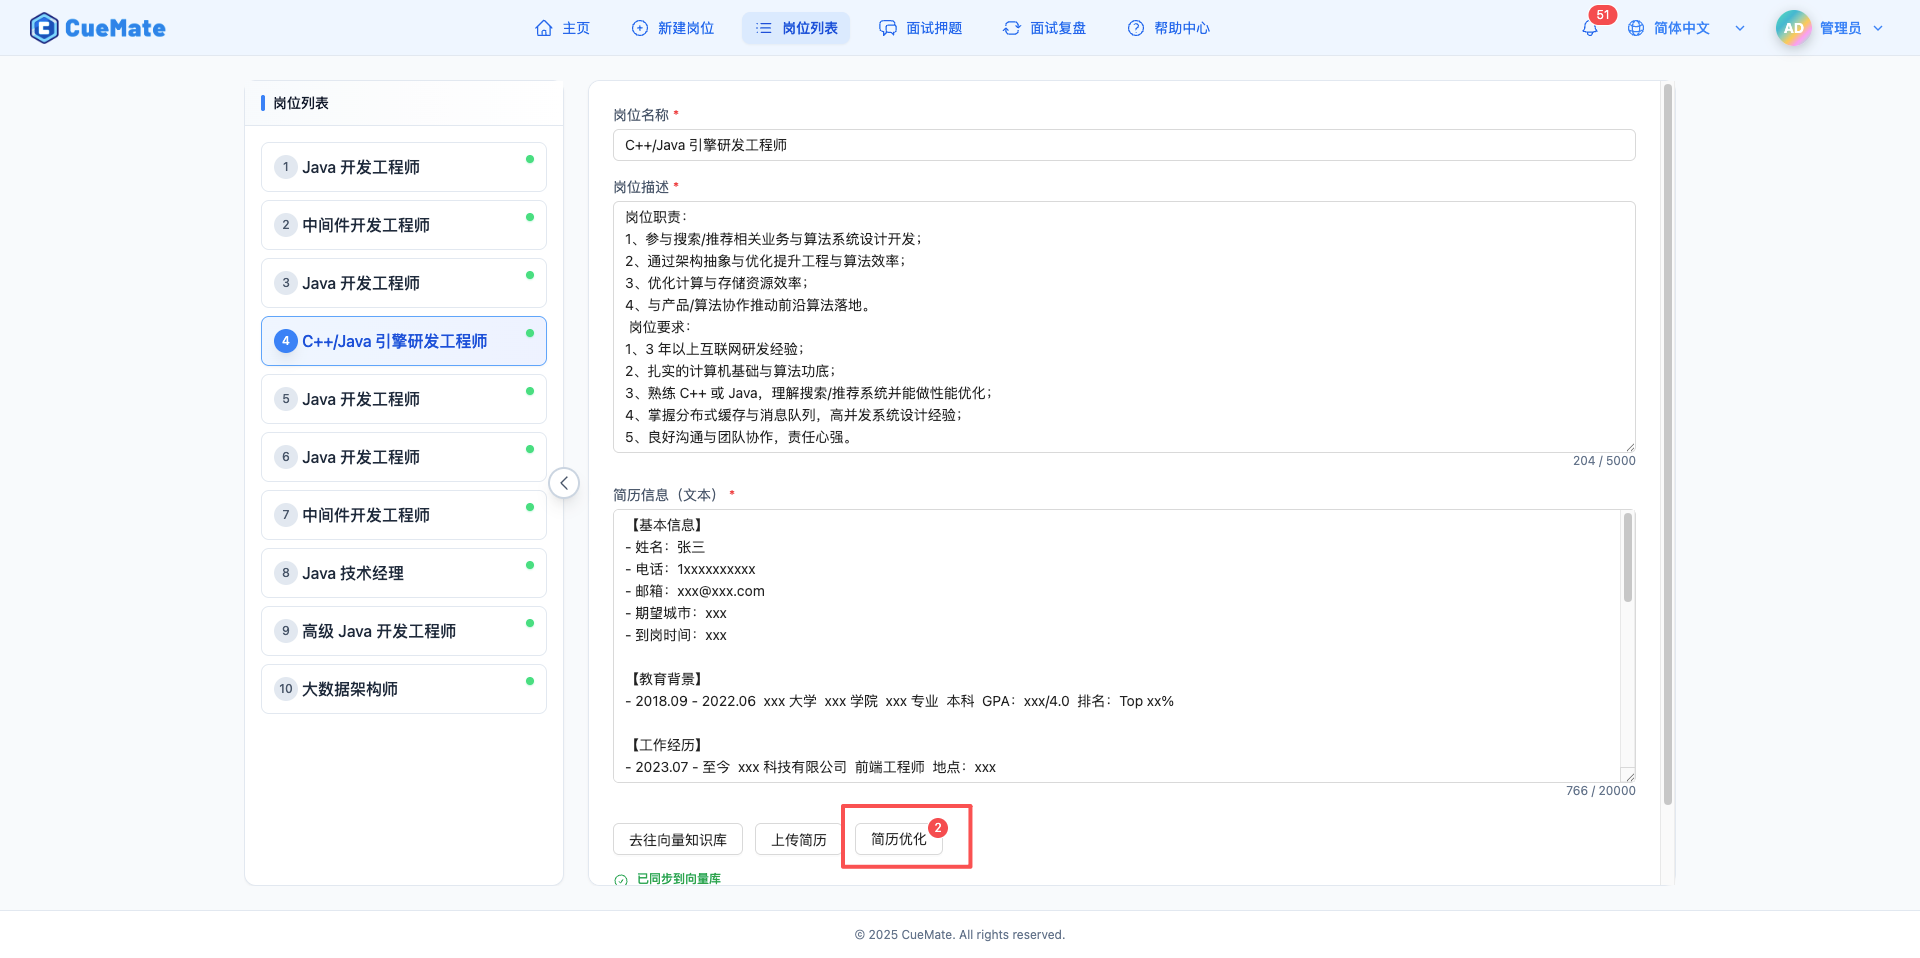
List Features:
- View History: Displays all resume optimization records including optimization time, status, word count changes, etc.
- Create New: Click "Create New Resume Optimization" button in top right corner to create new optimization
- View Details: Click any record in the list to view before/after comparison details
Record Statuses:
- Pending: Optimization task created, waiting to process
- Optimizing: AI is processing optimization task
- Completed: Optimization completed, results viewable
- Failed: Optimization failed, error message displayed
Record Information:
- Optimization status label
- Model name used
- Optimization count statistics
- Before/after word count comparison
- Optimization suggestions preview
- Creation time
3.3.2 Create New Resume Optimization
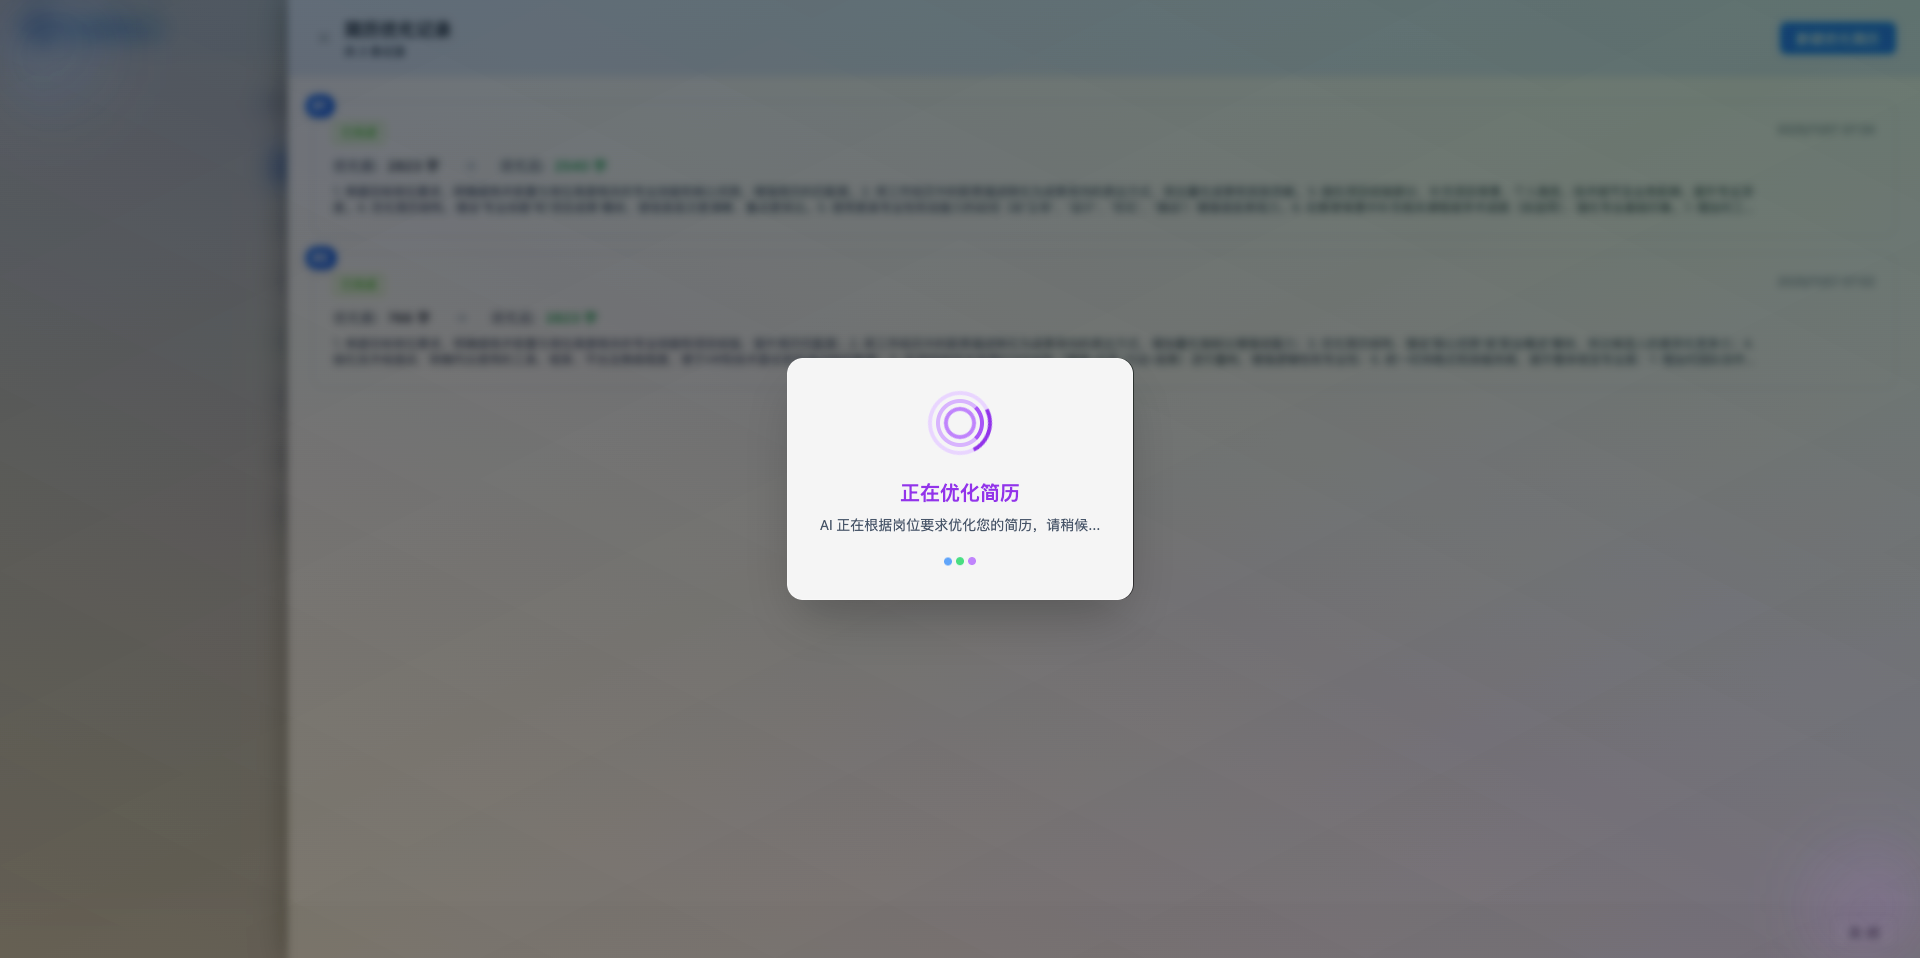
Click the "Create New Resume Optimization" button on the resume optimization list page.
Optimization Process:
- Read current position's JD and resume content
- Call LLM Router to send optimization request
- AI optimizes resume description based on JD requirements
- Save optimization record to database
- Automatically open optimization details page to display results
Optimization Directions:
- Highlight Matching Skills: Emphasize technical stack and experience required by JD
- Quantify Results: Change vague descriptions to specific data (e.g., "improved performance by 30%")
- Improve Expression: Enhance logic and professionalism of project descriptions
- Add Keywords: Include key technical terms appearing in JD
Notes:
- Optimization process takes a few seconds to tens of seconds, showing full-screen loading overlay
- Failed optimizations also save failure records for tracking issues
- Each optimization creates a new record, won't overwrite history
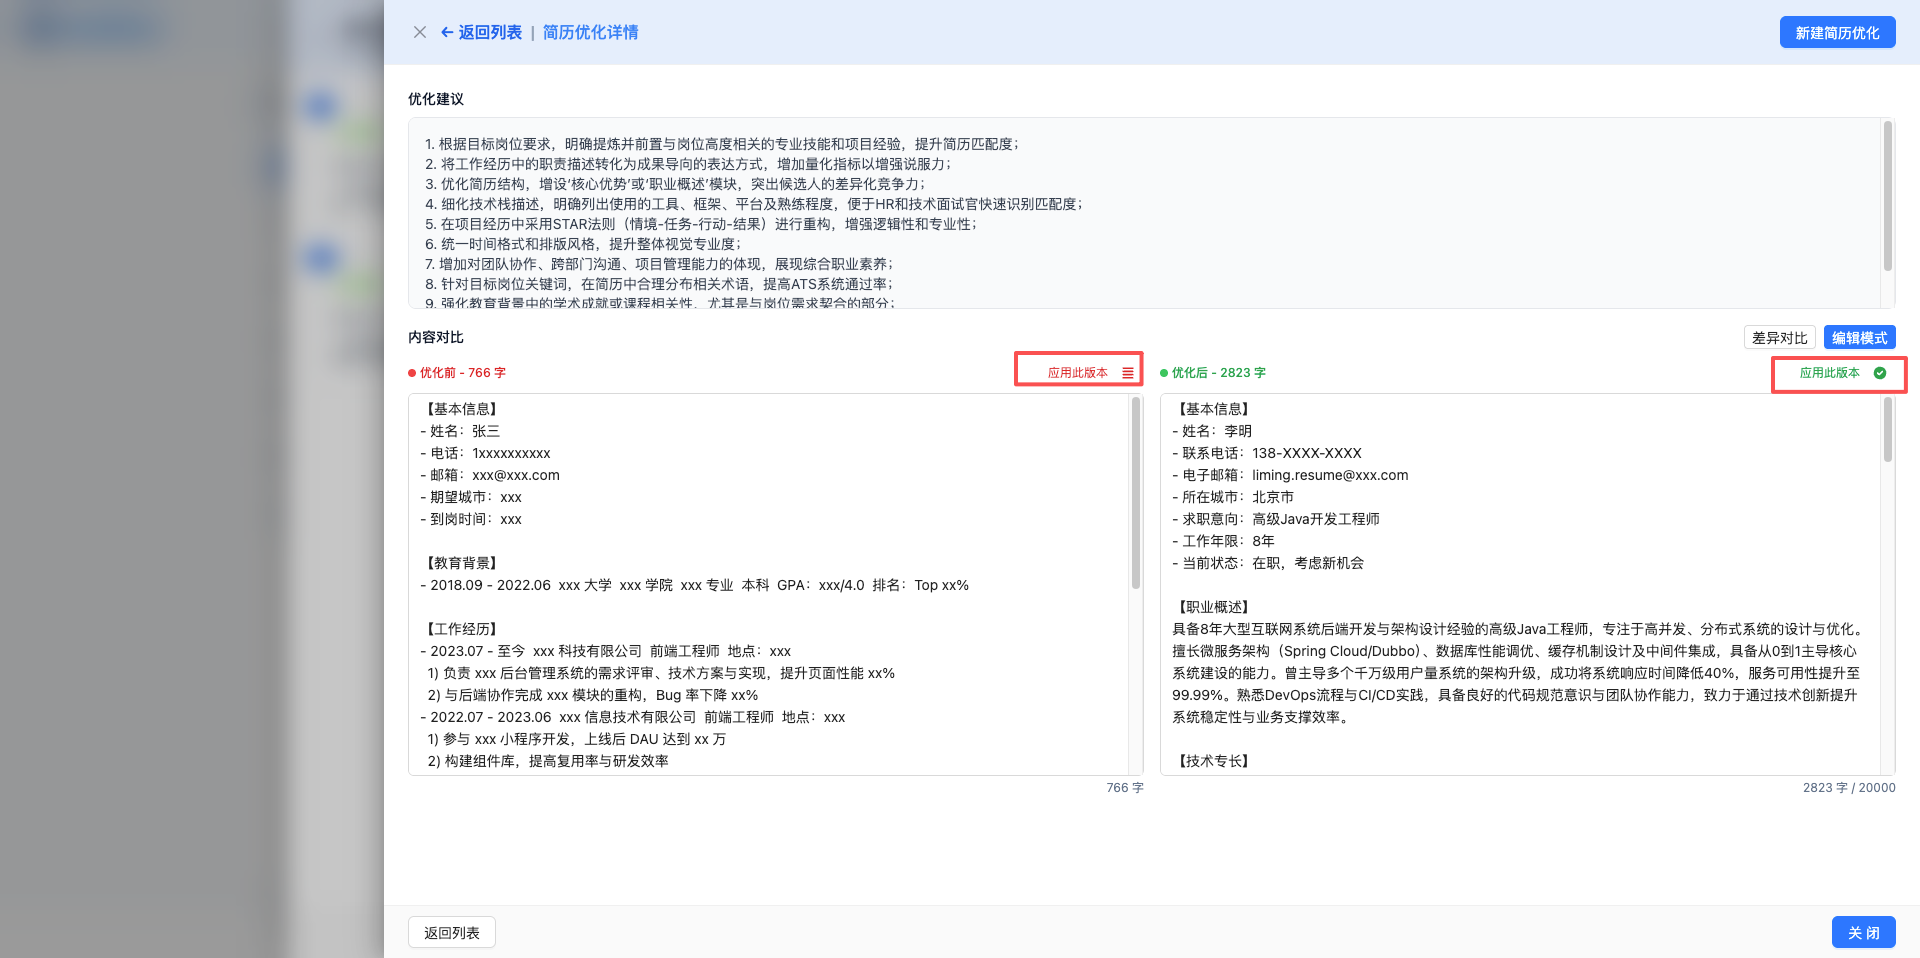
3.3.3 View Optimization Details
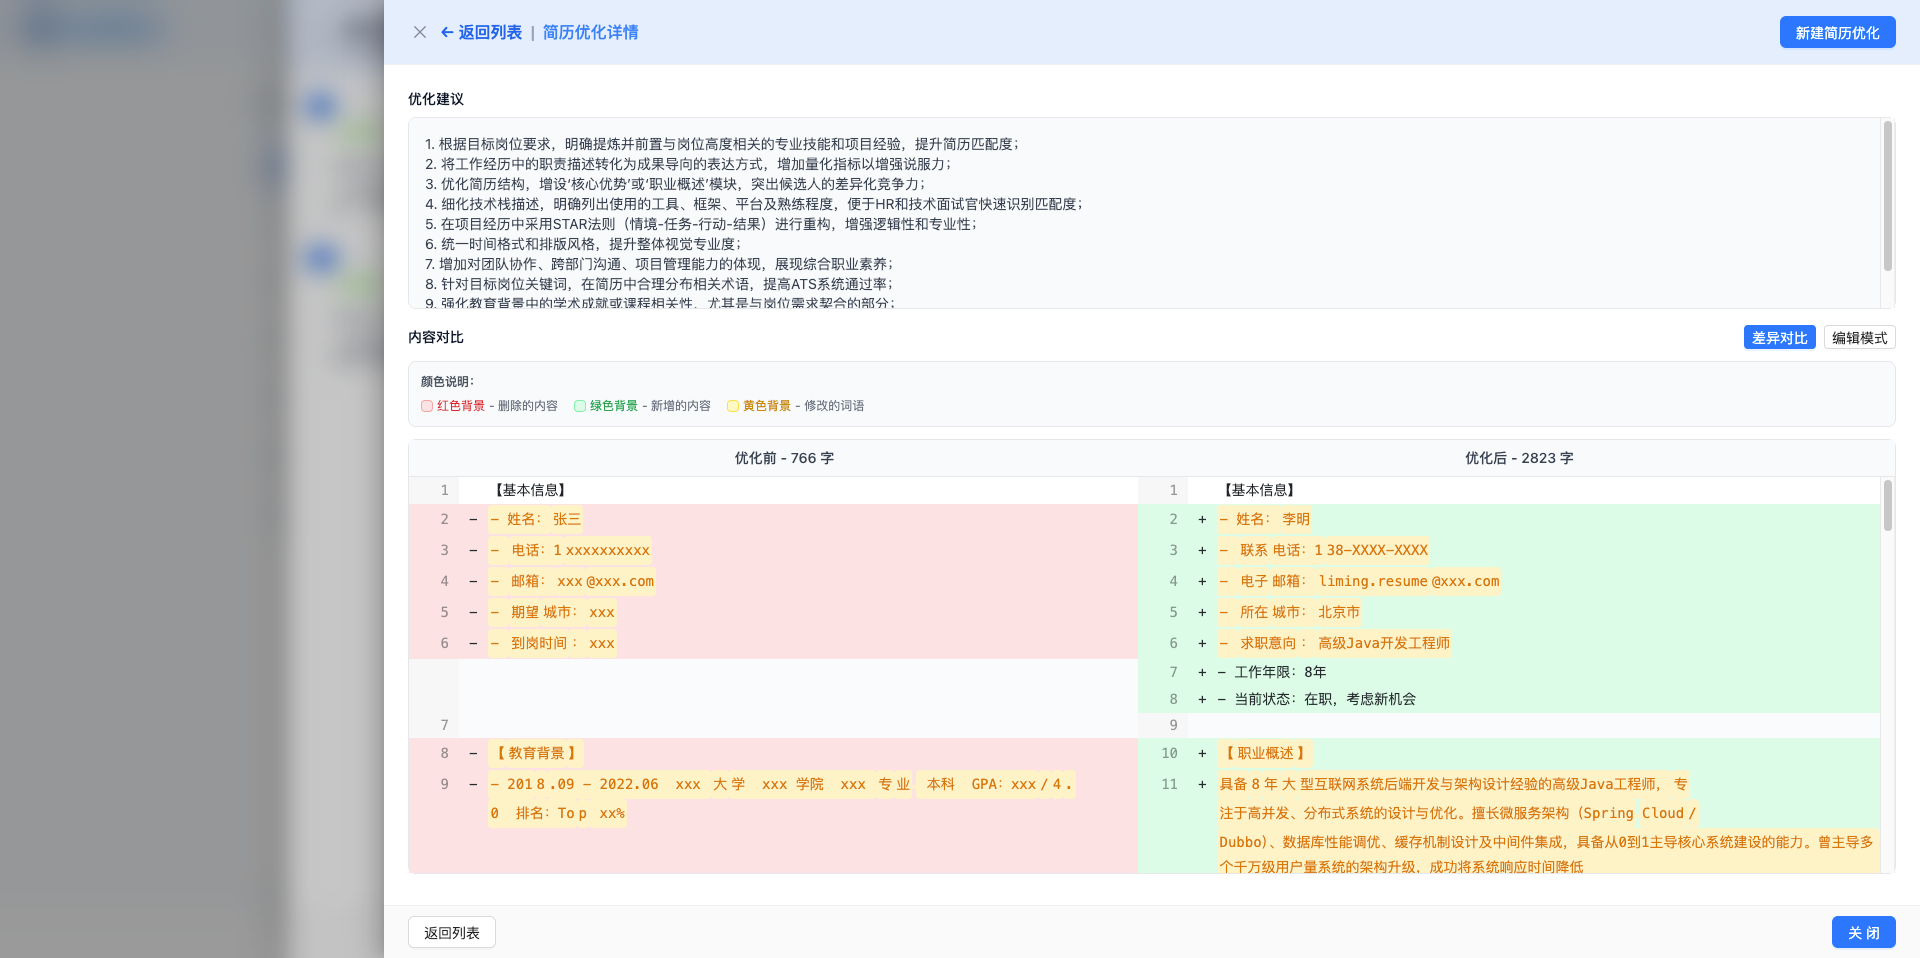
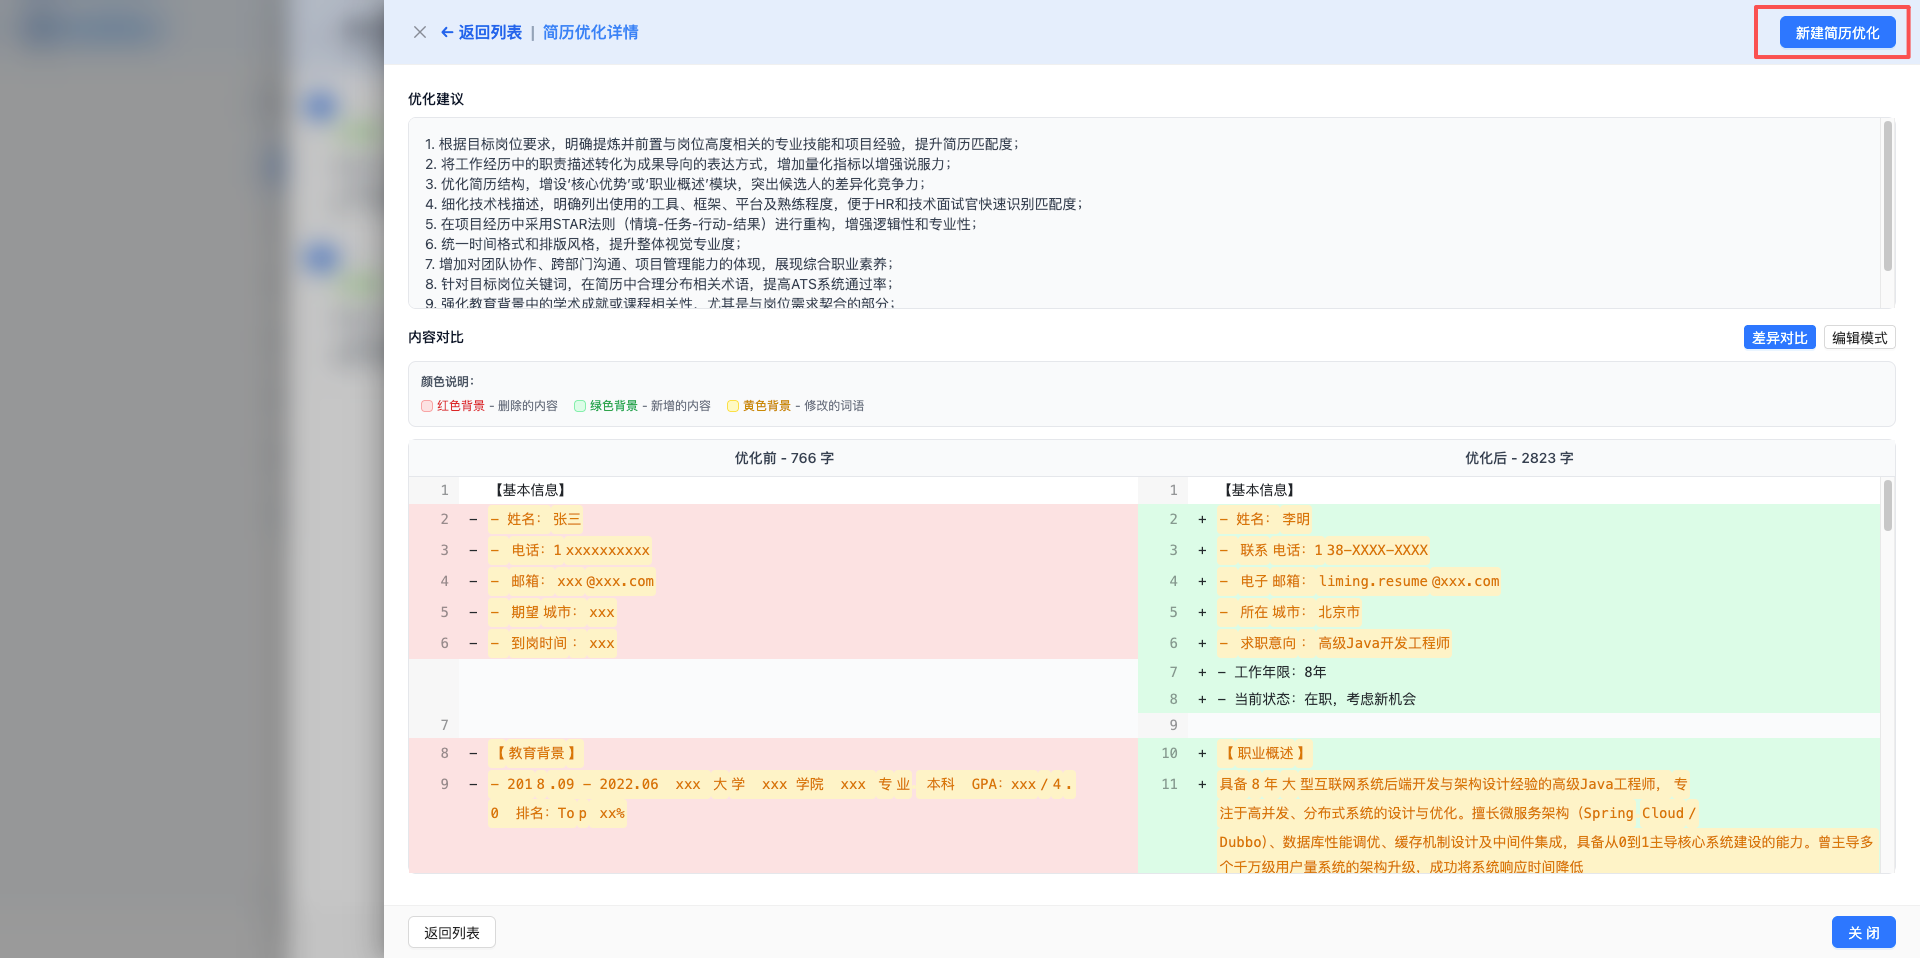
Click any record in the resume optimization list to open the optimization details page.
Details Page Features:
1. Optimization Information Display:
- Optimization status, model name, creation time
- Before/after word count statistics
- Optimization suggestions (formatted display)
2. Comparison Mode (Default):
- Uses Diff view to compare before/after differences
- Red: Deleted content
- Green: Added content
- Supports dark mode
3. Edit Mode:
- Click "Switch to Edit Mode" button
- Directly edit before and after resume content
- Can apply changes to position after modification
4. Action Buttons:
- Apply Original Resume to Position: Apply pre-optimization resume to current position
- Apply Optimized Resume to Position: Apply post-optimization resume to current position
- Create New Resume Optimization: Optimize again based on current optimized resume (iterative optimization)
- Return to List: Return to resume optimization list page
3.3.4 Iterative Resume Optimization
Click the "Create New Resume Optimization" button on the resume optimization details page to use the manually modified optimized resume for continued optimization until satisfied.
Iterative Optimization:
- Uses current optimized resume as new original resume
- Calls AI again for optimization to further improve resume quality
- Creates new optimization record, preserving complete optimization history
- Automatically displays new optimization details after completion
Use Cases:
- First optimization result not ideal, needs further optimization
- Want to try different optimization directions
- Iterate gradually to get best resume version
Notes:
- Each iteration creates a new optimization record
- Can view all iteration versions in list
- Avoid over-optimization, maintain resume authenticity
In edit mode, click the "Apply This Version" button to bring the satisfactory optimized resume content to the main page and save it.
4. Other Operations
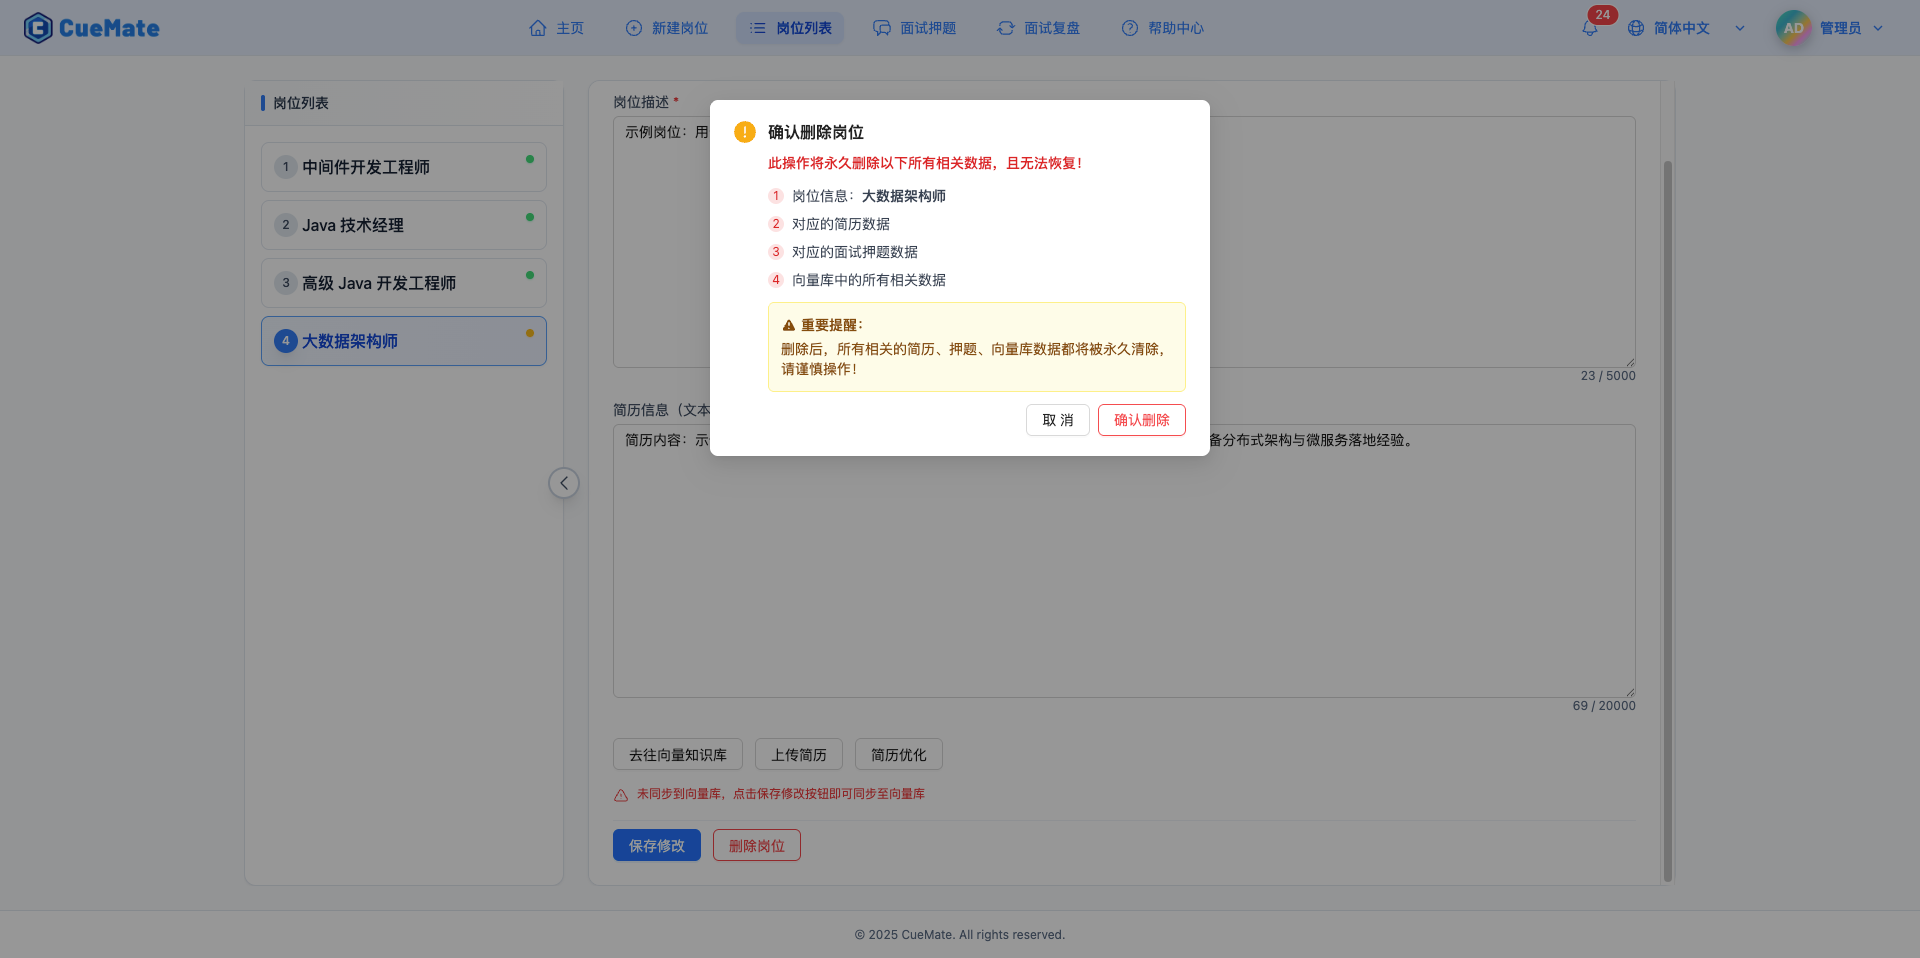
4.1 Delete Position
Click the "Delete Position" button to delete the current position.
WARNING
Delete Impact:
- Position Information: Permanently deletes position title and JD
- Resume Content: Deletes associated resume data
- Interview Questions: Deletes all questions for this position
- Vector Data: Deletes related data in vector database
- Interview Records: Historical interview records are not affected, still viewable
Delete Confirmation: After clicking delete button, a detailed confirmation dialog appears listing content to be deleted. Deletion executes only after confirmation and cannot be undone.
4.2 Go to Vector Knowledge Base
Click the "Go to Vector Knowledge Base" button to navigate to the Vector Knowledge Base page.
Use Cases:
- After modifying position information, need to sync to vector database
- View position data sync status in vector database
- Manage position data in knowledge base
Best Practices
Regularly Update Position Information
Recommended Frequency:
- Before applying to each new position, update position information based on latest JD
- Check monthly to ensure position requirements stay in sync with market
Update Content:
- Add newly appearing technical stack requirements
- Remove outdated skills
- Adjust years of experience and salary range
Targeted Resume Optimization
Using AI Optimization:
- Optimize resume separately for each position, highlighting most relevant experience
- Use optimization record list to compare effects of different versions
- Use iterative optimization to gradually improve resume quality
- Keep all optimization history for easy review and application
Optimization Suggestions:
- After first optimization, carefully review optimization suggestions and comparison results
- If first optimization is not ideal, use iterative optimization again
- Don't over-optimize, maintain resume authenticity
- Before each application, confirm resume version best matches position requirements
Manual Adjustments:
- After AI optimization, carefully check factual accuracy
- Add important information AI missed
- Remove inaccurate content AI added
- Fine-tune optimization results manually in edit mode
Timely Vector Database Sync
When to Sync:
- Immediately after modifying position information
- Immediately after updating resume content
- Confirm sync status before starting interview training
How to Check:
- Check status indicator color
- Go to Vector Knowledge Base page to view detailed sync information
Related Pages
- Create Position - Create new positions
- Interview Questions - Manage interview questions
- Vector Knowledge Base - Sync position data to vector database