Voice Test
The Voice Test feature is used to test the voice recognition capabilities of microphone and speaker, ensuring audio devices work properly for interview training. Through this feature, you can verify if the microphone can be correctly recognized and if the speaker can capture system audio, preparing for subsequent mock interviews and interview training.
1. Page Navigation
1.1 Open Main Application Window
Search for the CueMate application icon on the launcher and left-click to open the application.

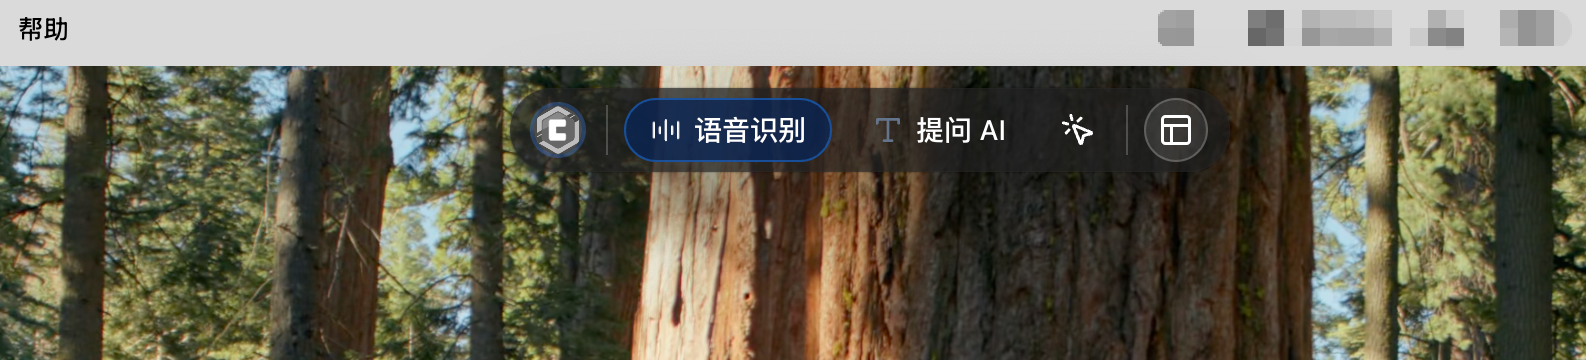
After launching the CueMate desktop application, you can see the control window floating directly above the screen. The button functions of the control window from left to right are:
- "Visit CueMate website" icon: click to open the CueMate official website
- "Voice Recognition" button: Click to start the voice recognition function and open the voice function window
- "Ask AI" button: Click to open the AI question window, quickly ask AI questions and get answers
- "Interactive mode" icon: Switch the click penetration mode of the window (interactive mode can operate the window normally, clicks in penetration mode will penetrate to the underlying application)
- "Main application window" icon: Click to open the main application window and enter the background management interface
- "Show/Hide" icon: Click to hide or show the control bar and all other windows
Click the "Voice Recognition" button (microphone icon) on the floating control bar to open the interview feature window.
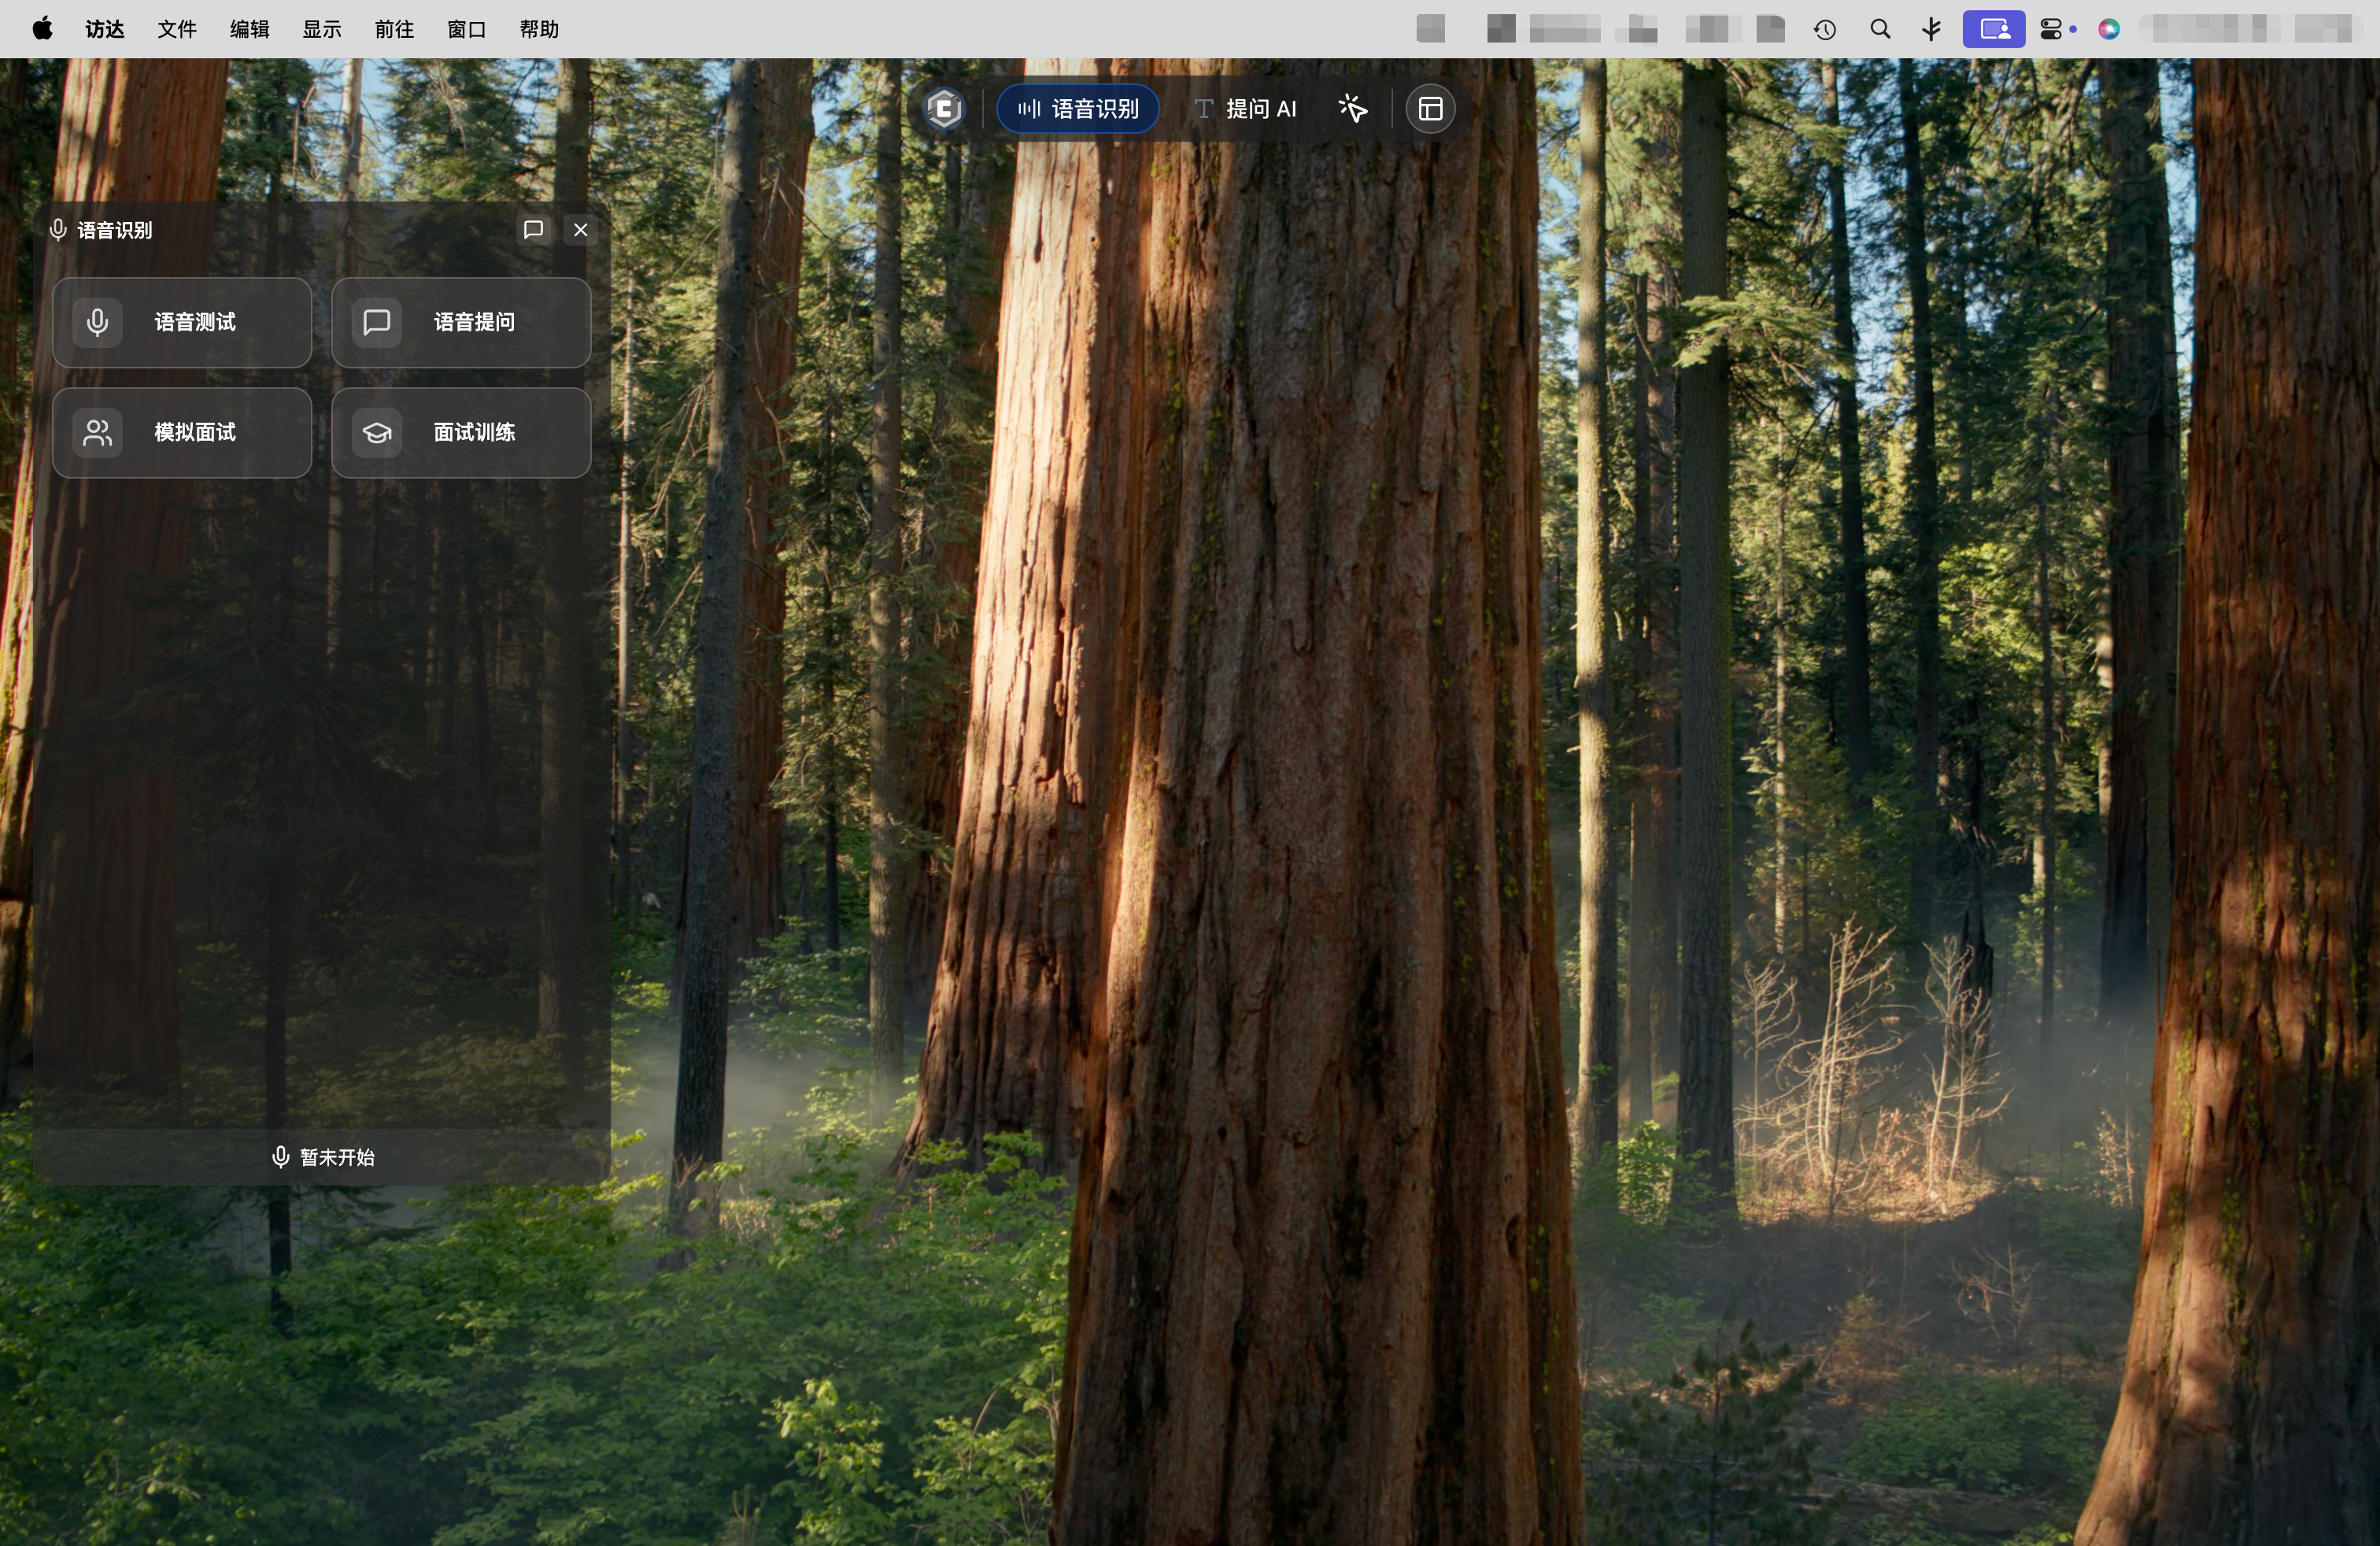
1.2 Enter Voice Test Page
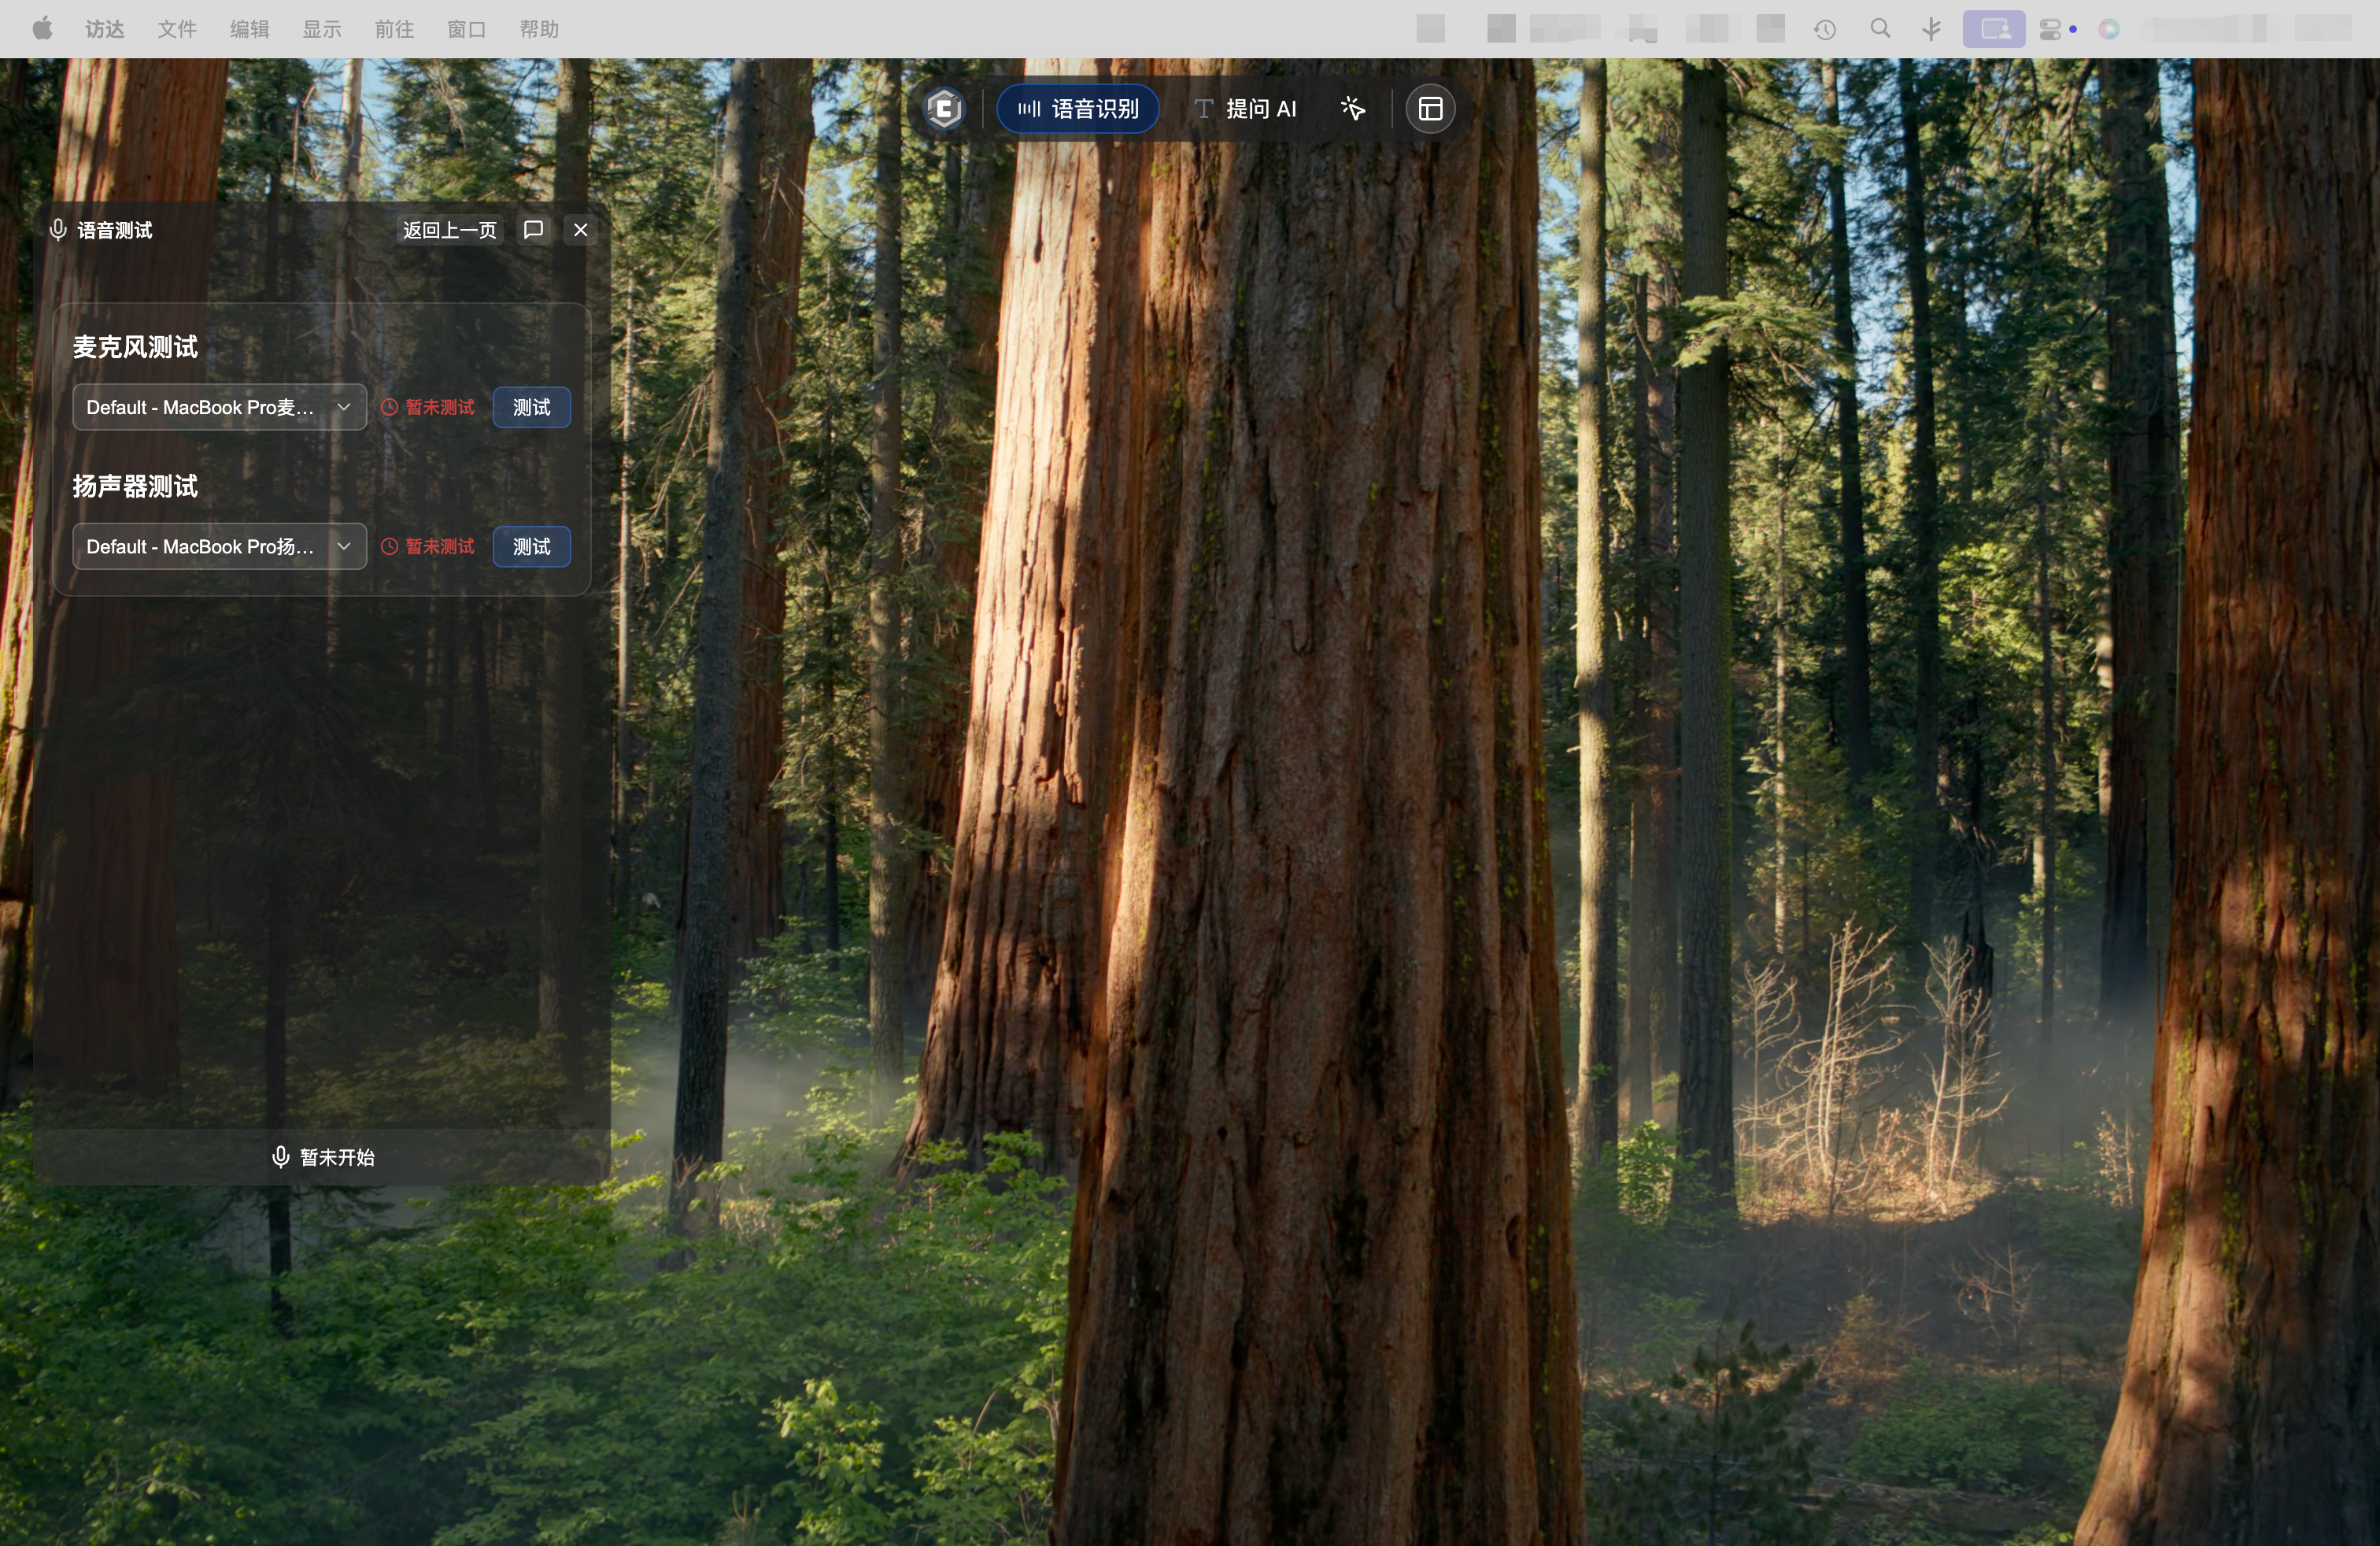
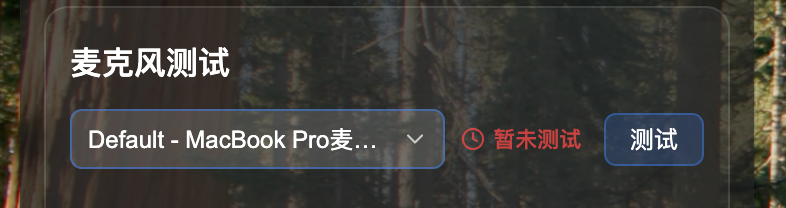
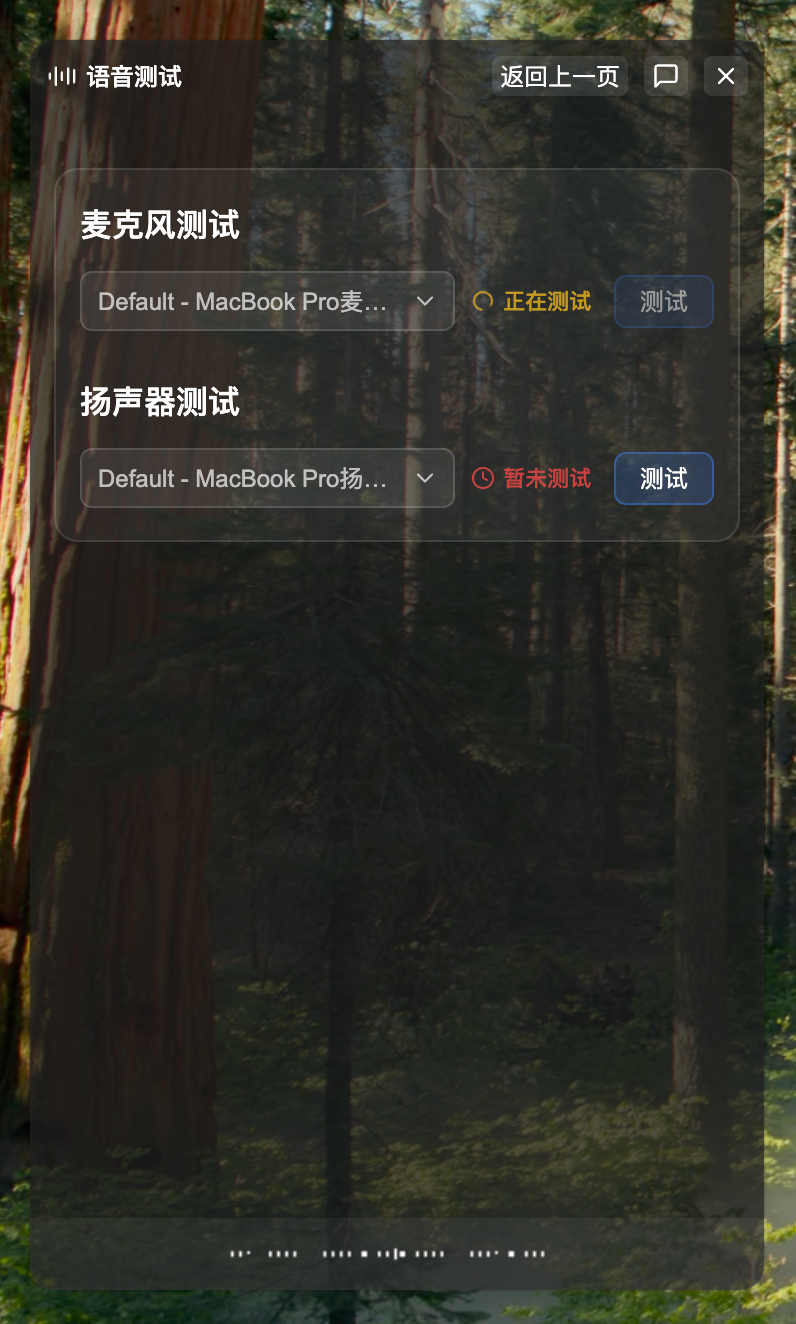
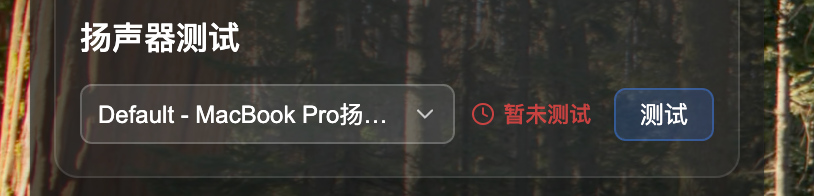
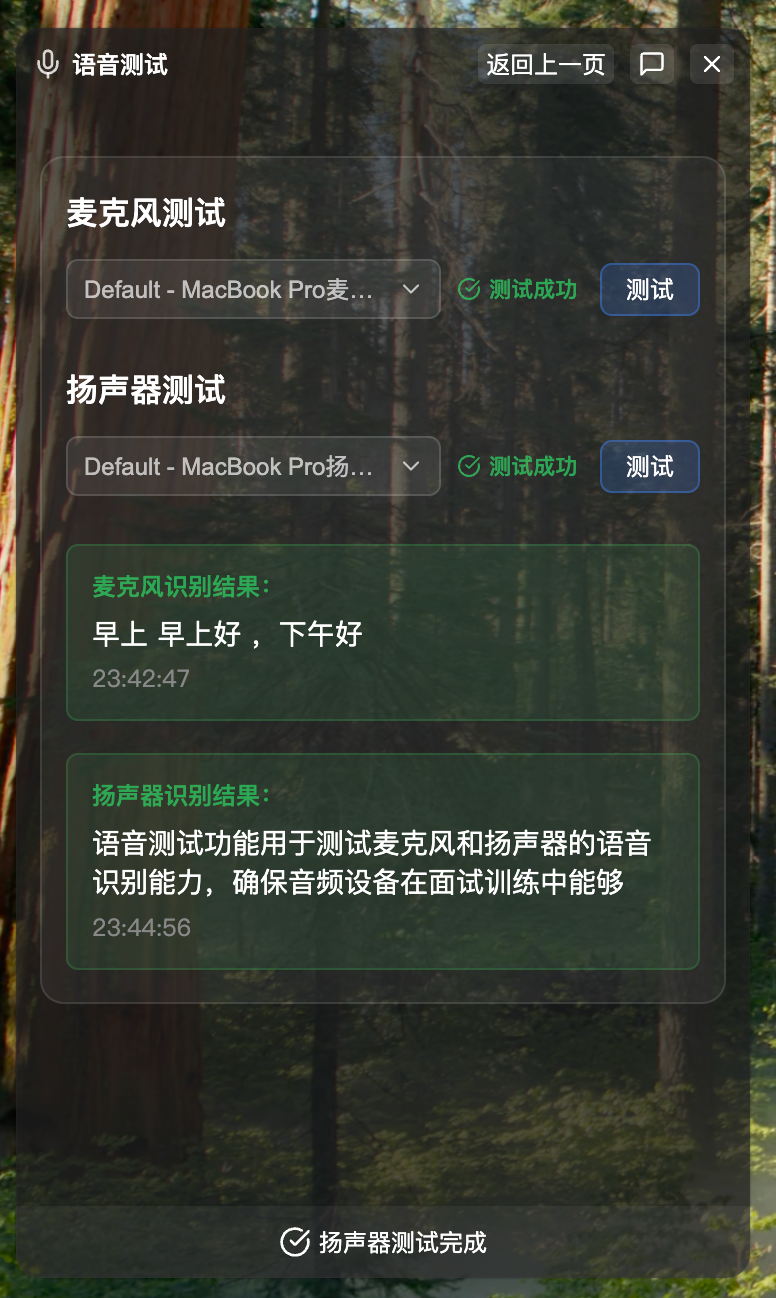
At the top of the interview feature window, click the "Voice Test" tab to enter the voice test page. The page is divided into two test areas: Microphone Test and Speaker Test.
2. System Permission Authorization
IMPORTANT
The voice test feature requires the following system permissions:
- Microphone Permission: For microphone audio capture (Microphone Test)
- Screen Recording & System Audio Permission: For system audio capture (Speaker Test)
Please follow the steps below to complete authorization, otherwise test features will not work properly.
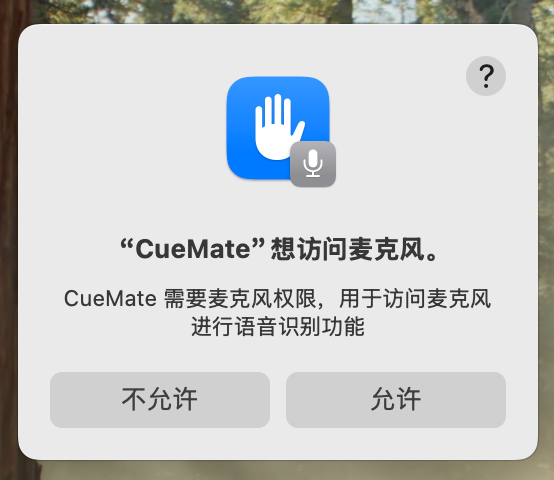
Before starting tests, you need to grant CueMate the necessary system permissions. The voice test feature requires two permissions:
- Microphone permission: For microphone audio capture (Microphone Test)
- Screen Recording & System Audio permission: For system audio capture (Speaker Test)
2.1 Microphone Permission Authorization
When using microphone feature for the first time, the system will automatically show an authorization prompt. Please click the "Allow" button to grant CueMate permission to access the microphone.
If you accidentally clicked "Don't Allow" or closed the authorization window:
- Open "System Preferences > Privacy & Security"
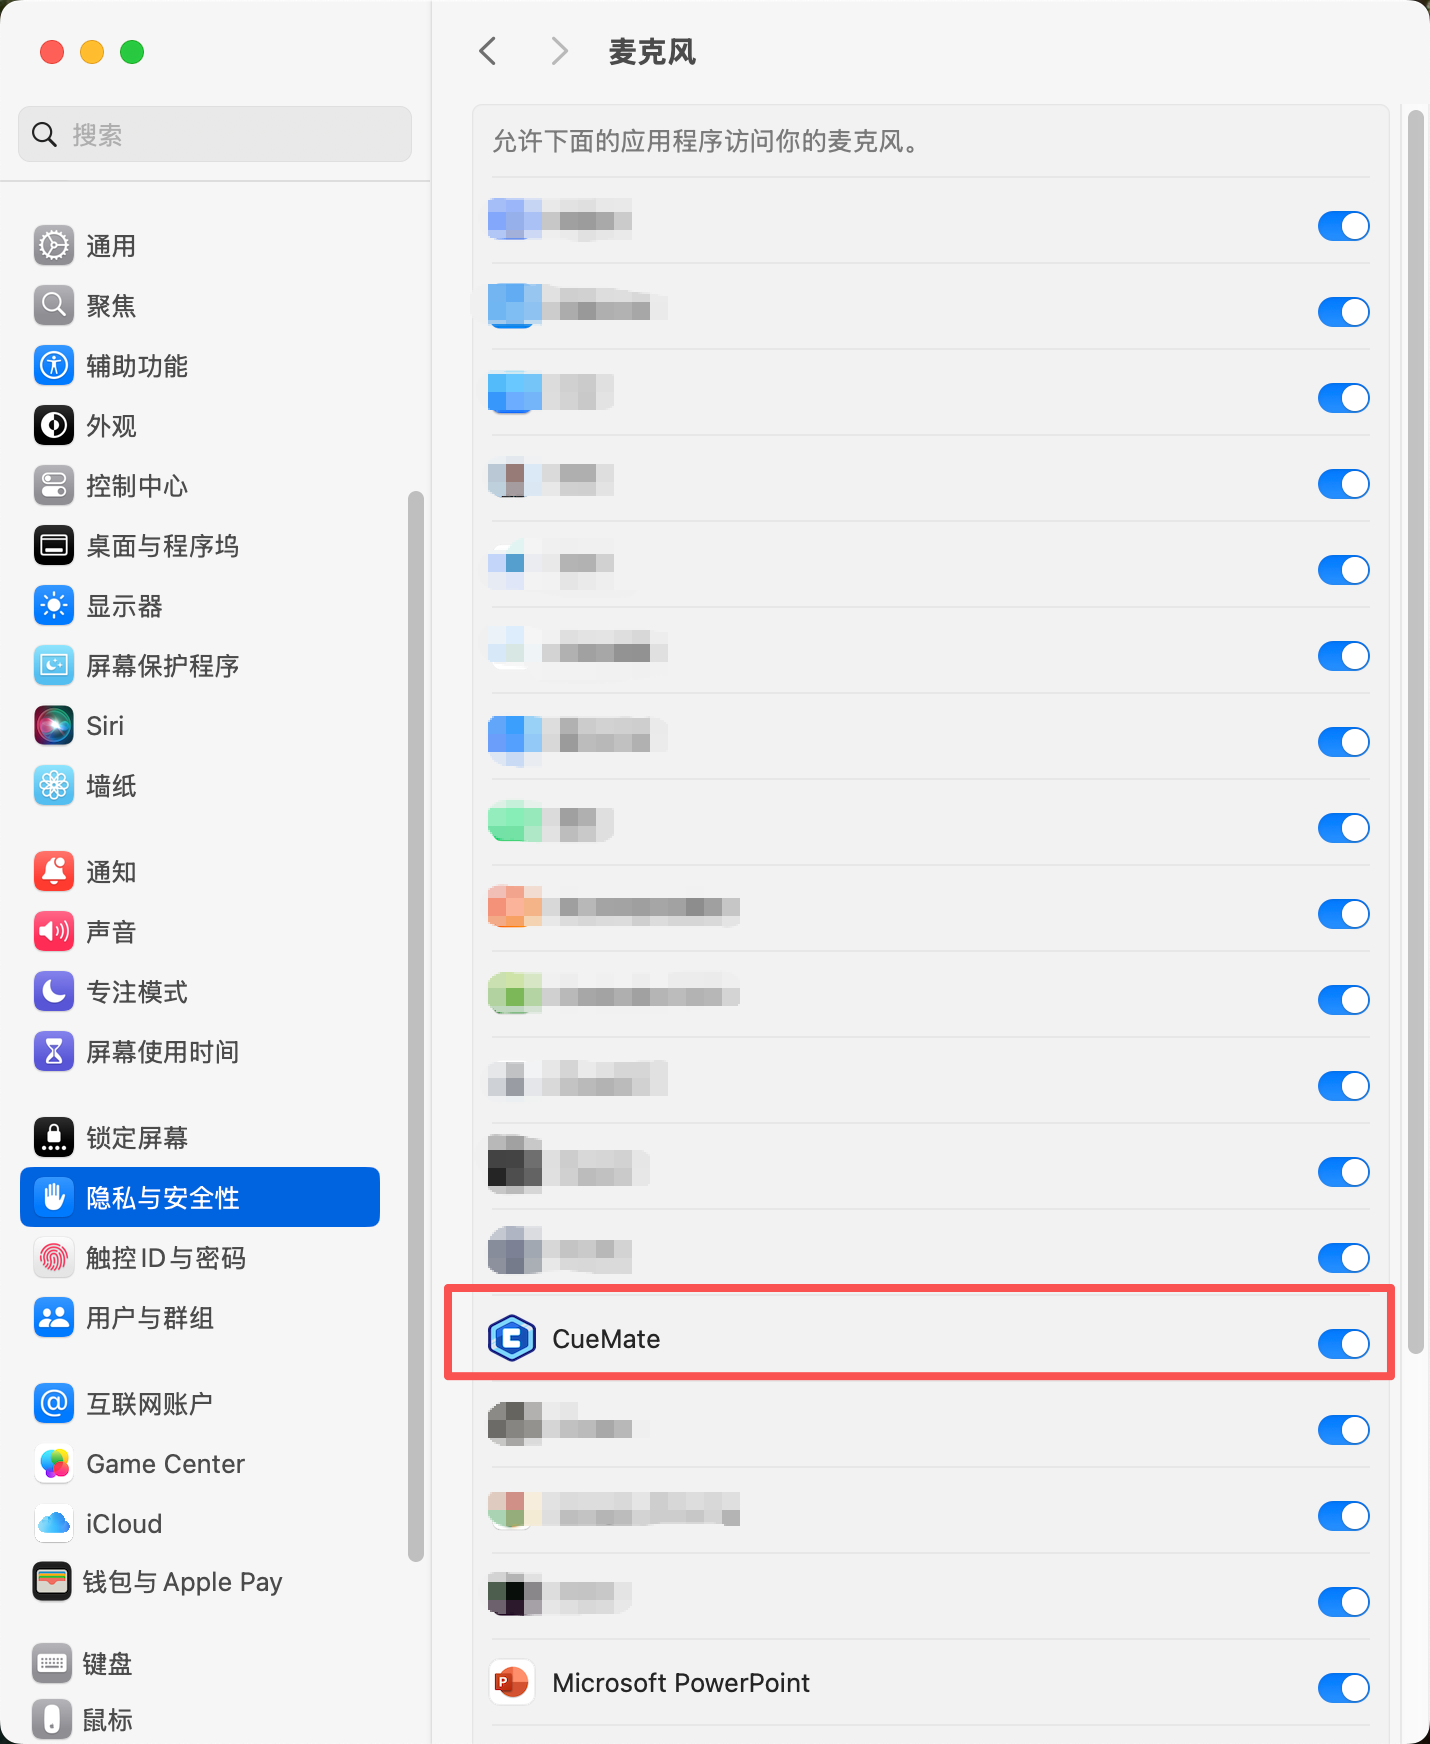
- Find and click "Microphone" in the left menu
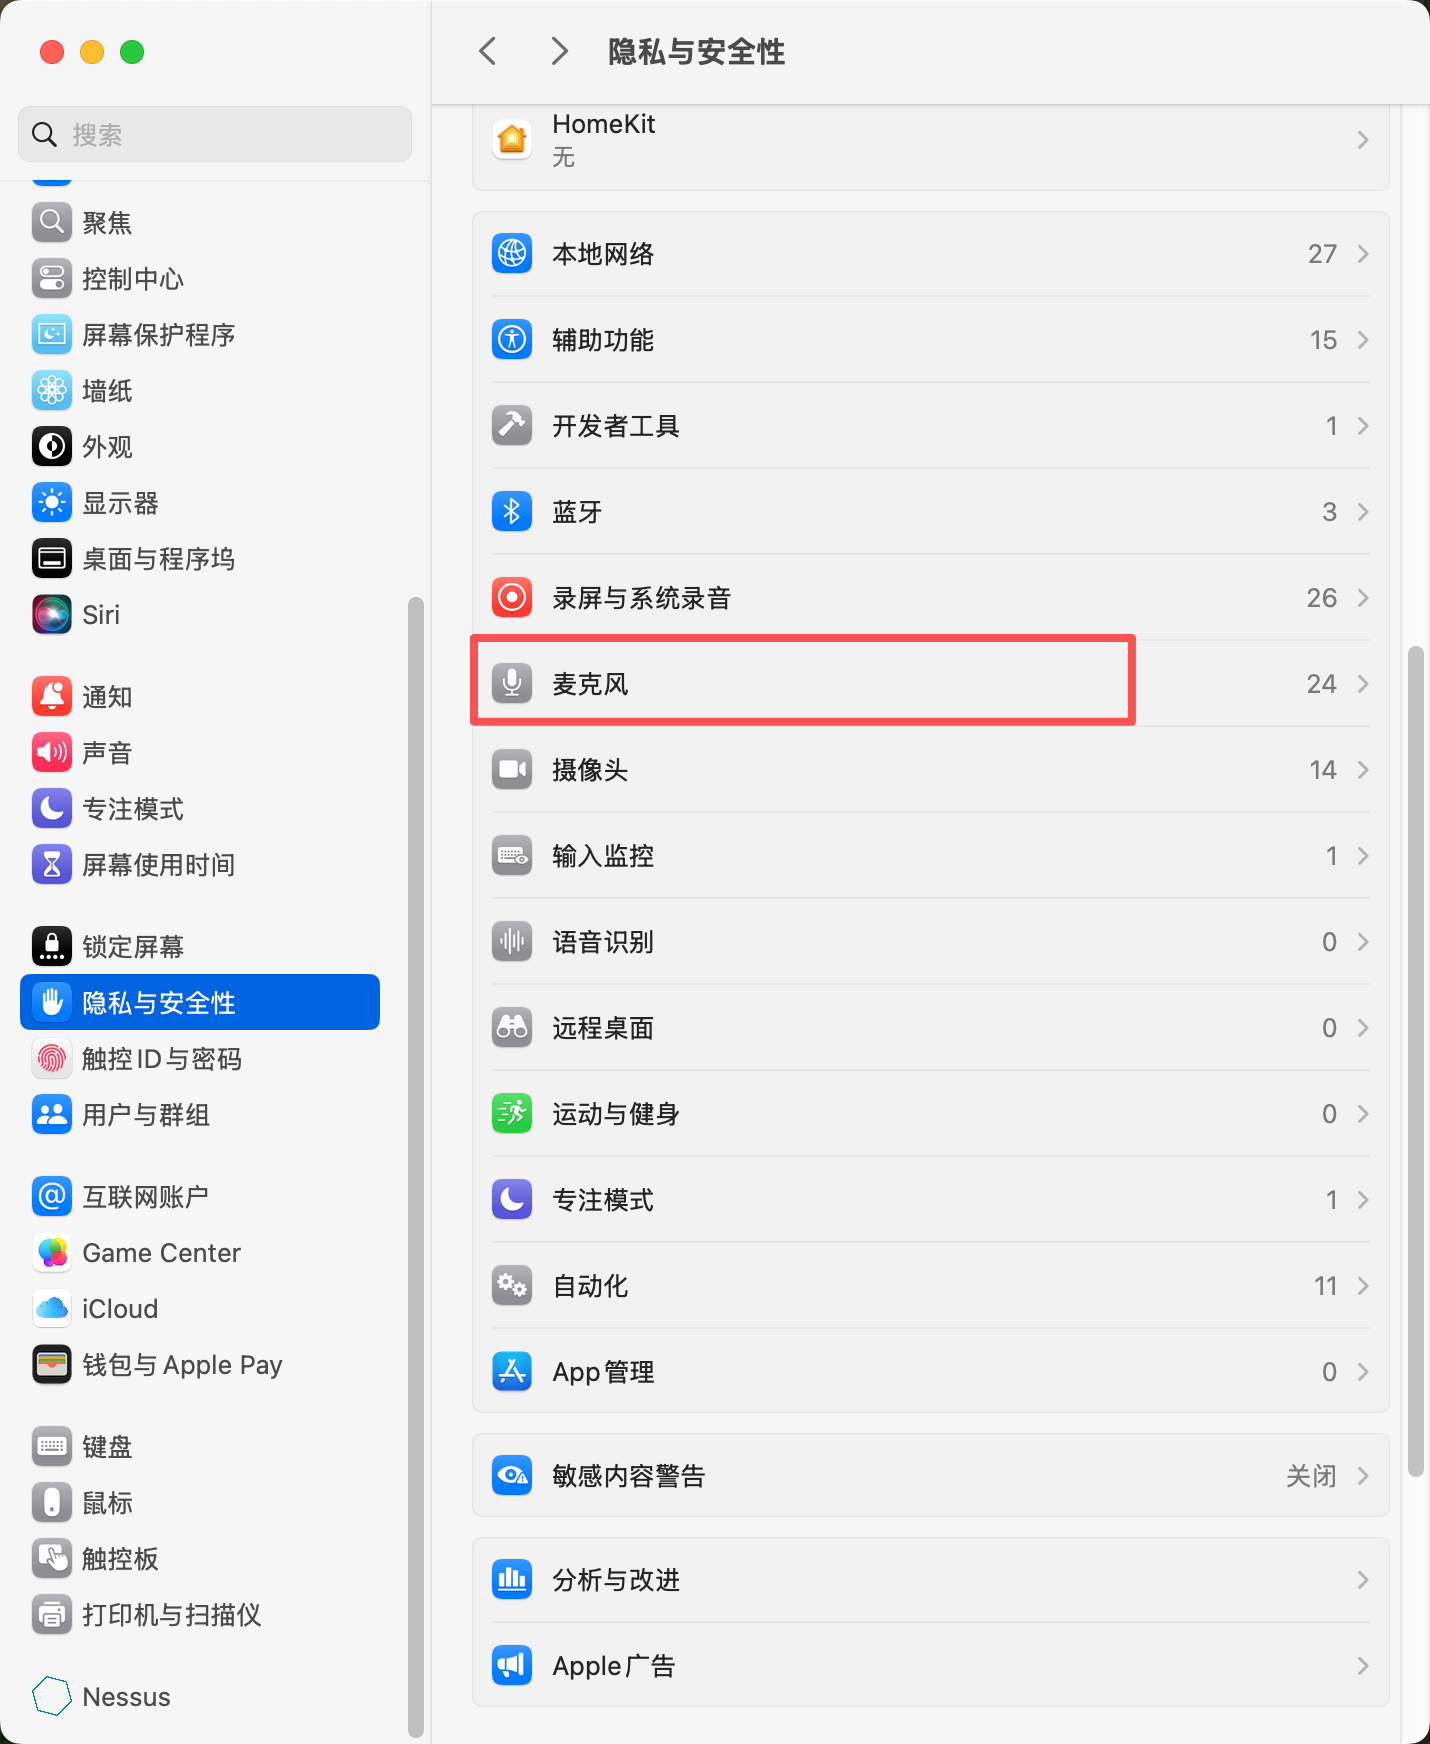
- Find CueMate in the right app list and toggle the switch to enable microphone permission
2.2 Speaker Permission Authorization
Speaker test requires using macOS's system audio capture feature (AudioTee), which needs "Screen Recording & System Audio" permission to work properly.
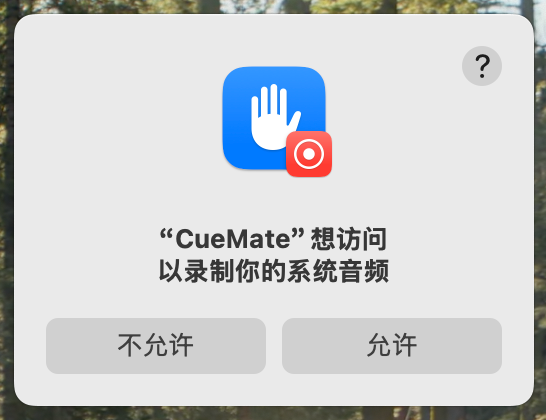
When using speaker test feature for the first time, the system will automatically show an authorization prompt. Please click the "Allow" button to grant CueMate permission to access system audio.
If you accidentally clicked "Don't Allow" or closed the authorization window:
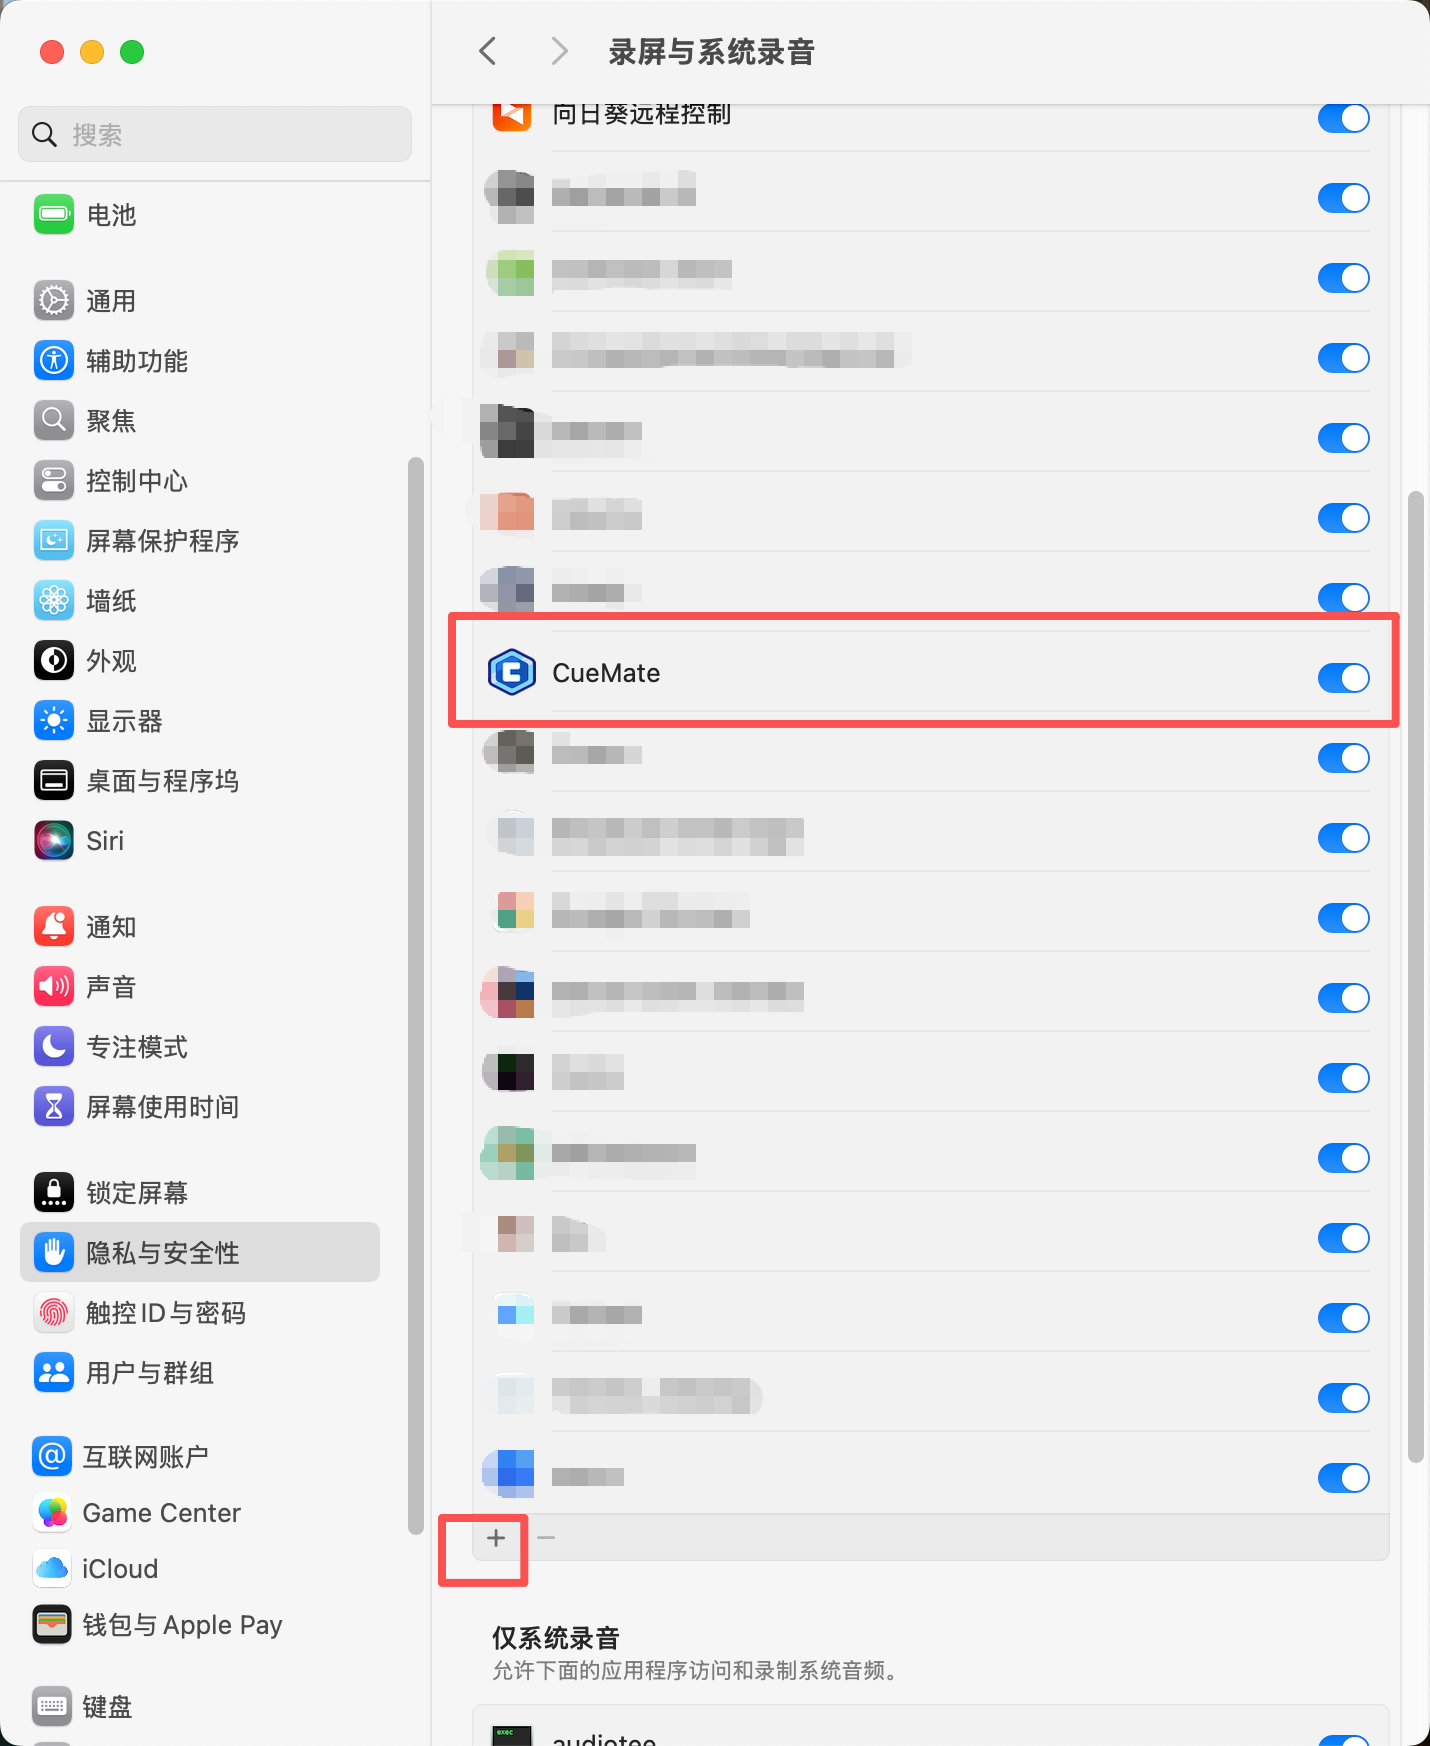
- Open "System Preferences > Privacy & Security"
- Find and click "Screen Recording & System Audio" in the left menu

- Find CueMate in the right app list and toggle the switch to enable system audio capture permission
- If CueMate is not in the list, you can click the "+" button at the bottom of the list to manually add it
After authorization, CueMate can capture system audio (sounds played by the speaker), used to recognize "interviewer" voice in interview training scenarios.
Notes:
- "Screen Recording & System Audio" permission is only used for system audio capture, CueMate will not record your screen
- No need to restart the app after authorization (app restarts automatically by default the first time), just return to CueMate and click the test button
- The bottom prompt "System Audio Only - Allow apps below to access and record system audio" indicates this permission is only for audio functionality
3. Microphone Test
Microphone test is used to verify if the microphone device can properly capture audio and be recognized by cuemate-asr service and converted to text. This is the core functionality for user voice input in mock interviews and interview training.
3.1 Select Microphone Device
In the "Microphone Device" dropdown, select the microphone device you want to test.
Device Selection Notes:
- System will automatically list all available audio input devices
- Default selection is the microphone device configured in Voice Settings page
- If not configured, automatically selects the system's first available default device
- Recommend using built-in computer microphone (such as MacBook built-in microphone)
3.2 Start Microphone Test
After selecting the microphone device, click the "Test" button (blue button), the system will automatically execute the following process:
- Start microphone audio capture, begin recording your voice
- Connect to cuemate-asr voice recognition service (WebSocket connection)
- Send captured audio to cuemate-asr for recognition in real-time
- Display recognized text content in real-time
- Automatically determine test success based on recognition results
Test Steps:
- After clicking "Test" button, speak clearly into the microphone
- Recommend saying a complete sentence, about 5-30 characters (e.g., "The weather is really nice today")
- System will display recognized text in real-time in the microphone test area
- Test status changes from "Not Tested" to "Testing"
- Test automatically ends when any of the following conditions are met:
- Speaking duration ≥ 2 seconds and recognized text length is 5-30 characters
- Recognized text length exceeds 30 characters
- Speaking duration ≥ 15 seconds and text was successfully recognized
- Total test duration ≥ 30 seconds (test timeout)
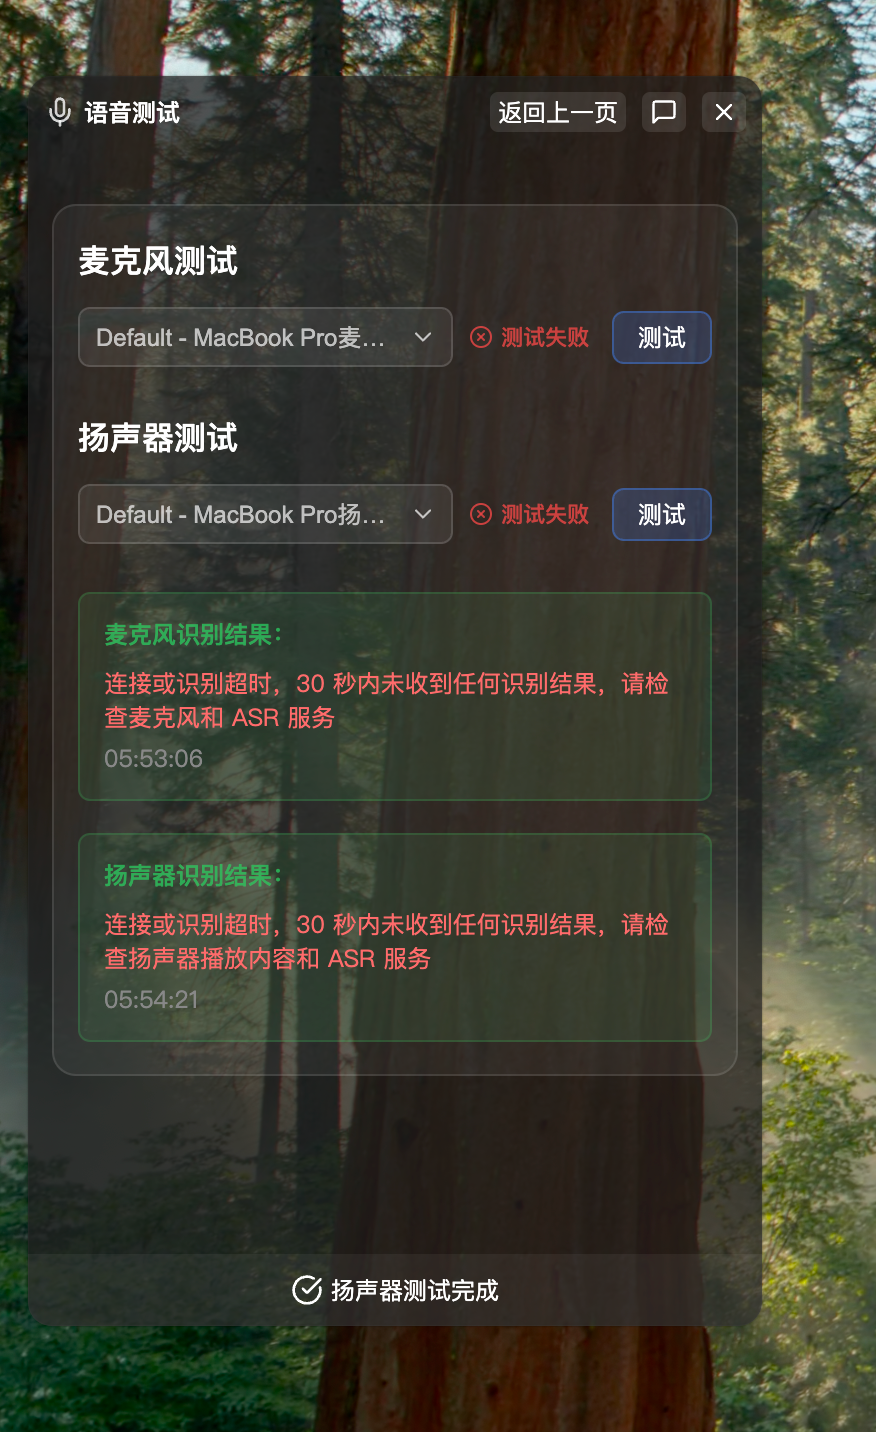
3.3 View Test Results
After test completion, the microphone test area will display test result status and detailed information:
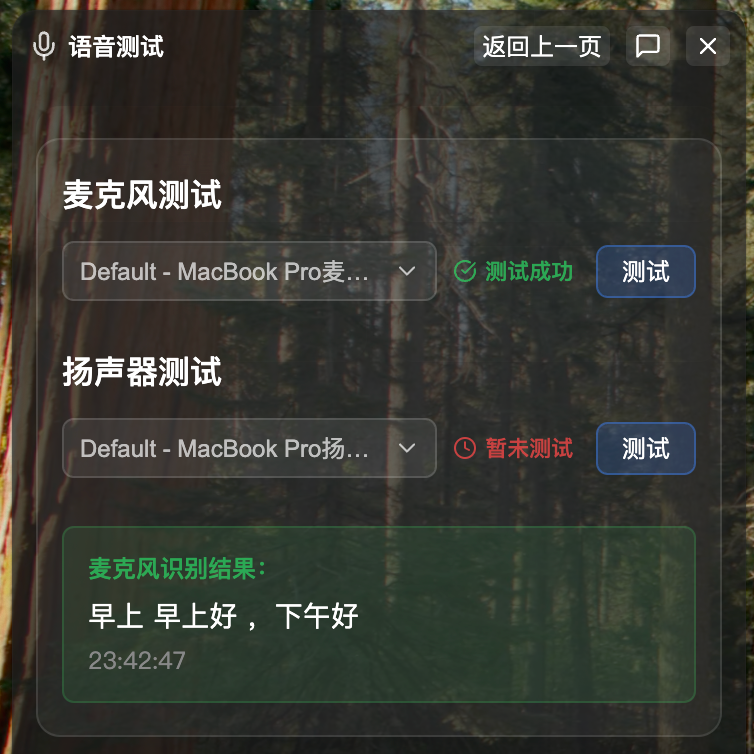
Test Successful
- Status icon shows green checkmark ✓
- Status text shows "Microphone Test Complete"
- Green area below shows "Microphone Recognition Result:"
- Shows complete recognized text content (e.g., "The weather is really nice today")
- Shows test duration (e.g., "00:00:15" means 0 minutes 15 seconds)
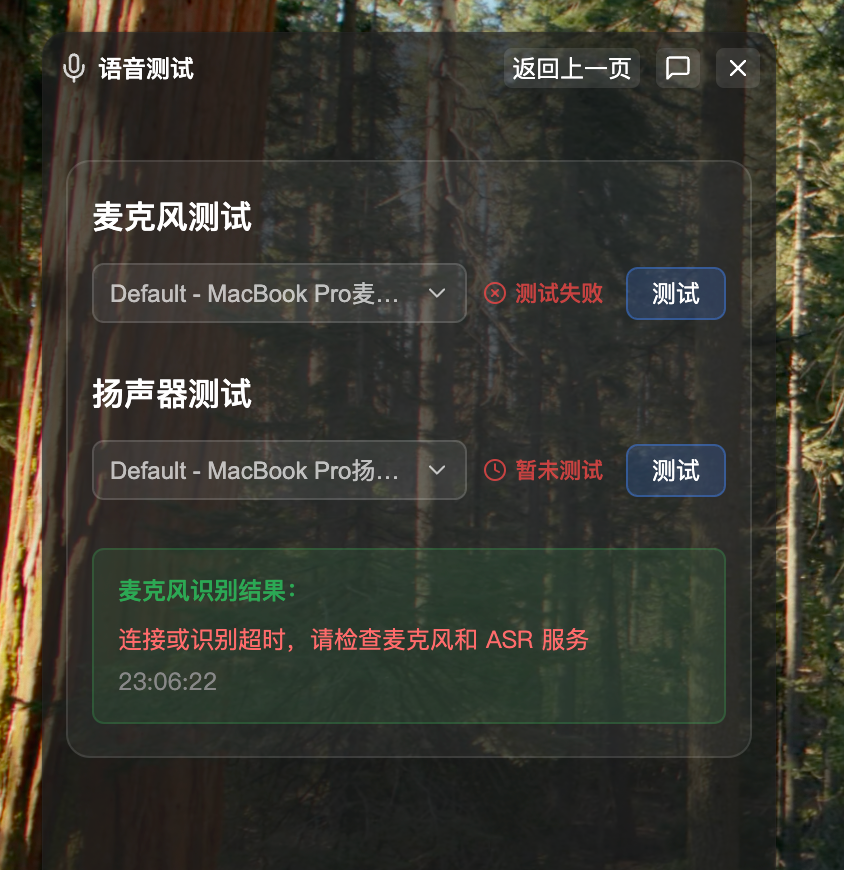
Test Failed
- Status icon shows red X ✗
- Status text shows "Test Failed"
- Red area below shows error reason
- Common error messages:
- "Failed to connect to microphone recognition service": cuemate-asr service not started or cannot connect
- "Microphone recognition WebSocket connection error": Network connection issue
- "Failed to start microphone recognition": Microphone permission not granted or device unavailable
- Shows test duration
View Detailed Information
Click the result area to expand and view complete recognized text or error details. If recognition content is long, you can scroll to view all content, or go to Log Management for details.
4. Speaker Test
Speaker test actually tests system audio capture capability, verifying if AudioTee can properly capture audio played by the speaker and be recognized by cuemate-asr. This feature is used for recognizing interviewer voice in interview training scenarios (by capturing audio output from interview software like Tencent Meeting, Zoom).
4.1 Select Speaker Device
In the "Speaker Device" dropdown, select the speaker device you want to test.
Device Selection Notes:
- System will automatically list all available audio output devices
- Default selection is the speaker device configured in Voice Settings page
- If not configured, automatically selects the system's first available default device
- Recommend using built-in computer speaker (such as MacBook built-in speaker)
4.2 Start Speaker Test
After selecting the speaker device, click the "Test" button (blue button), the system will automatically execute the following process:
- Start AudioTee system audio capture
- Connect to cuemate-asr voice recognition service
- Listen to system audio played by the speaker
- Send captured audio to cuemate-asr for recognition in real-time
- Display recognized text content in real-time
Test Steps:
- After clicking "Test" button, play audio or video containing speech
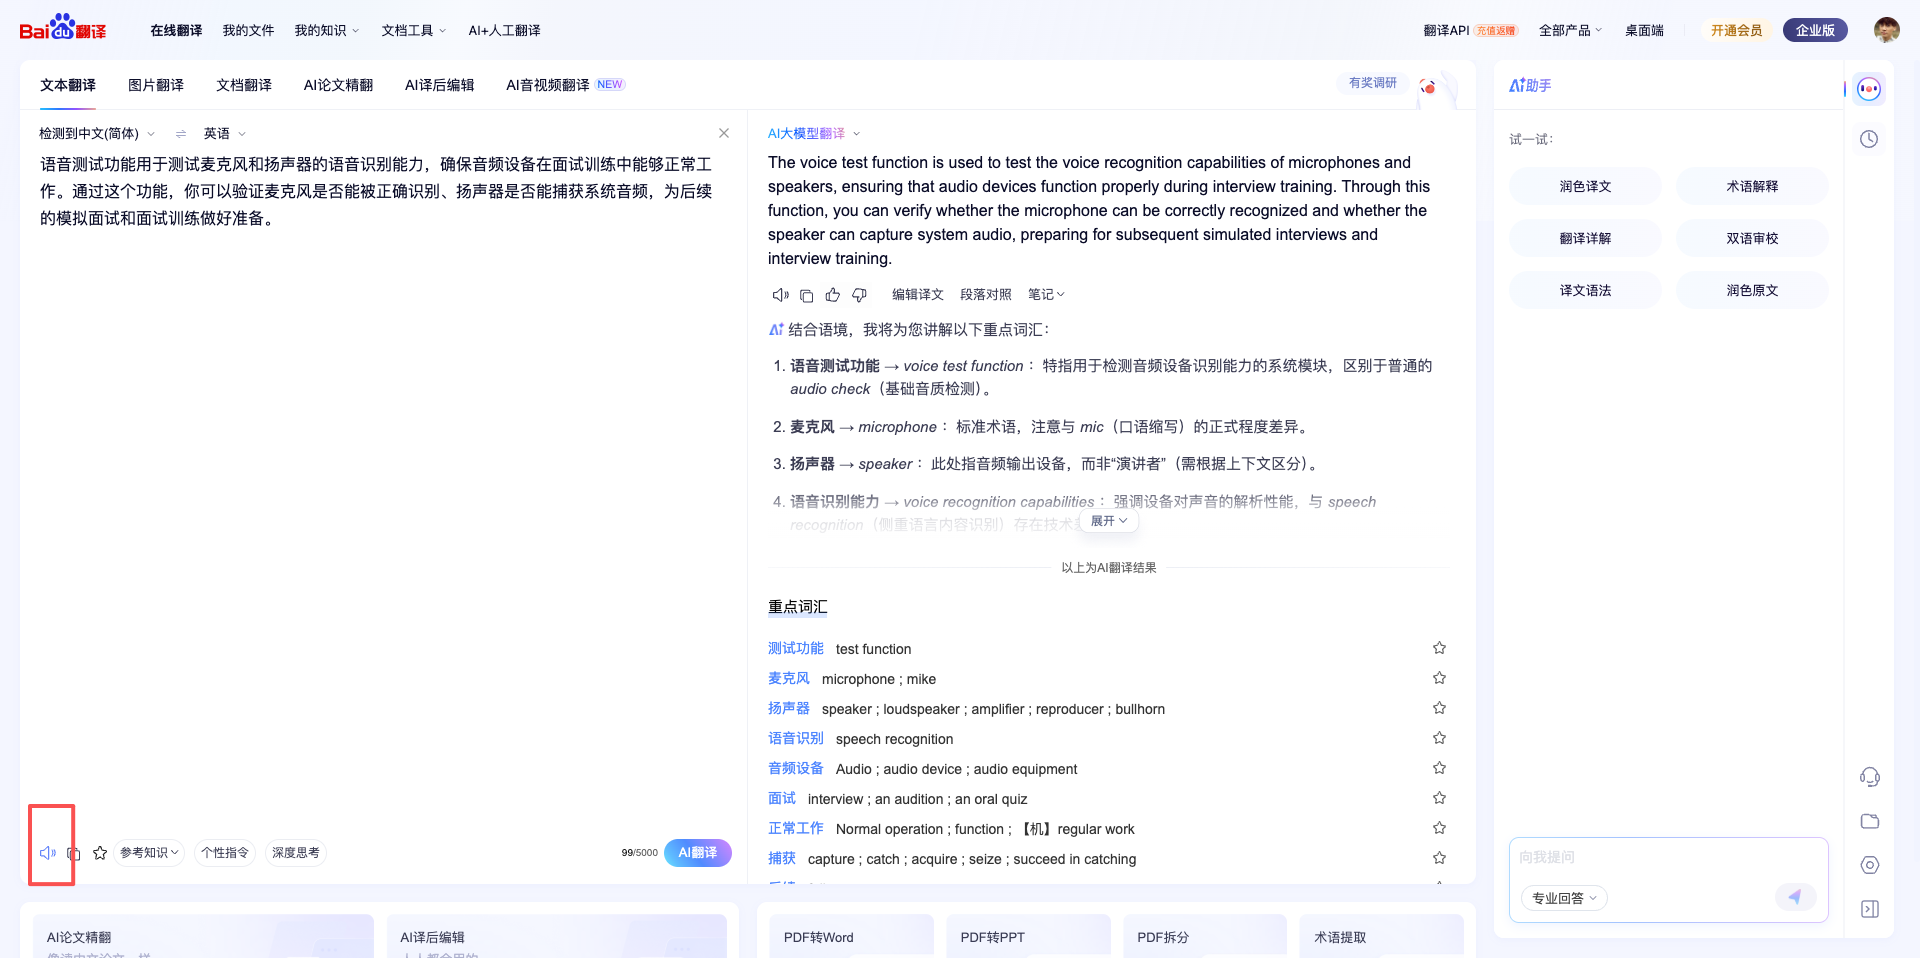
Suggestion 1: Go directly to Baidu Translate page, paste some text, and play audio:
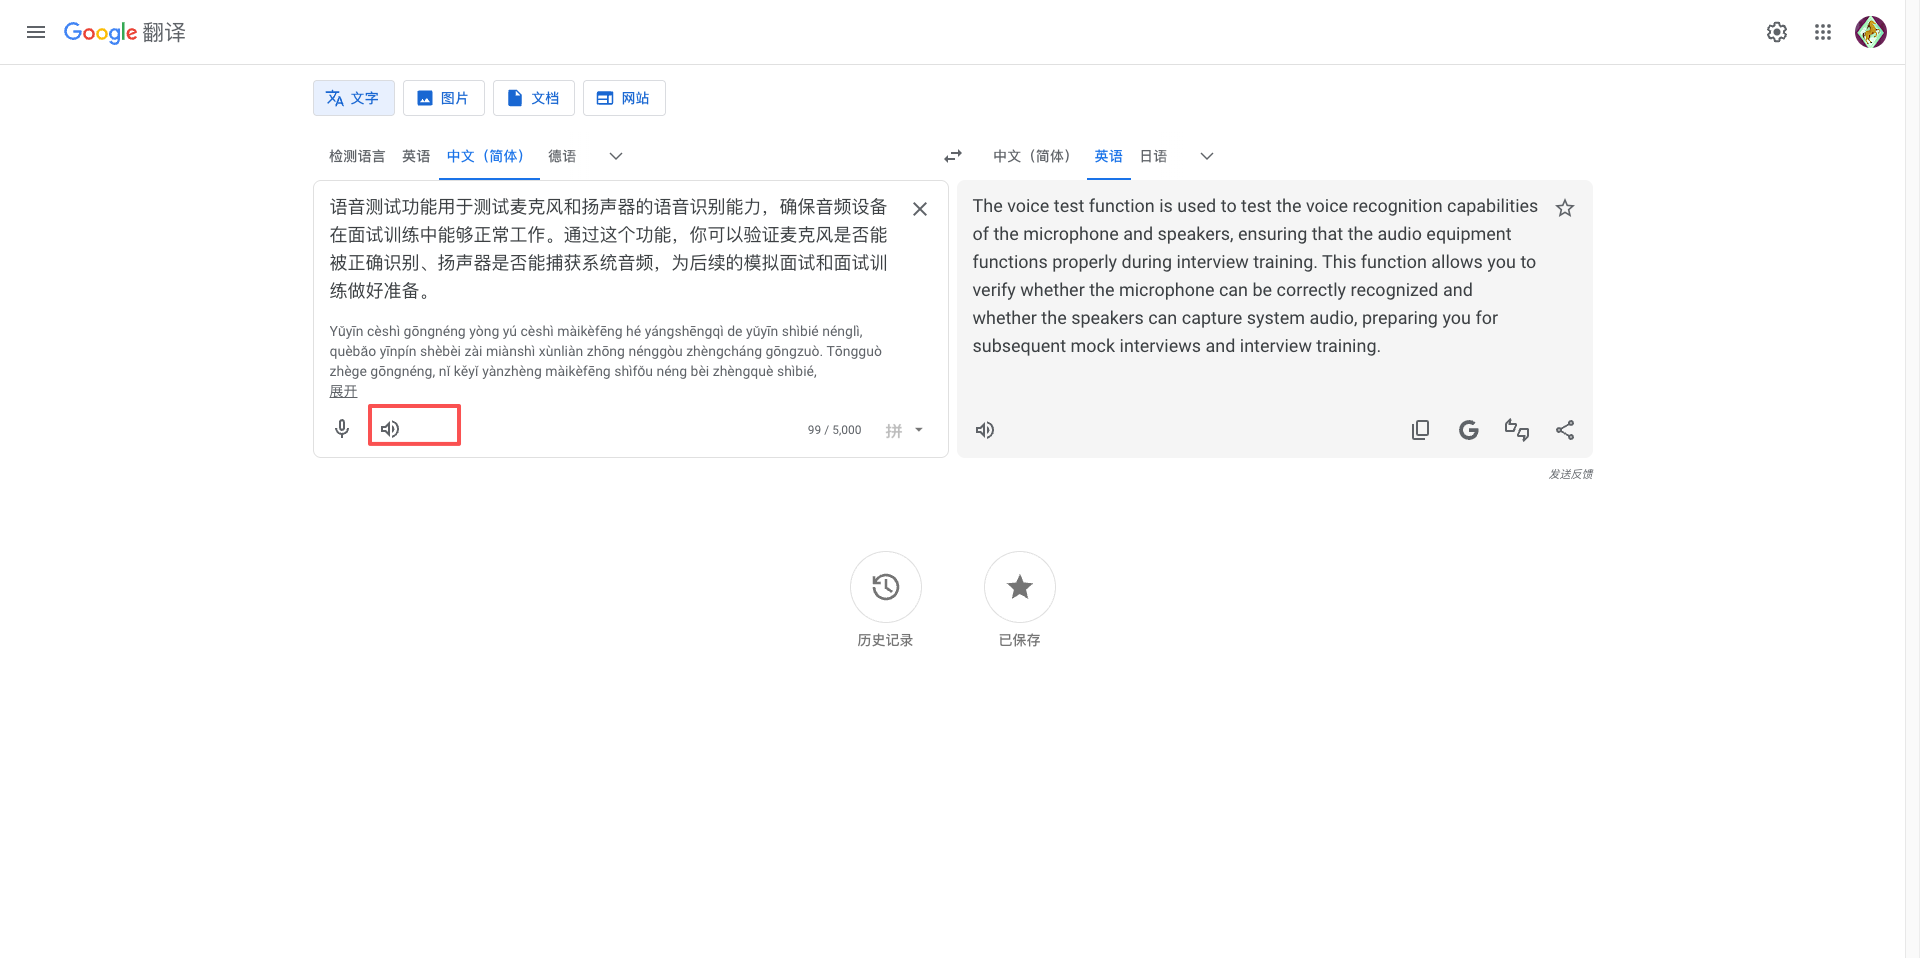
Suggestion 2: Go directly to Google Translate page, paste some text, and play audio:
- Recommend playing clear Chinese or English speech content
- Ensure volume is moderate, not muted
- System will display recognized text in real-time in the speaker test area
- Test status changes from "Not Tested" to "Testing"
- Test automatically ends when conditions are met (same conditions as microphone test)
4.3 View Test Results
After test completion, the speaker test area will display test result status and detailed information:
Test Successful
- Status icon shows green checkmark ✓
- Status text shows "Speaker Test Complete"
- Green area below shows "Speaker Recognition Result:"
- Shows complete recognized text content
- Shows test duration
Test Failed
- Status icon shows red X ✗
- Status text shows "Test Failed"
- Red area below shows error reason
- Common error messages:
- "AudioTee unavailable, cannot perform system audio capture": AudioTee module failed to load
- "Failed to connect to speaker recognition service": cuemate-asr service not started or cannot connect
- "Failed to start speaker capture": Screen recording permission not granted
- Shows test duration
Common Problem Solutions:
- If permission issues are prompted, refer to "2.2 Screen Recording & System Audio Permission Authorization" section to complete authorization
- Ensure played audio volume is loud enough to be captured by the system
- Confirm cuemate-asr service is running normally
5. Important Notes
5.1 Service Dependencies
Voice test feature depends on cuemate-asr service running normally (default port 10095). If service is not started, test will fail with connection error.
5.2 Test Recommendations
Microphone Test:
- Keep microphone distance moderate (10-30 centimeters)
- Speak clearly, at moderate speed
- Choose quiet environment, avoid noise interference
Speaker Test:
- Play clear Chinese or English speech content
- Moderate volume, not muted or too loud
- Ensure audio content contains complete sentences
Related Pages
- Voice Settings - Configure default microphone and speaker devices
- System Settings - Configure basic system parameters
- Voice Q&A - Use voice Q&A feature
- Mock Interview - AI mock interview
- Interview Training - Real interview training